How use DigiFi's webhooks to receive real-time updates.
Overview of DigiFi Webhooks
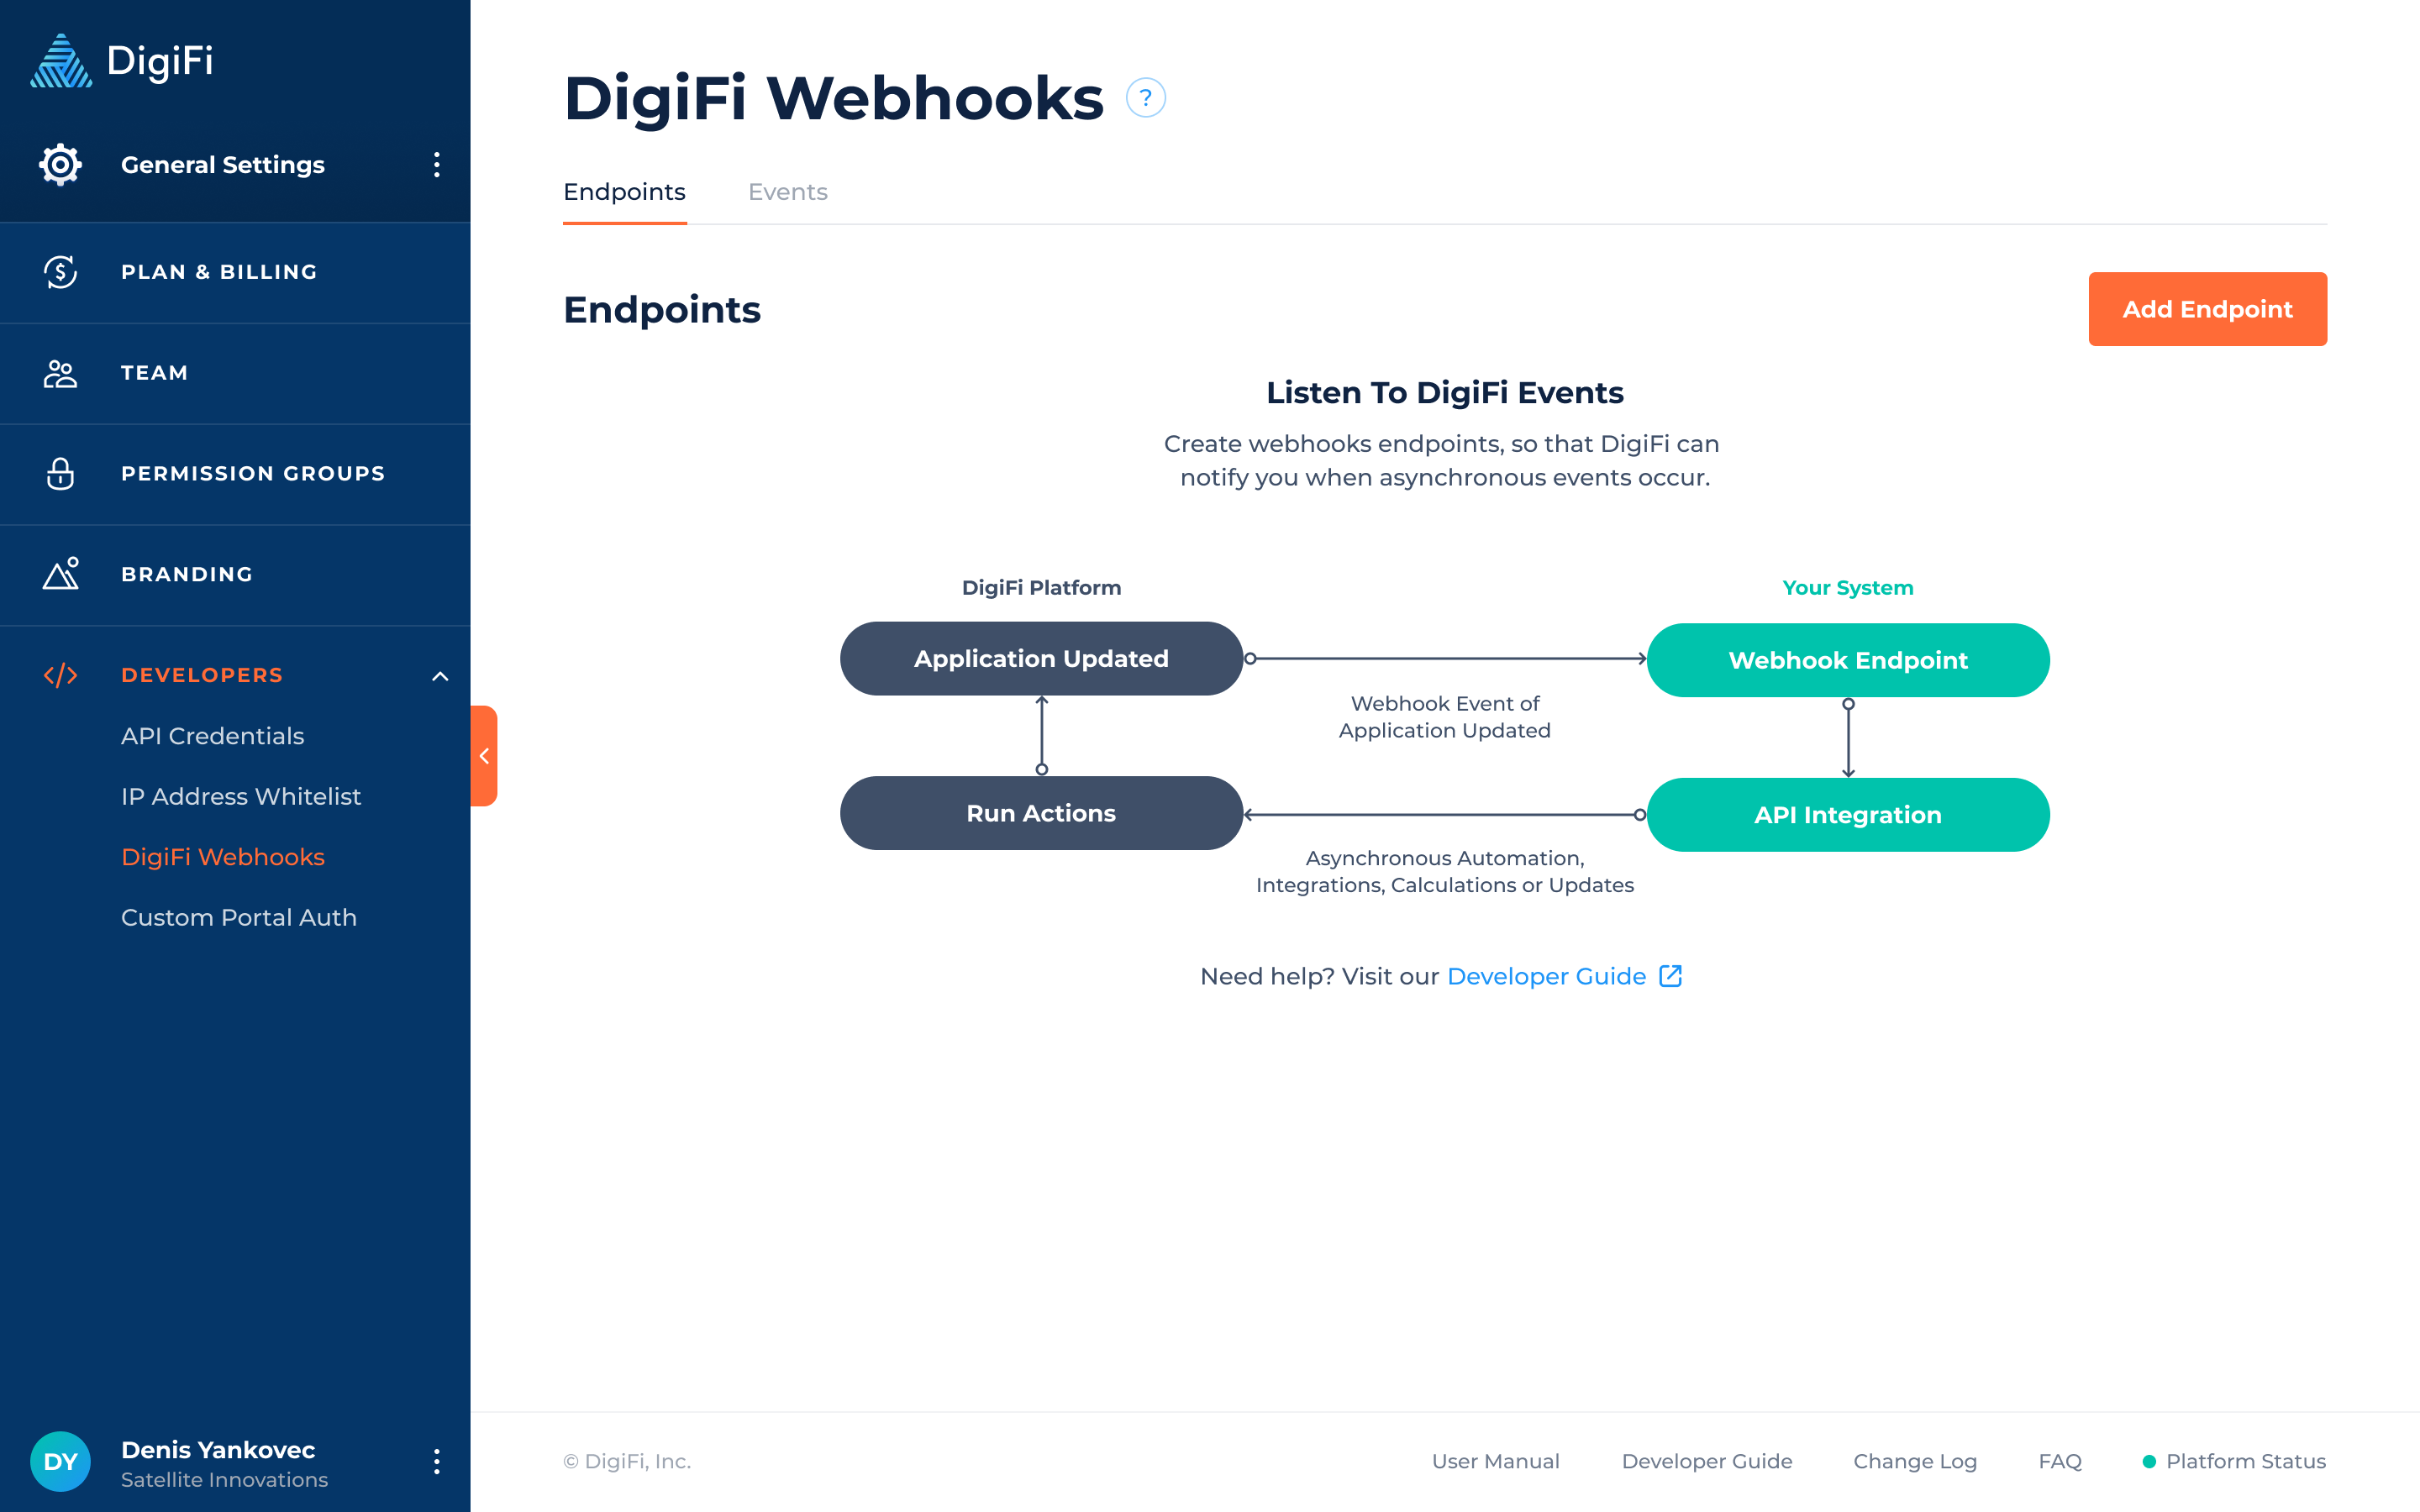
DigiFi's platform offers webhooks that will push real-time notifications to your external applications when events occur. Webhooks provide a powerful way to track the state of applications and to implement automated actions from other applications.
Webhooks are particularly useful for:
- Notifying you of asynchronous events, such as when a borrower completes an action (e.g. submitting an application, uploading a document, providing additional information, etc.).
- Acting as triggers for event-based automation (e.g. integrations, decisioning, status changes, emails, etc.).
DigiFi uses HTTPS to send these notifications to your application as a JSON payload. You can then use these notifications to execute actions in your backend systems.

Settings Up Webhooks
To begin receiving and processing webhook events from DigiFi, follow these steps:
- Identify the type(s) of events you want to listen for.
- Create a webhook endpoint as an HTTP endpoint (i.e. URL) on your local server.
- Parse event objects sent by DigiFi and return 2xx response status codes.
- Deploy your webhook endpoint to a publicly accessible HTTPS URL.
- Connect your HTTPS URL to DigiFi's platform in the DigiFi Webhooks UI.
Step 1: Identify Which Events You Want To Monitor
A single webhook endpoint can listen for one or multiple types of events and DigiFi's platform emits the following types of events:
| Event Type | Description |
|---|---|
| application.created | Occurs when applications are created. |
| application.updated | Occurs when applications are updated. |
| application.deleted | Occurs when applications are deleted. |
| applicationDecisionProcessed | Occurs when decision ran for an application. |
| externalIntegration.processed | Occurs when external integration is processed. |
| borrower.created | Occurs when borrowers are created. |
| borrower.updated | Occurs when borrowers are updated. |
| borrower.deleted | Occurs when borrowers are deleted. |
| intermediary.created | Occurs when intermediaries are created. |
| intermediary.updated | Occurs when intermediaries are updated. |
| intermediary.deleted | Occurs when intermediaries are deleted. |
| document.created | Occurs when documents are created. |
| document.updated | Occurs when documents are updated. |
| document.deleted | Occurs when documents are deleted. |
| note.created | Occurs when notes are created. |
| note.updated | Occurs when notes are updated. |
| note.deleted | Occurs when notes are deleted. |
| task.created | Occurs when tasks are created. |
| task.updated | Occurs when tasks are updated. |
| task.deleted | Occurs when tasks are deleted. |
Best Practice: Only Listen For Relevant EventsYour webhook endpoints should be configured to receive only the types of events required by your integration. Listening for extra events (or all events) will put undue strain on your server and is not recommended.
You can change the events a webhook endpoint will receive by navigating to an endpoint within the DigiFi platform.
Step 2: Create A Webhook Endpoint On Your Local Server
Set up an HTTP endpoint on your local machine that can accept unauthenticated webhook requests with a POST method.
For example, this is a route written in Express (Node.js). The /webhooks route is configured to accept only POST requests and expects data to be delivered in a JSON payload.
const express = require('express');

const app = express();

app.post('/webhooks', (req, res) => {
  res.status(200).send({});
});

app.listen(3000, () => {
  console.log(`Example app listening at http://localhost:3000`)
});
Step 3: Parse Event Objects And Return 2xx Responses
Your endpoint must be configured to read event objects for the type of event notifications you want to receive. DigiFi sends events to your webhook endpoint as part of a POST request with a JSON payload.
Check Event Objects
Each event is structured as an event object with a eventId, eventType and related event data nested under the data. Your endpoint must check the event type and parse the payload of each event.
Within the data section, there are two main subsections:
previousObjectprovides the data prior to the change that triggered the event.objectprovides the updated data (after the change that triggered the event).
These subsections only appear if relevant. For example, in a application.created event only object will appear, but in an application.updated event both previousObject and object``` will appear.
{
  "eventId": "619r70gb56df8c78wfcb0c",
  "eventType": "application.updated",
  "createdAt": "2021-11-18T12:50:41.894Z",
  "data": {
    "previousObject": {...},
    "object": {...}
}
By comparing the information within previousObject and object, you can identify which field(s) changed
as well as the information, both before and after the change.
Return A 2xx Response
Your endpoint must quickly (within 6 seconds) return a successful status code (2xx) prior to any complex logic that could cause a timeout. For example, you must return a 200 response before running another integration within the DigiFi platform.
const express = require('express');

const app = express();

app.post('/webhooks', (req, res) => {
  switch (req.body.eventType) {
    case 'application.created': {
      handleApplicationCreate();
    }
    case 'application.updated': {
      handleApplicationUpdate();
    }
  }

  res.status(200).send({});
});

app.listen(3000, () => {
  console.log(`Example app listening at http://localhost:3000`)
});
Built-In Retries
DigiFi webhooks have built-in retry methods for failed requests:
| Retry Number | Timing |
|---|---|
| 1 | 5 minutes after the actual request |
| 2 | 15 minutes after the prior retry |
| 3 | 30 minutes after the prior retry |
| 4 | 1 hour after the prior retry |
| 5 | 2 hours after the prior retry |
| 6 | 4 hours after the prior retry |
| 7 | 8 hours after the prior retry |
After 24 hours if there are no successful events, we will:
- Email all users with the permission level of the Owner, as well as the users that created and most recently updated the endpoint in DigiFi’s platform informing them that the endpoint has experienced continuous failures and that the issue needs to be addressed within the next 24 hours.
- Automatically disable the endpoint (if you haven’t addressed the issue and the issue persists beyond the 48-hour period).
Handling Duplicate Events
Your webhook endpoints might occasionally receive the same event more than once. You can guard against duplicate events by logging the eventId of events you’ve processed, and then checking future events against this.
Step 4: Deploy Your Endpoint To A Public HTTPS URL
To begin receiving events from DigiFi, you must deploy your endpoint to a publicly accessible HTTPS URL.
Receive Events With An HTTPS ServerIf you use an HTTPS URL for your webhook endpoint, DigiFi validates that the connection to your server is secure before sending your webhook data. For this to work, your server must be correctly configured to support HTTPS with a valid SSL certificate.
Step 5: Register Your Public URL In DigiFi's Webhooks Dashboard
Once you've deployed your endpoint to a public HTTPS URL, you can add the endpoint to DigiFi's platform through our webhooks dashboard.
To add an endpoint to DigiFi's platform:
- Navigate to General Settings > Developers > DigiFi Webooks
- Click the button
This will open a form with the following information:
| Field | Description |
|---|---|
| URL | The public HTTPS URL your endpoint was deployed to. |
| Description | A brief description of your webhook. |
| Listening For | The event(s) that your endpoint will listen for. |
| Data Source | The environment in which webhooks should be configured to receive the event (Production Mode and/or Testing Mode) |
| Status | A toggle to decide whether your endpoint should immediately be activated (if not, you can activated it later). |
Once you have completed the form, click . Your endpoint will be created and you'll begin receiving events immediately if your endpoint was activated.
You will be able to see all events related to this endpoint in the "Events" tab, and the "Integration" tab provides your Webhook Secret Key, which you can use to further secure your endpoint (suggested).
Secure Your Webhooks Endpoint
To let you verify that events were sent by DigiFi (not by a third party), DigiFi can optionally sign the webhook events it sends to your endpoints by including a signature in each event’s x-digifi-signature header.
You can verify signatures either using DigiFi's Official Node.js library, or using your own solution.
Before you can verify signatures, you need to retrieve your endpoint’s secret from within the DigiFi platform by navigating to this specific webhook and clicking on the "Integration" tab.
DigiFi generates a unique secret key for each endpoint. Additionally, if you use multiple endpoints, you must obtain a secret for each one you want to verify signatures on.
Highly Recommended To Increase Security!Security your endpoint provides increased security for your overall application. It is highly recommended that all organizations who implement DigiFi Webhooks secure their endpoints.
Verify Signatures Using DigiFi's Node.js Library
When using DigiFi's library to verify signatures, you perform the verification by providing:
- the event payload,
- the x-digifi-signature header,
- the x-digifi-event-timestamp, and
- the endpoint’s secret.
If verification fails, DigiFi returns an error.
const express = require('express');
const digifi = require('digifi-node-js');
const bodyParser = require('body-parser');

const app = express();
const endpointSecret = '...';

app.post('/webhooks', bodyParser.raw({ type: 'application/json' }), (req, res) => {
  const timestamp = req.headers['x-digifi-event-timestamp'];
  const signature = req.headers['x-digifi-signature'];

  if (!digifi.verifyWebhookSignature(req.body, endpointSecret, timestamp, signature)) {
    res.status(400).send({ message: 'Invalid signature' });

    return;
  }

  if (!digifi.verifyWebhookTimestamp(timestamp)) {
    res.status(400).send({ message: 'Invalid timestamp' });

    return;
  }

  switch (req.body.eventType) {
    case 'application.created': {
      handleApplicationCreate();
    }
    case 'application.updated': {
      handleApplicationUpdate();
    }
  }

  res.status(200).send({});
});

app.listen(3000, () => {
  console.log(`Example app listening at http://localhost:3000`)
});
Preventing Replay Attacks
A replay attack is when an attacker intercepts a valid payload and its signature, then re-transmits them. To mitigate such attacks, DigiFi includes a timestamp in the x-digifi-event-timestamp header. Because this timestamp is part of the signed payload, it is also verified by the signature, so an attacker cannot change the timestamp without invalidating the signature. If the signature is valid but the timestamp is too old, you can have your application reject the payload.
Our libraries have a default tolerance of five minutes between the timestamp and the current time. You can change this tolerance by providing an additional parameter when verifying signatures. Use Network Time Protocol (NTP) to ensure that your server’s clock is accurate and synchronizes with the time on DigiFi's servers.
DigiFi generates the timestamp and signature each time an event is sent to your endpoint. If DigiFi retries an event (e.g., your endpoint previously replied with a non-2xx status code), then a new signature and timestamp is generated for the new delivery attempt.
Verifying Signatures Manually
DigiFi generates signatures using a hash-based message authentication code (HMAC) with SHA-256.
Although it’s recommended to use our official libraries to verify webhook event signatures, you can create a custom solution by following these steps.
Step 1: Extract The Timestamp And Signatures From The Header
Retrieve the x-digifi-event-timestamp and x-digifi-signature from request headers.
Step 2: Prepare The signed_payload String
The signed_payload string is created by concatenating:
- The timestamp (as a string),
- The character ".", and
- The actual JSON payload (i.e., the request body)
Step 3: Determine The Expected Signature
Compute an HMAC with the SHA256 hash function. Use the endpoint’s signing secret as the key, and use the signed_payload string as the message.
Step 4: Compare The Signatures
Compare the signature (or signatures) in the header to the expected signature. For an equality match, compute the difference between the current timestamp and the received timestamp, then decide if the difference is within your tolerance.
To protect against timing attacks, use a constant-time string comparison to compare the expected signature to each of the received signatures.