Application Tasks
How to organize and streamline work with application tasks.
Overview of Tasks
Tasks are lists of actions that should be performed during application processing. They are a helpful way to streamline and standardize the loan processing workflow. Further, they are often used to manage application conditions or other requirements that must be met before the application can advance. Tasks can be assigned to both internal assignees (i.e. your team) and external assignees (i.e. a borrowers or intermediary).
Tasks can contain the following information:
- The title of the task.
- The labels assigned to the task.
- The status of the task (i.e. "Not Done", "In Progress", "In Review", "Done", "Canceled" or "Failed").
- The internal assignee(s), if any (i.e. team members)
- The internal instructions for the team members to complete.
- The external assignee, if any (i.e. borrower or intermediary)
- The external instructions for the borrower or intermediary to complete.
- The task's due date and due time, which lets assignees understand when it should be completed.
- Variables (i.e. data fields) that are related to the task and are displayed within it.
- Documents that have been associated with the task.
- Comments have been made regarding the task.
Task Board View
The default view for tasks shows all of the in-process tasks placed on a board in columns corresponding to their current status.
This view displays the current task work queue and includes the ability for team members to:
- View information such as the task title and the display ID of the application to which this task has been assigned.
- View the due date, assigned individual(s) for the task, and labels associated with each task.
- Filter for tasks assigned to you by clicking on your avatar.
- Filter by other task attributes by clicking the "Filters" button.
- Select your preferred sorting option by clicking on the "Sort By" button.
- Move tasks between statuses using drag-and-drop.
- Create new tasks by clicking on the "Create Task" button.

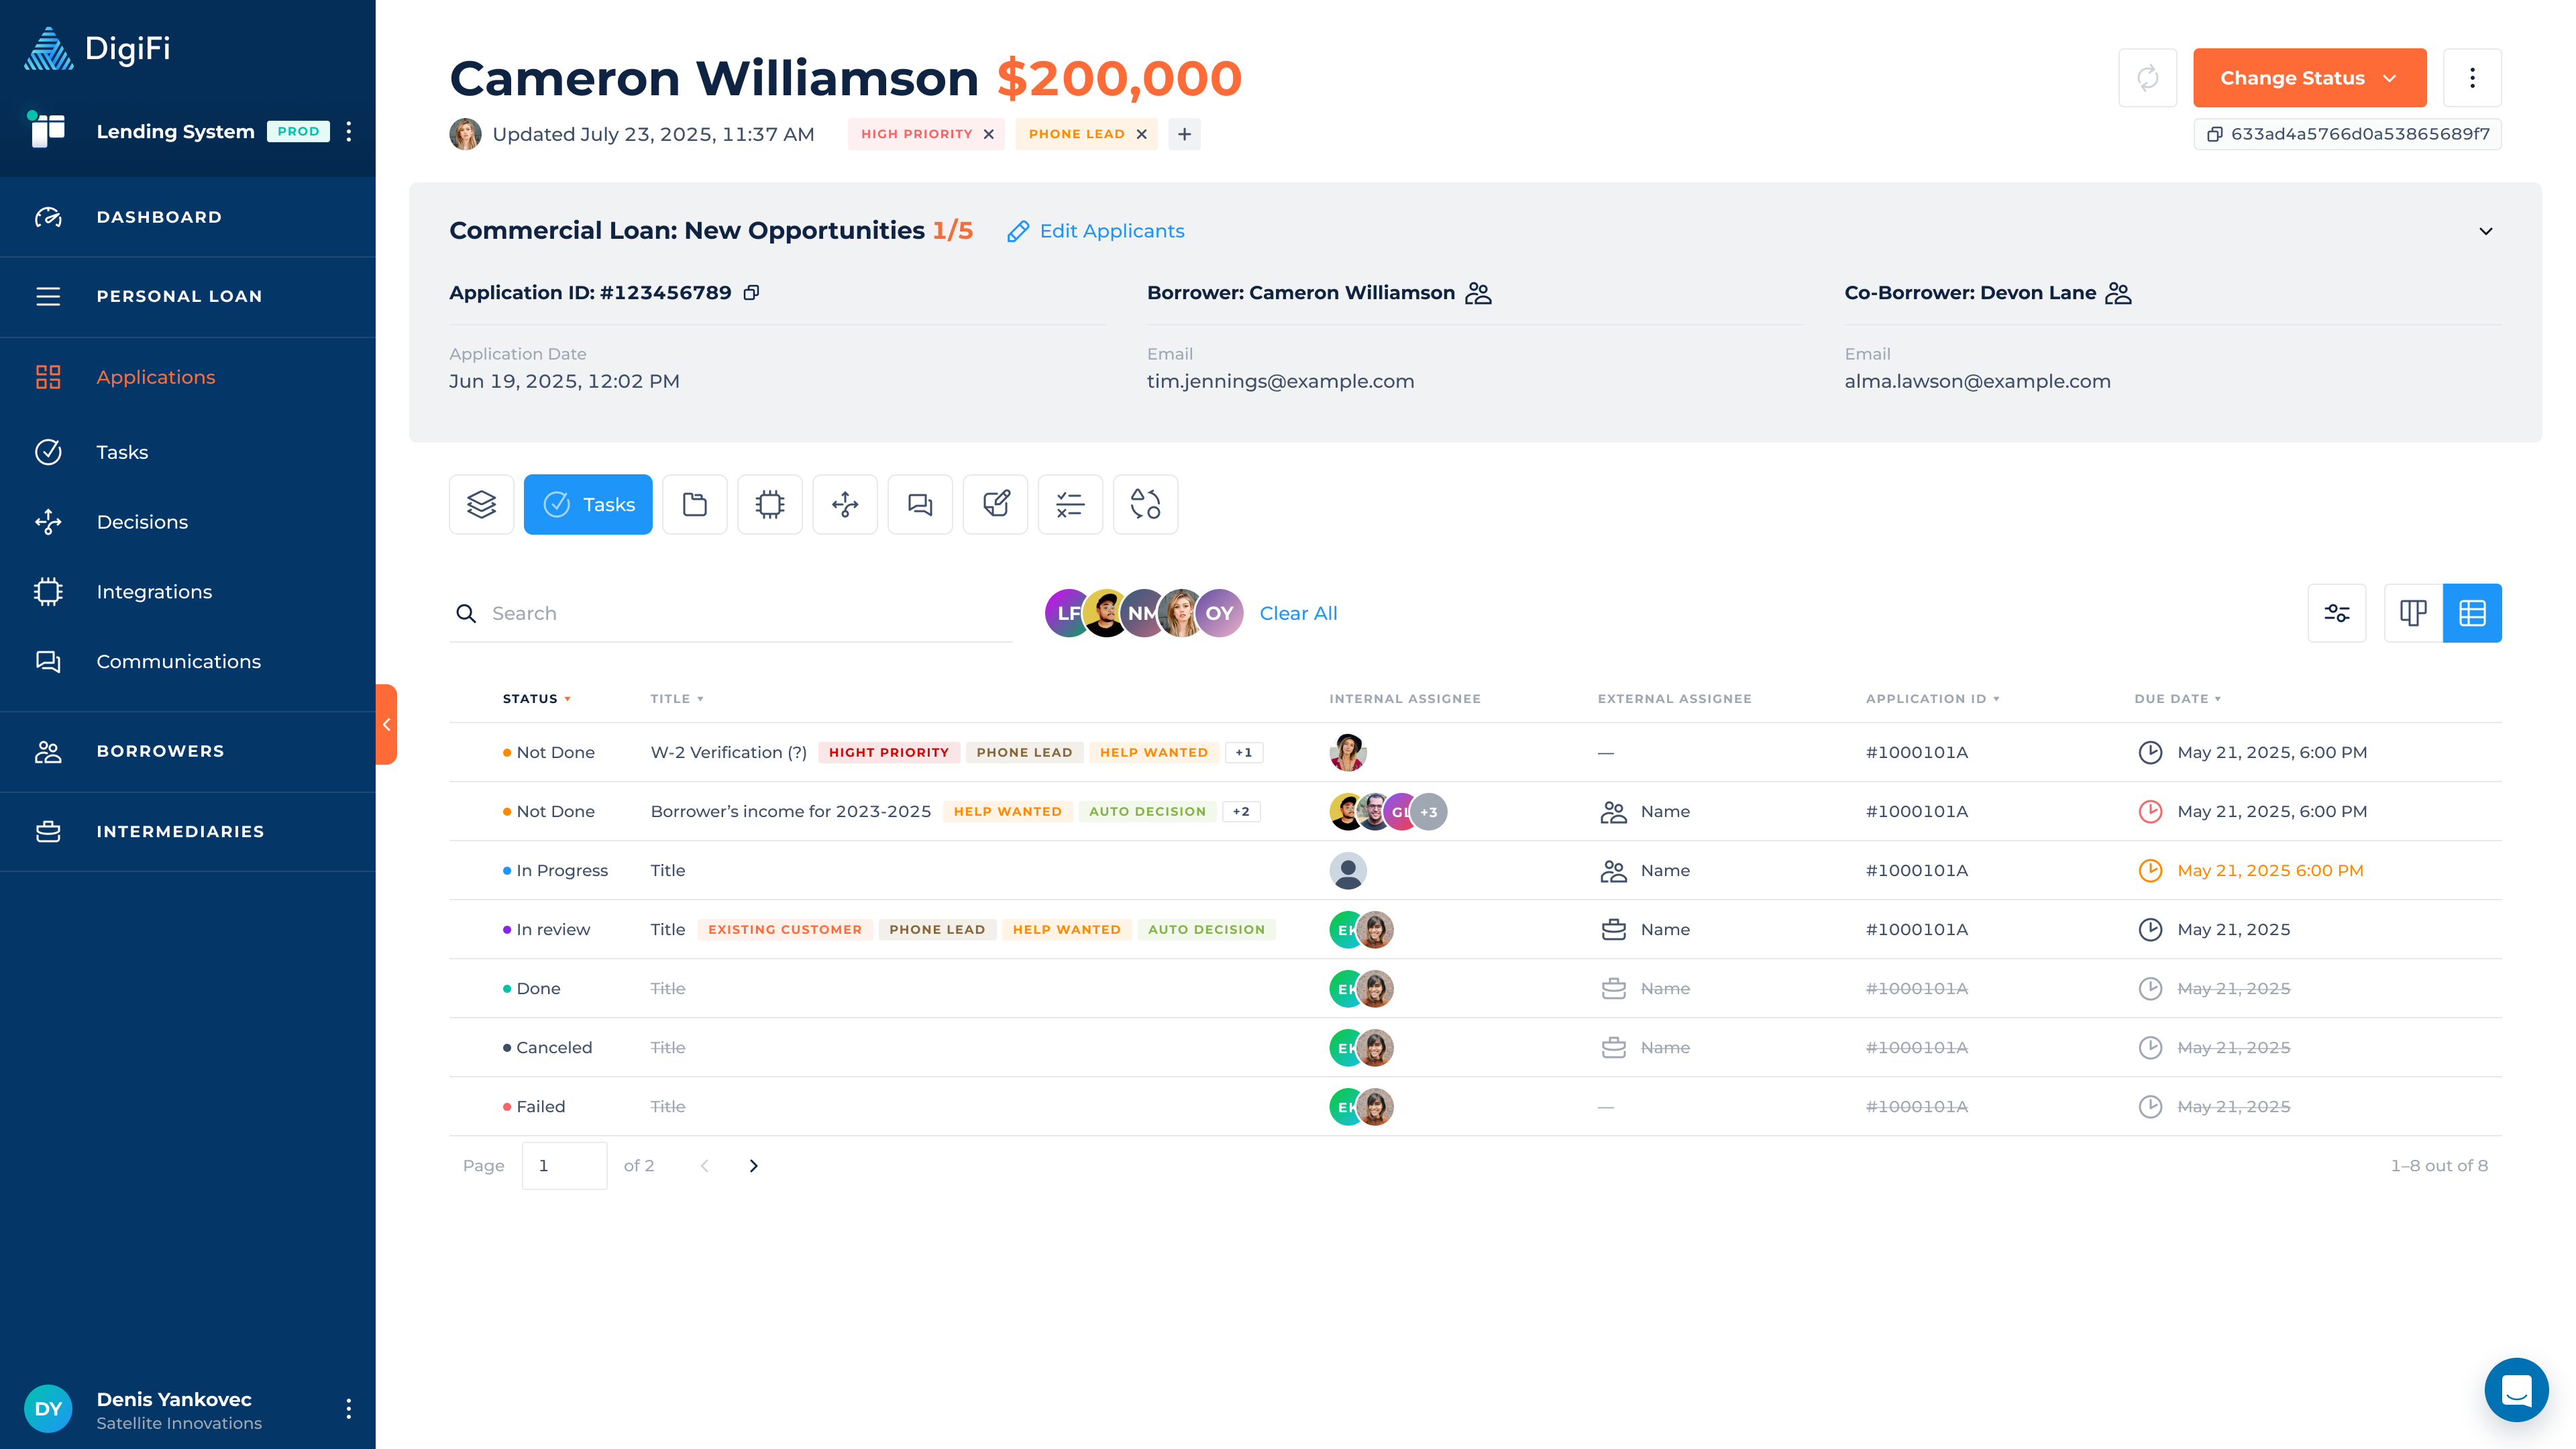
Task Table View
The secondary view for tasks shows all tasks in a table format. You can navigate to this option by clicking on the table icon in the top-right corner of the board.
The table view provides similar functionality to the board view, however it offers more information and a denser view of the data. You can view any task's detailed information by clicking on its row in the table.
How to Create a Task
To create a new Task:
- Navigate to the "Tasks" tab of an application
- Click
- Choose one of the following options:
- New Task, to create a standalone task manually
- Use Task Template, to create a task using a preconfigured template
- Complete or review the task configuration.
- Click
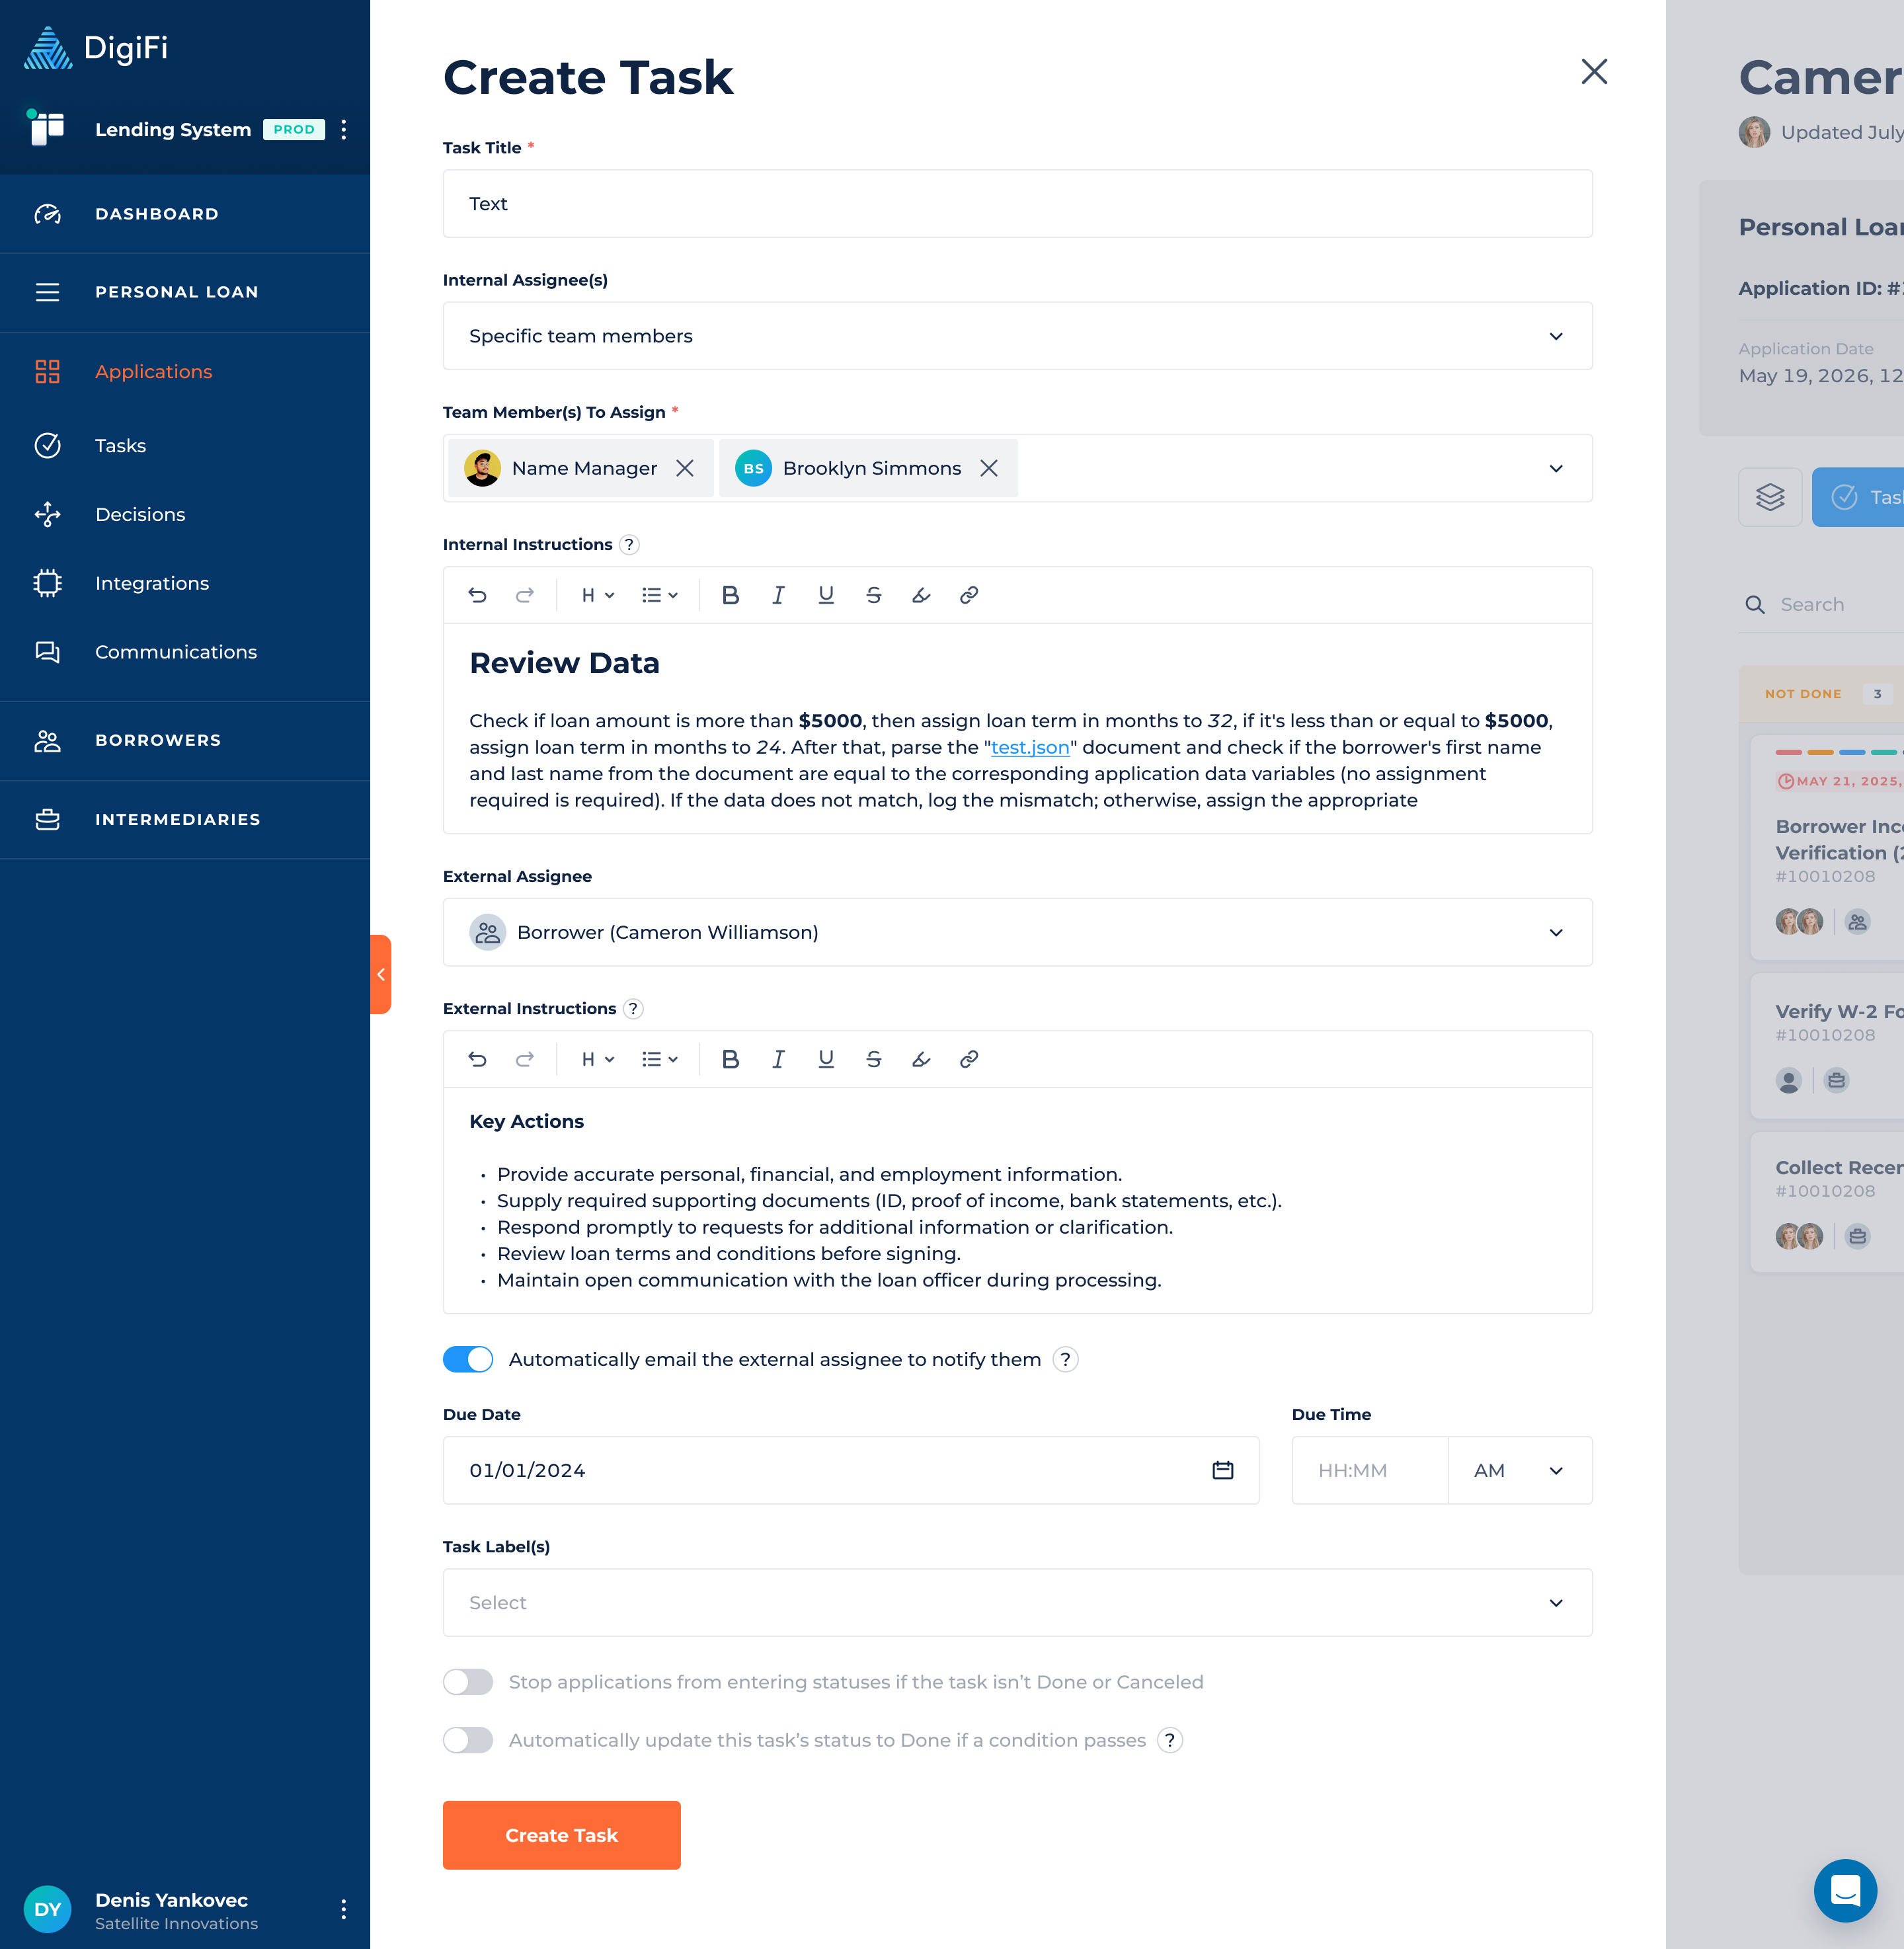
The "Create Task" form includes the following fields:
- Task Title, which is the title of the task.
- Internal Assignee(s), which lets you select the team members assigned to the task.
- Internal Instructions, which is the description of the task for the team members. You can customize the task text using the editor by adding headings, bold formatting, highlights, and more.
- External Assignee, which lets you select the borrower/intermediary assigned to the task.
- External Instructions, which is the description of the task for the borrower/intermediary. You can customize the task text using the editor by adding headings, bold formatting, highlights, and more.
- Automatically email the external assignee to notify them, which is a toggle that, if activated, sends an email containing the task description and a link to upload a file (borrowers/intermediary only).
- Due Date/Time for the task to be completed by.
- Task Label(s), which lets you select the task labels.
- Stop applications from entering statuses if the task isn’t Done or Canceled, which is a toggle that, if activated, prevents the application from entering the selected workflow statuses until the task is completed or canceled.
- Automatically update this task's status to Done if a condition passes, if a condition passes, which will be checked every time the application is updated. This condition must return “true” (string) or TRUE (boolean) to pass.
Please note that editable data can only be configured within task templates. When creating a task manually, you can either select a task template that already contains variables, or create a task from scratch without variables.
Tasks with External Assignees
If you are assigning tasks to a borrower or intermediary, please note the following:
- They will receive an email when the task is created so that they're aware of the requirement. If you don't want to send the email to borrowers/intermediaries, deactivate the "Automatically email the external assignee to notify them" toggle.
- You can display these tasks on a digital lending portal that they have access to. This gives you the ability to let them upload documents directly to the task, add comments to the task and change their status.
DigiFi's standard borrower portals include built-in functionality to make it easy for borrowers or intermediaries to work on their tasks. They'll be presented with a list of outstanding tasks and can upload documents, add comments or mark tasks as complete (which moves them to the "In Review" status for your team to confirm).
If you have a custom digital lending portal, we recommend creating a page for their tasks and using the DigiFi API to fetch and return task-related information.
How To Work On Tasks
To edit a task:
- Navigate to the "Tasks" tab of the application.
- Click on the task you would like to edit.
- A Task Details panel will open, displaying all task information, assignments, instructions, data, assets, documents, and comments.
Each section of the task can be edited independently while working through the application workflow.
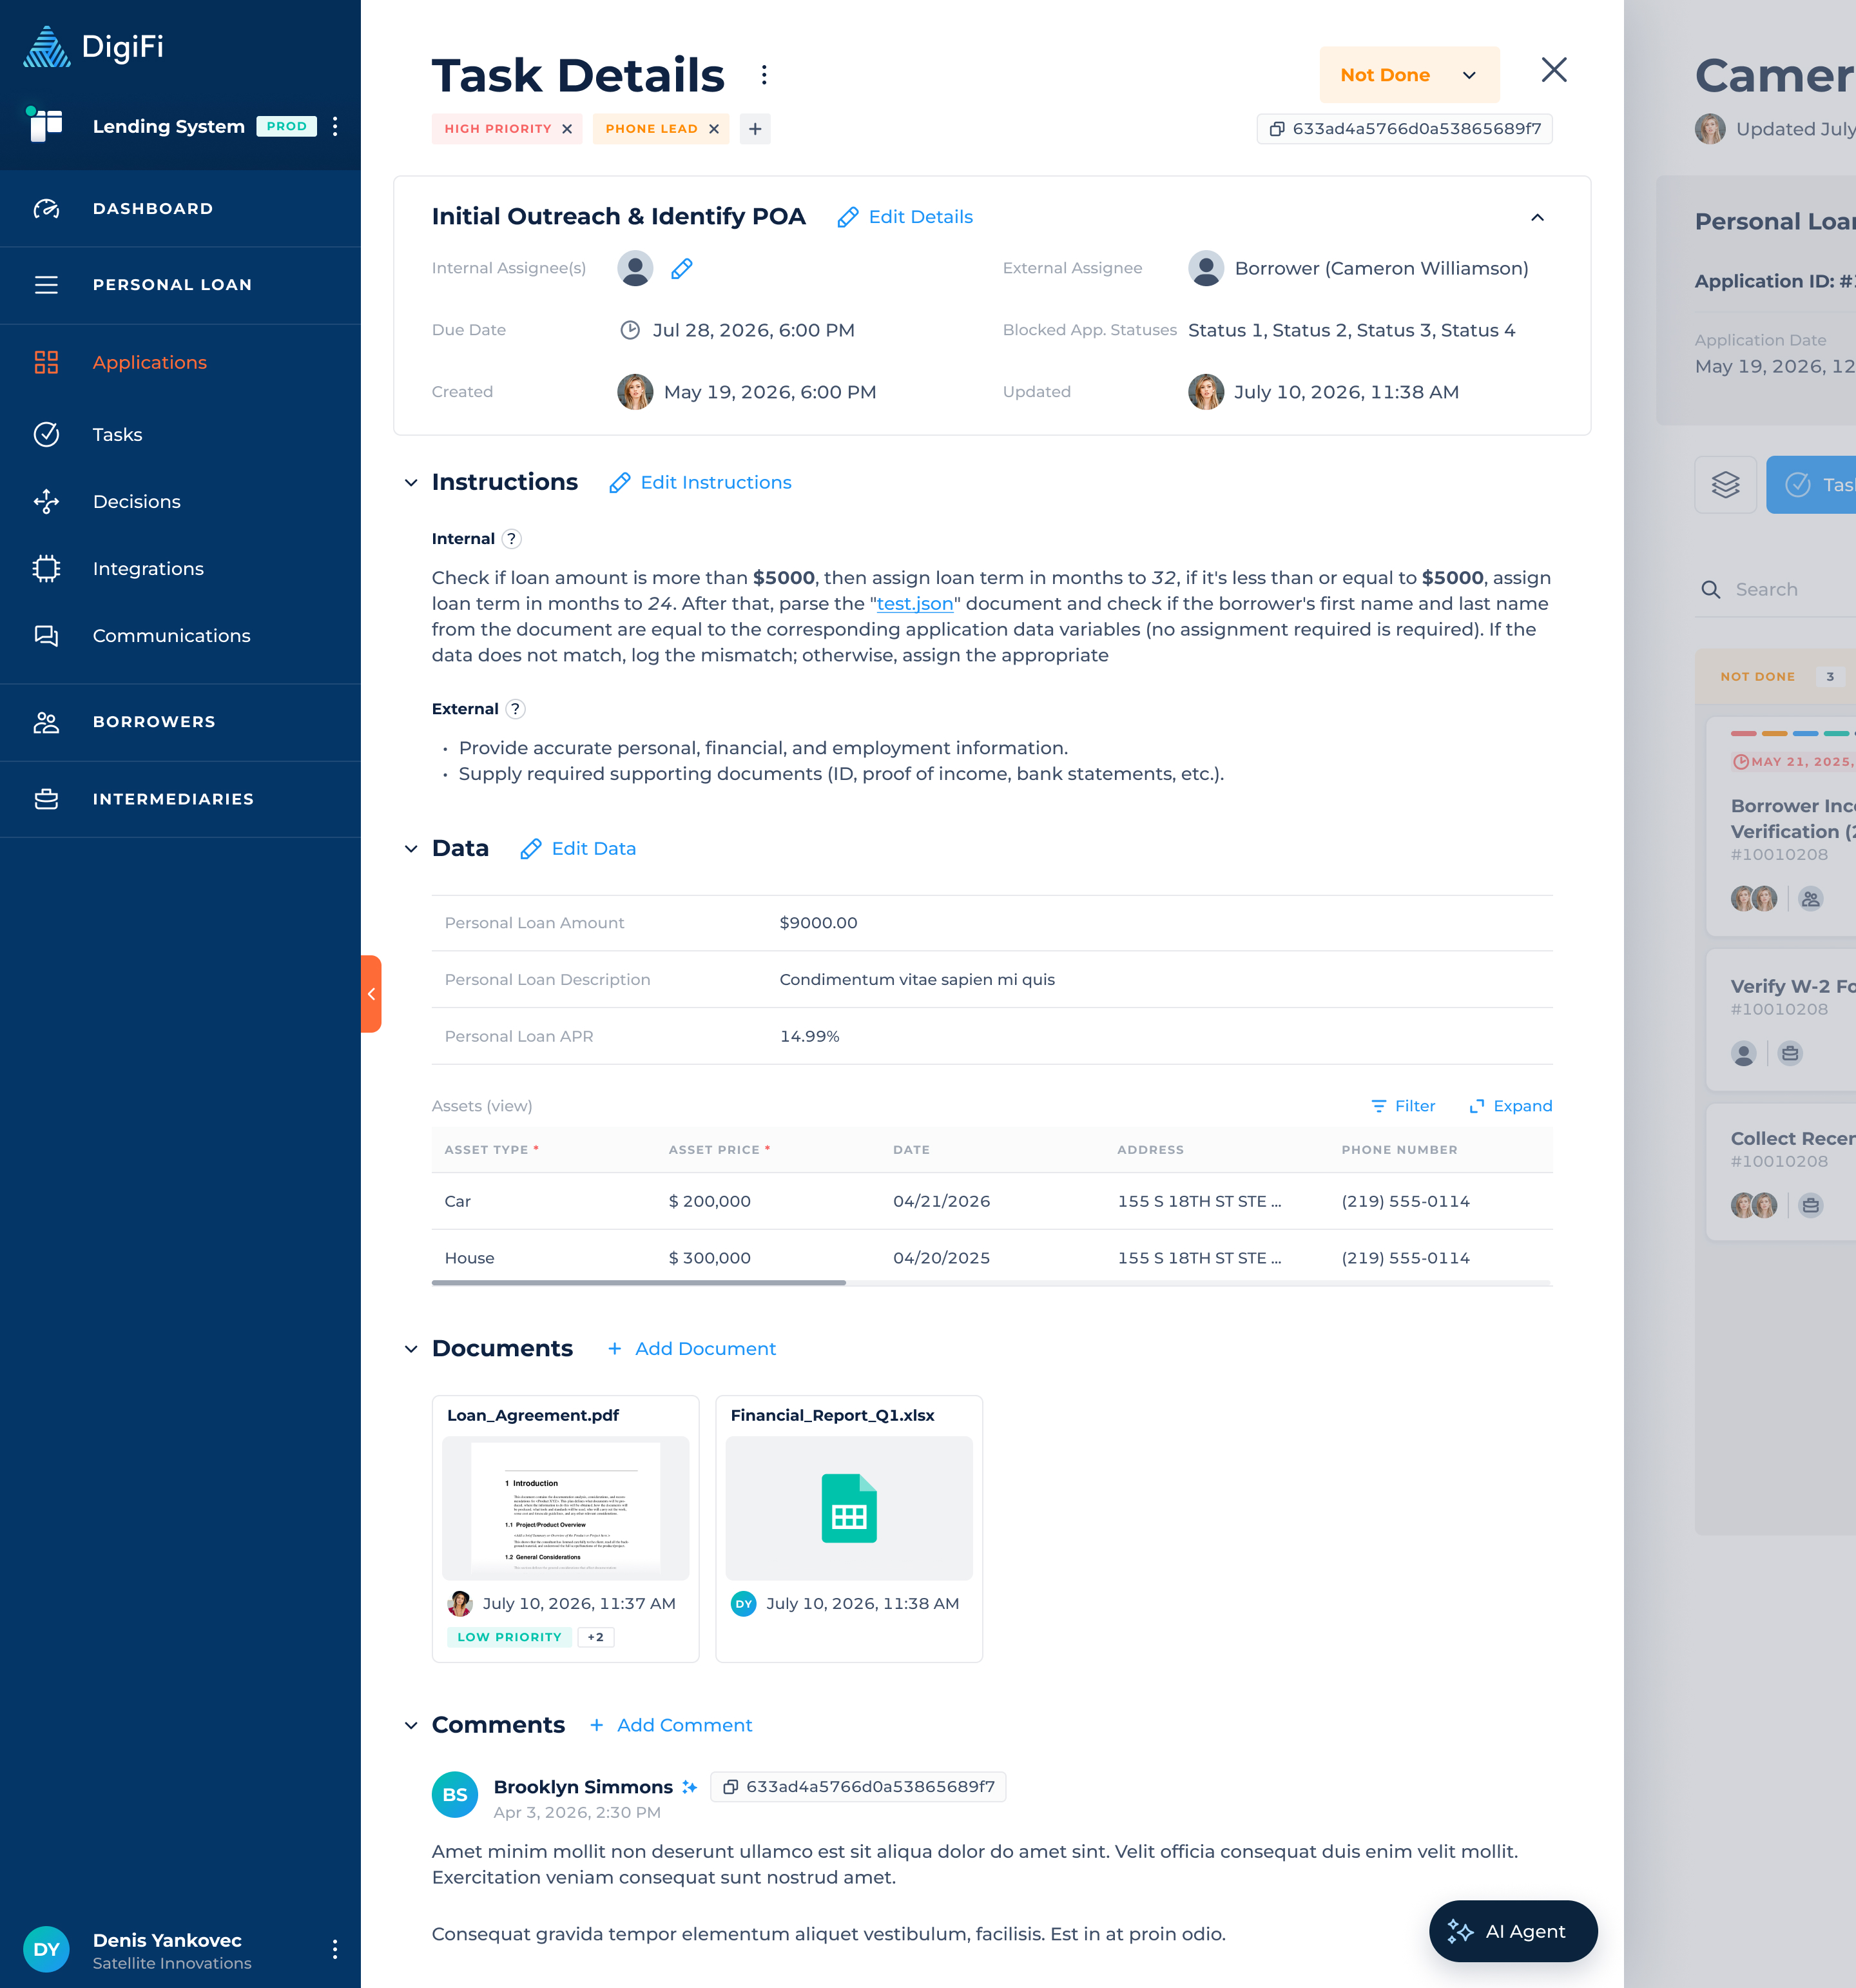
Task Details
The top section of the task contains key assignment and scheduling information.
Team members can:
- Modify the Internal Assignee.
- Modify the External Assignee.
- Update the Due Date.
- Review task status, creation date, and last updated information.
- Change the task status using the status dropdown located in the upper-right corner of the panel.
To make changes, click Edit Details.
Instructions
The Instructions section provides guidance for completing the task.
Team members can:
- Update Internal Instructions used by staff members or AI Agent.
- Update External Instructions intended for borrowers, applicants, or external parties.
To edit instructions, click Edit Instructions.
Data
The Data section contains task variables and application-specific information used throughout the workflow.
These values can be modified by both users and the AI Agent while processing an application task.
To update any values, click Edit Data.
Documents
The Documents section contains files associated with the task.
Team members can:
- View attached documents in a split view.
- Upload new documents by selecting Add Document.
- Link existing application documents to the task.
Documents attached to a task are also accessible by the AI Agent. The AI Agent can review supported documents, extract relevant information, and use that information to populate or update application data fields and task variables as part of the workflow.
Comments
The Comments section is used for team collaboration and task tracking.
Team members can:
- Leave task-related updates.
- Share important findings or notes.
- Communicate next steps.
- Document decisions made during the review process.
Keeping comments current helps maintain visibility and ensures the team stays aligned throughout the workflow.
To add a comment, click Add Comment.
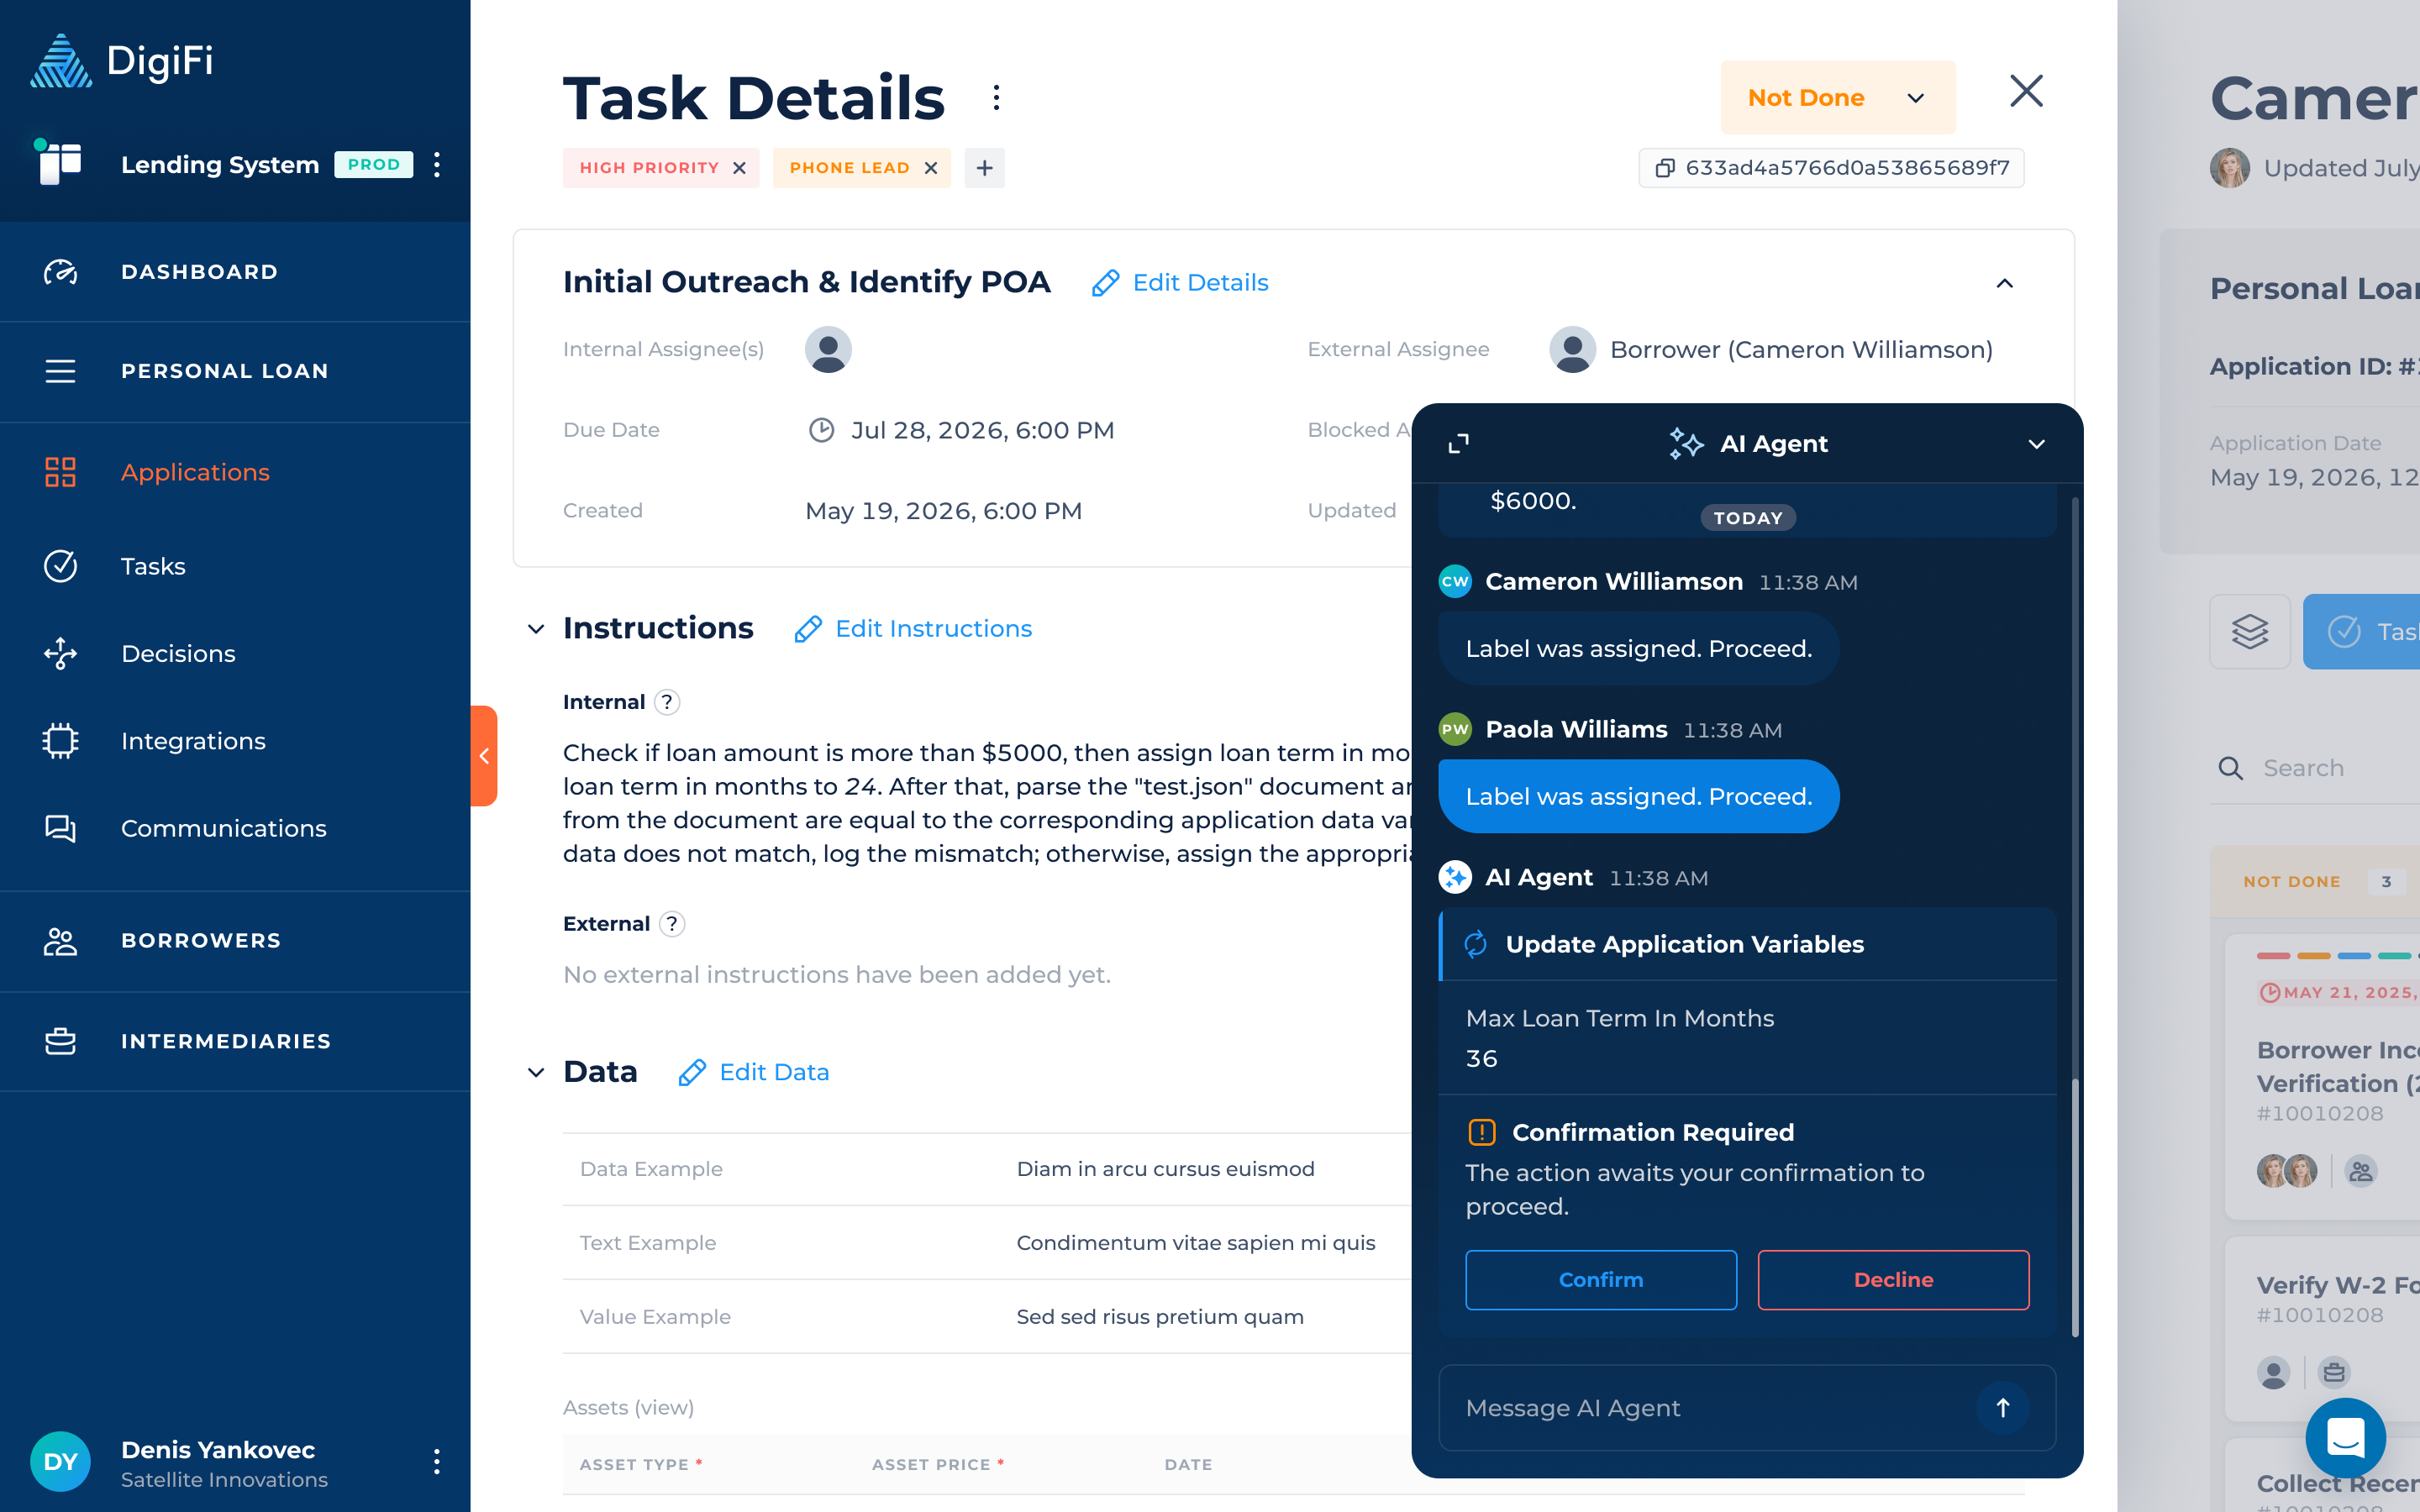
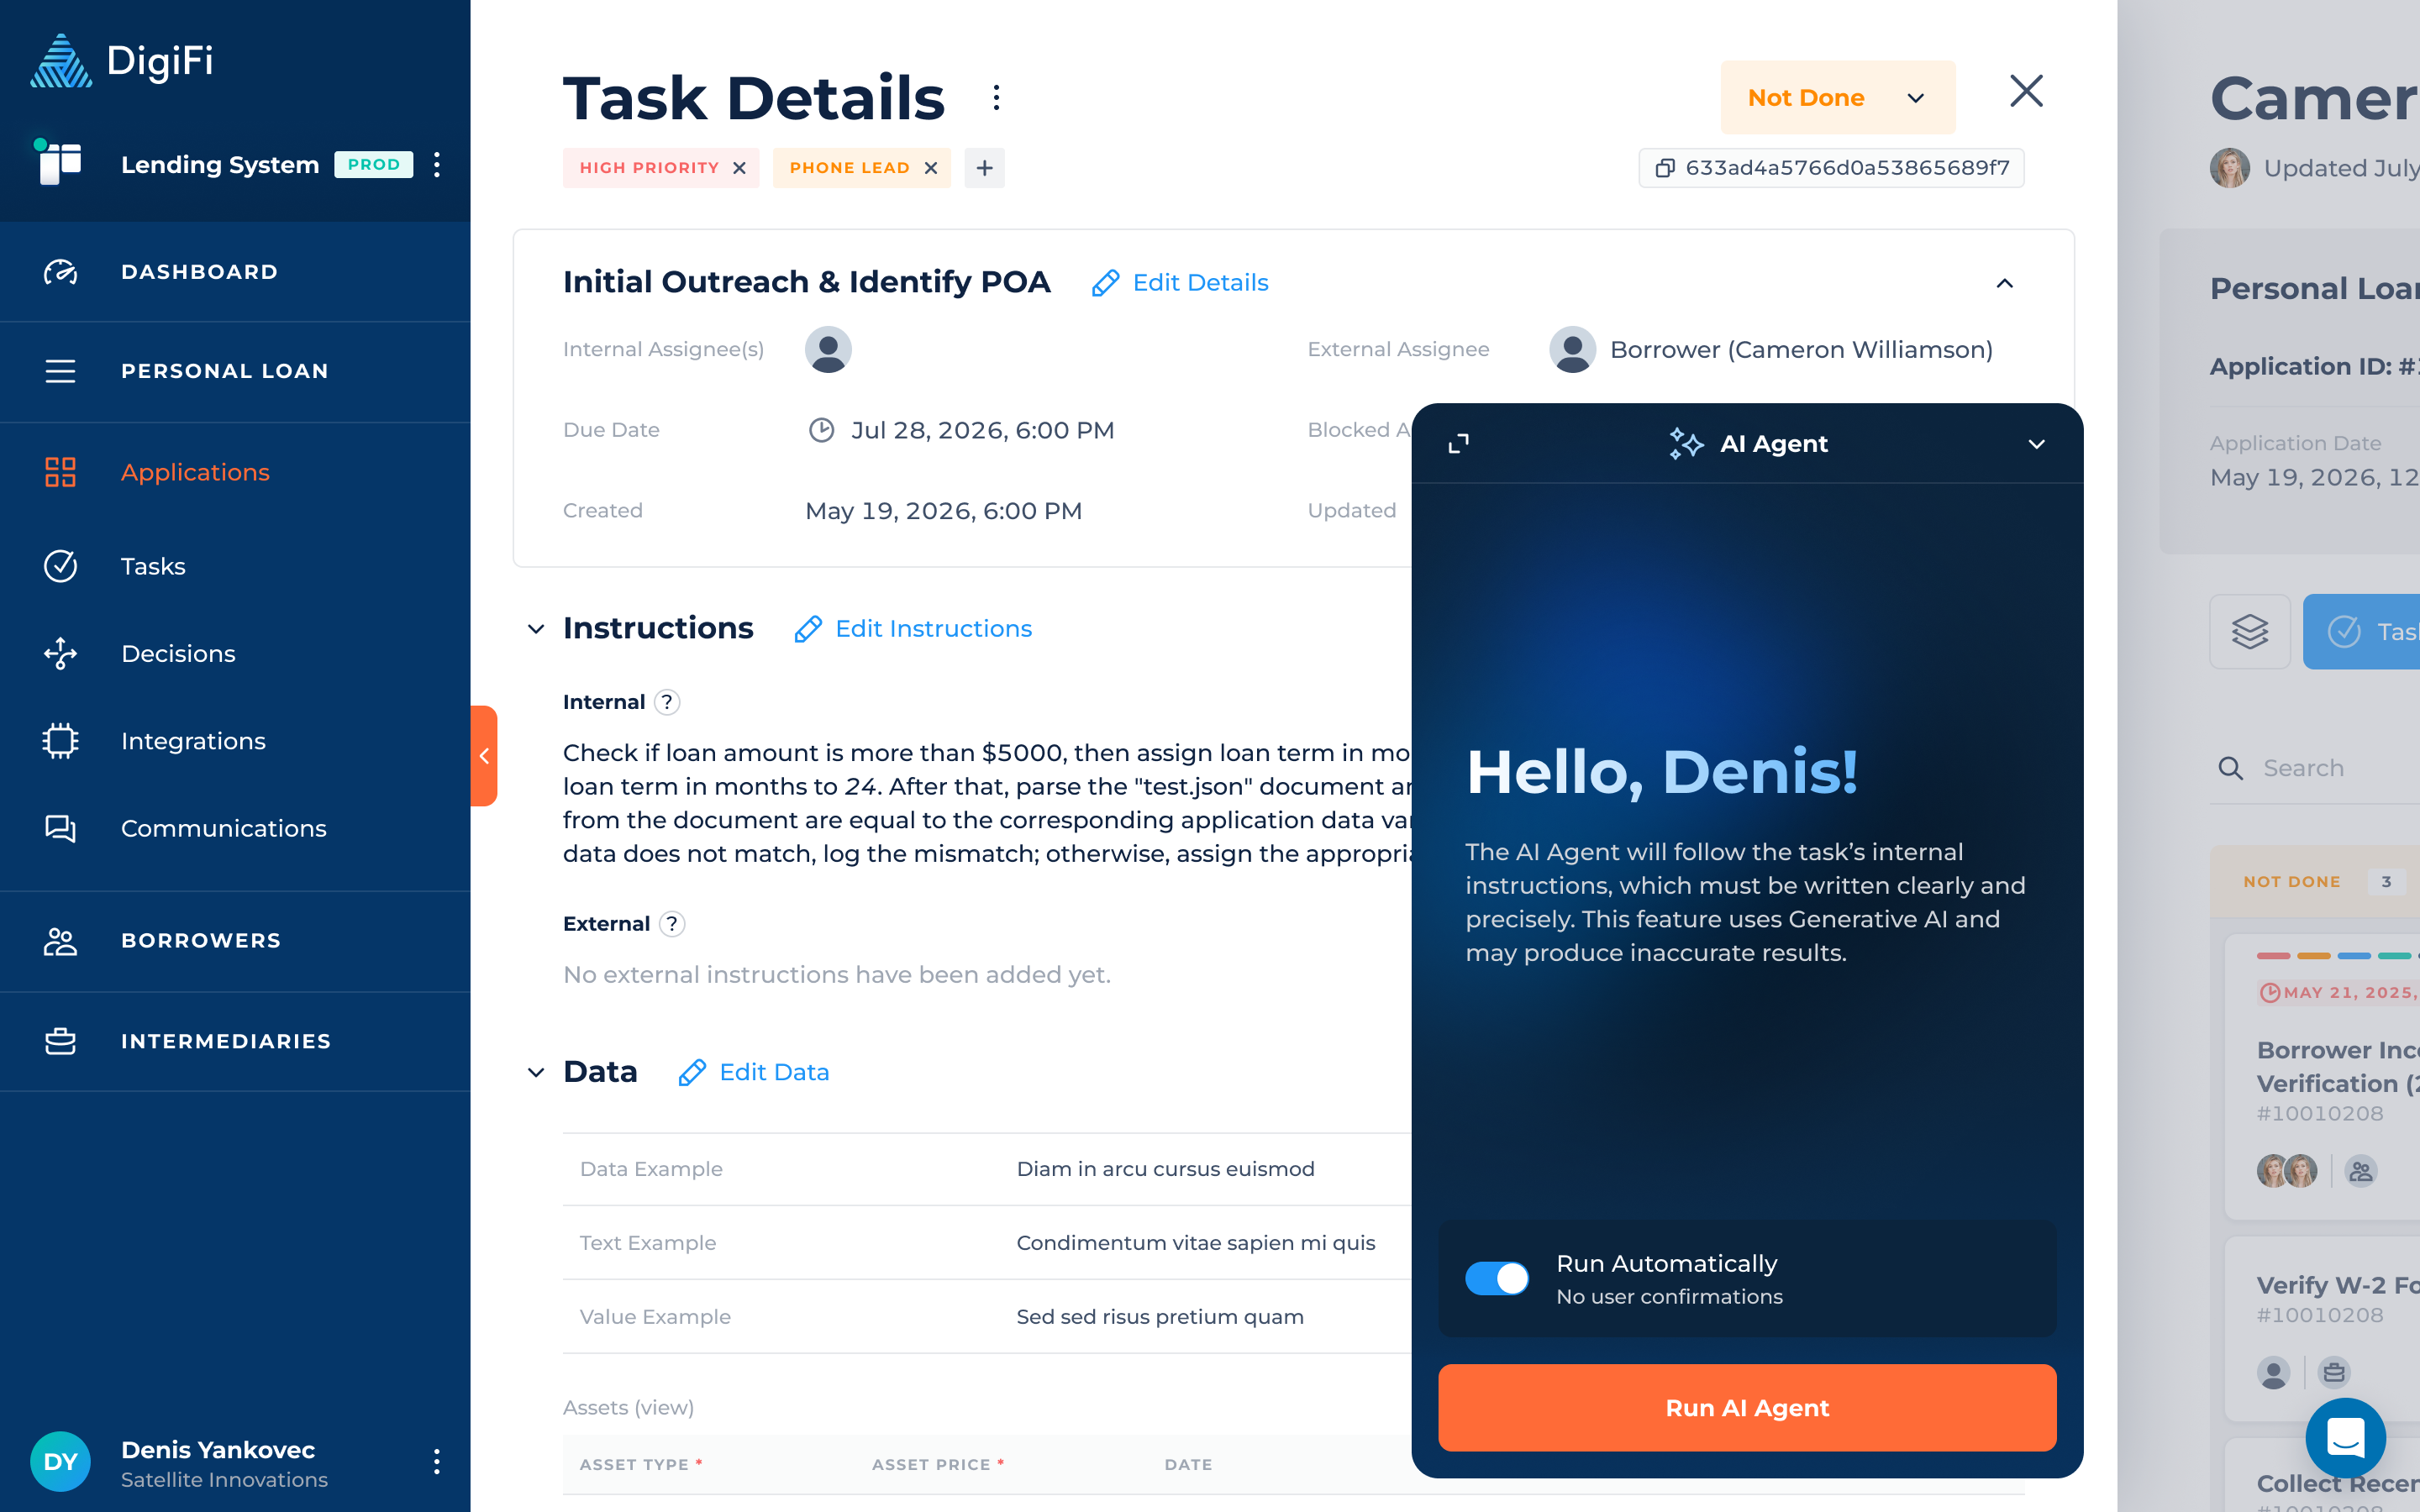
Using the DigiFi AI Agent for Tasks
DigiFi provides a built-in AI assistant, available as an optional integration in the Marketplace. Using the AI Agent may incur additional costs for AI actions and page reviews.
The agent can perform a variety of actions, including:
- Reading task data (title, instructions, data variables, documents, labels, status).
- Updating task data (labels, status, variables).
- Reading and analyzing documents (verifying authenticity, extracting data, matching with existing data).
- Performing calculations and updating variables.
- Adding task comments.
- and more.
To have the agent complete a task, write internal instructions following our best practices to ensure precise results.
Guided Mode (Manual Execution)
In guided mode, the Agent reads your instructions and creates a step-by-step plan. Once approved, the Agent begins executing the plan, documenting each step thoroughly.
Some actions require user confirmation. After reviewing the Agent’s update, the user can either confirm or decline the action. If declined, the user can provide feedback specifying what needs to change for approval.
The agent requires manual approvals in guided mode, meaning a user must be present to confirm suggested updates. It can also pause and request guidance whenever critical data is missing, instructions are unclear, or business judgment is needed.
Automated Execution (Workflow Mode)
Users can enable the “Run Automatically” toggle to allow the AI Agent to execute all internal instructions within a task without user confirmation.
In automatic mode:
- The Agent executes defined tasks without step-by-step confirmations.
- Confirmation-related blocks are hidden during execution.
- All actions are logged.
- A complete execution history is available after processing.
To automate AI Agent in your workflow tasks you can use the “Run AI Agent” action in Automation Builder.
Place Run AI Agent actions at the end of your workflow.
The AI Agent runs longer than other automated actions and may take 1-2+ minutes to complete.
If subsequent workflow actions depend on its output, add a Time Delay to ensure processing is complete before the workflow continues.
Updated about 1 month ago