Automation Builder
How to automate a wide range of actions using DigiFi’s automation builder.
Overview of Automation Builder
DigiFi’s automation builder is a powerful tool that lets you eliminate manual work by implementing triggers and actions to automate decisions, tasks, emails, status changes and more.
Each automation you create will let you:
- Define a Trigger to start an automated process, based on application status changes and/or data changes.
- Add one or more Actions that will run when the automation is triggered (e.g. run decision, send email, create task, assign team member, add label, assign values etc.).
- Add one or more Time Delays to run actions after a certain time or at regular intervals (e.g. send an email to a borrower 10 days after the application reaches a specific status).
- Combine actions within a single automation flow to enable synchronous, multi-step processing.
You can create multiple automations that run at the same or different times to automate a wide range of previously-manual work!
For ExampleEvery time an application is submitted, you want to automatically run an integration to pull the applicant's credit report, review their data against credit requirements, calculate pricing and send an offer/no-offer email. This could be implemented using the automation builder, by adding an automation with the following details:
- Trigger: Run the automation whenever an application enters the "New Application" status.
- Actions:
- Run Integration (credit bureau) 2. Run Decision (credit requirements) 3. Run Decision (pricing) 4. Send Email (offer or no offer)
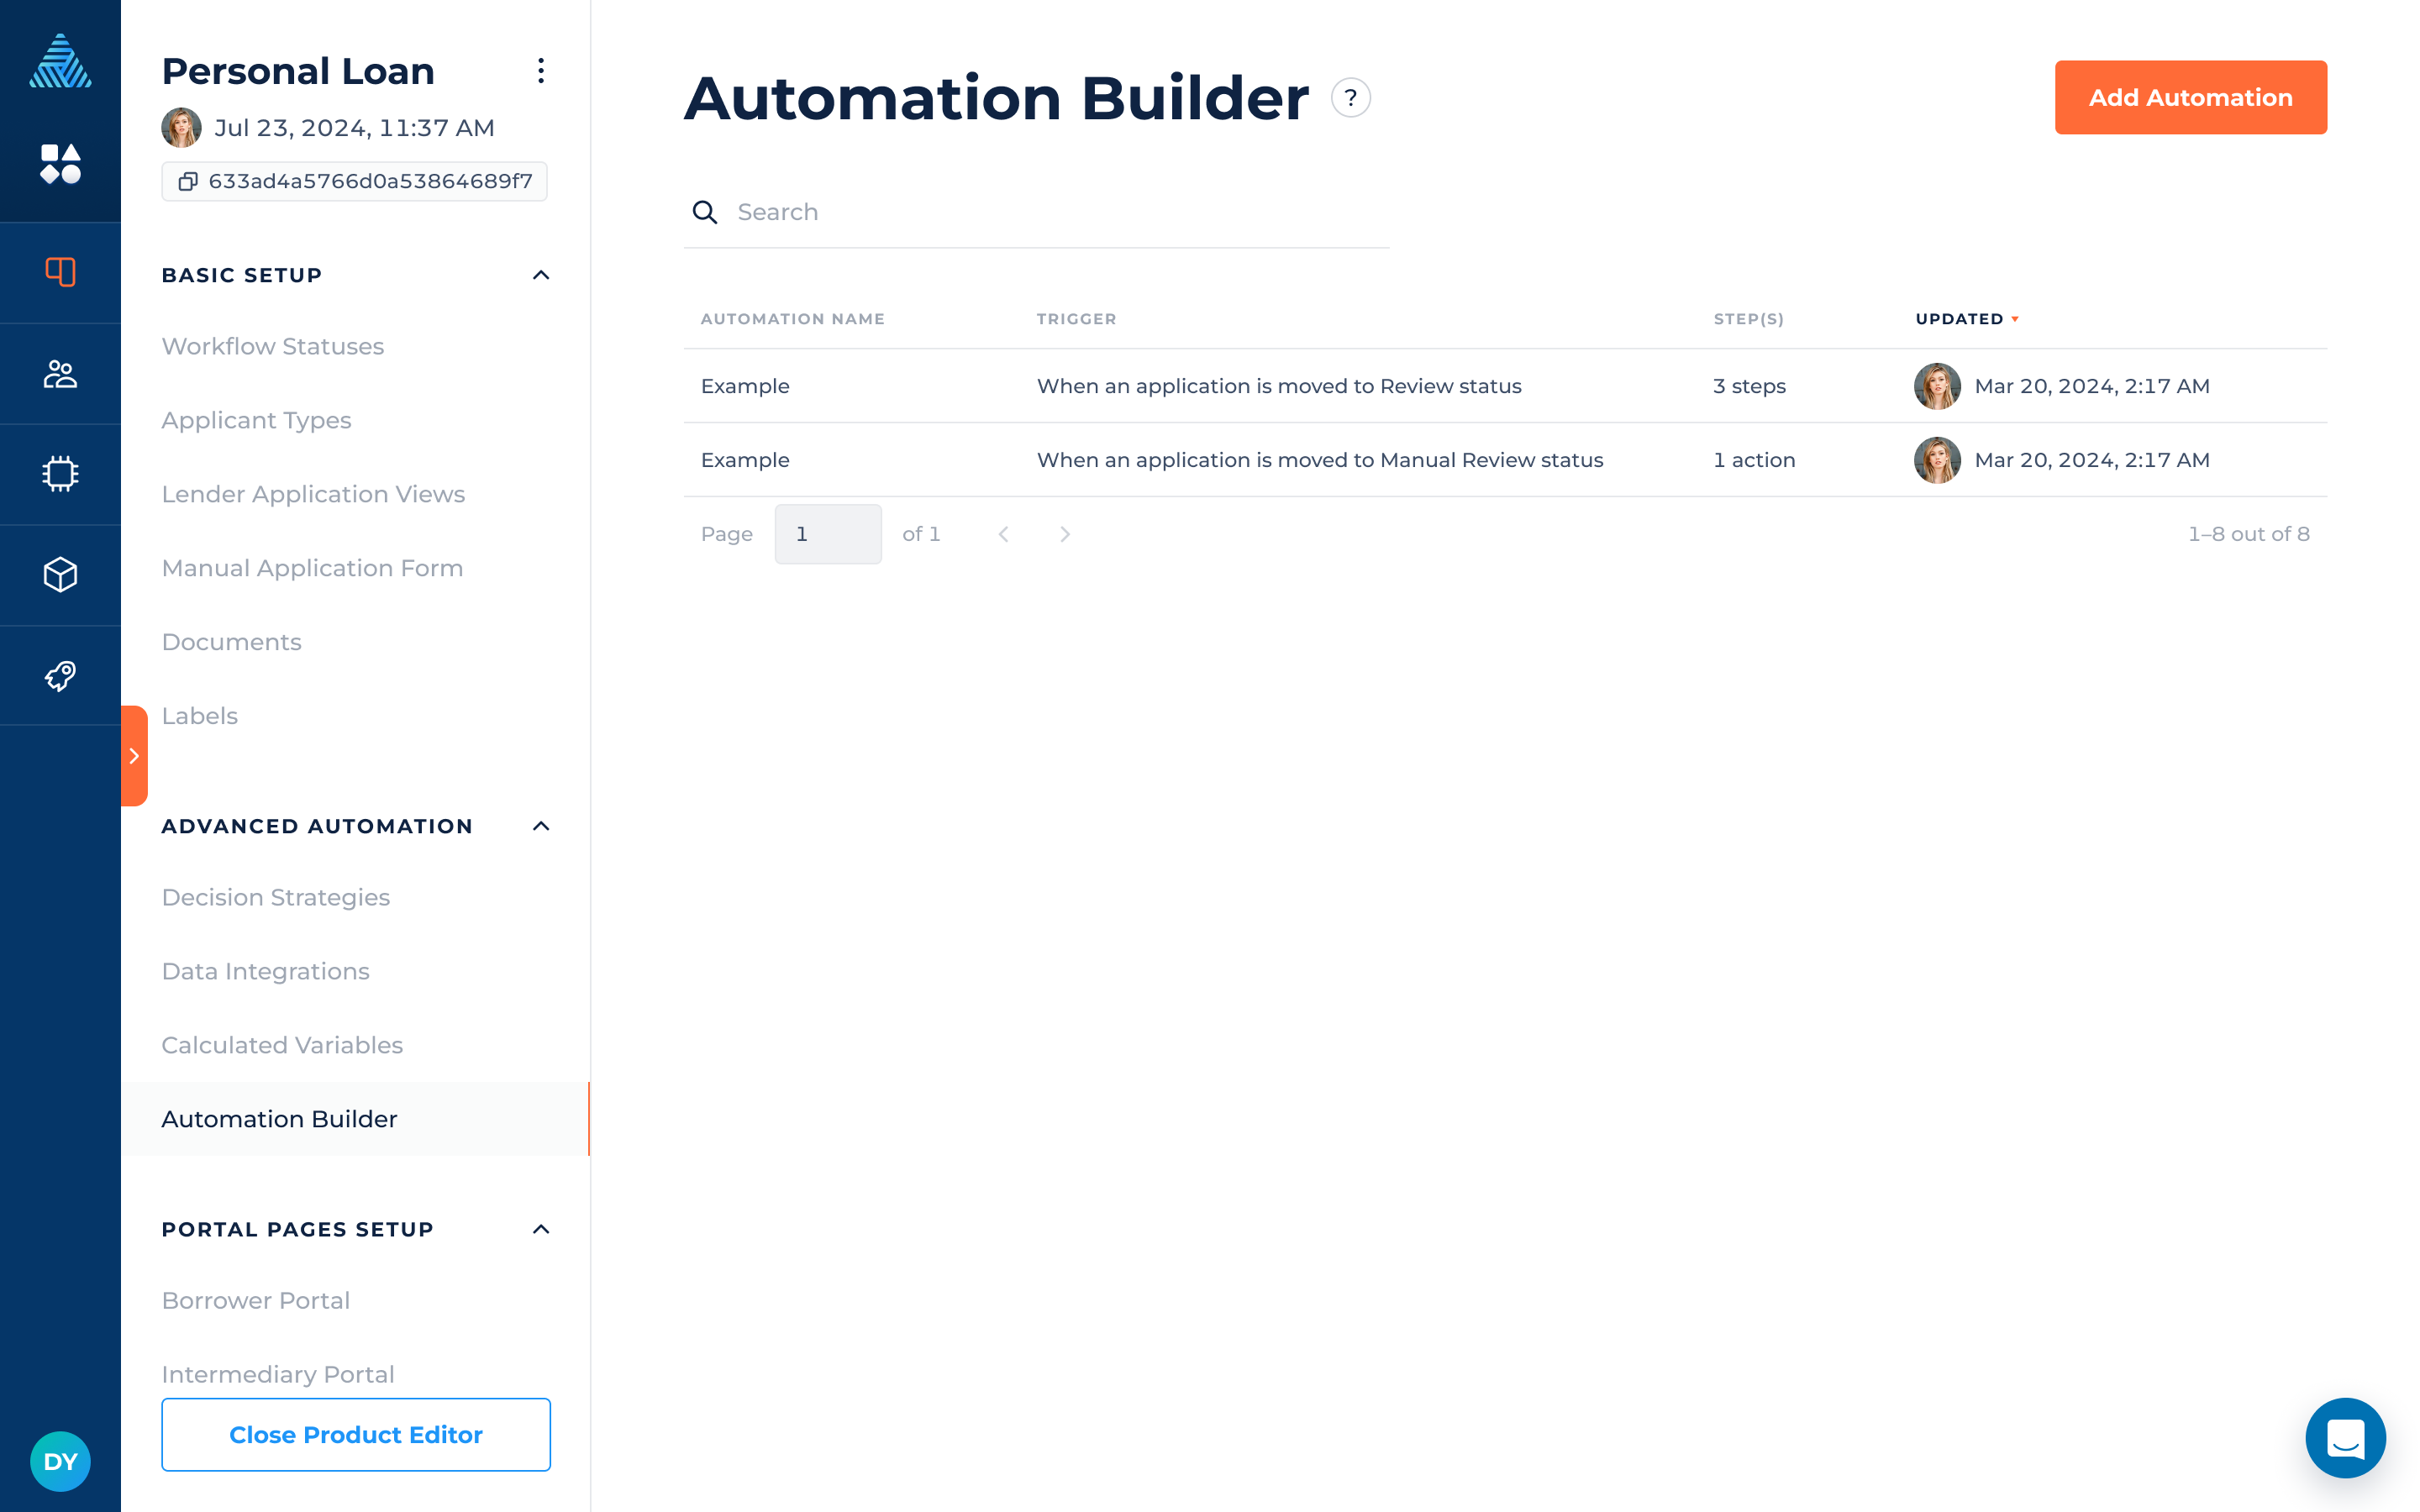
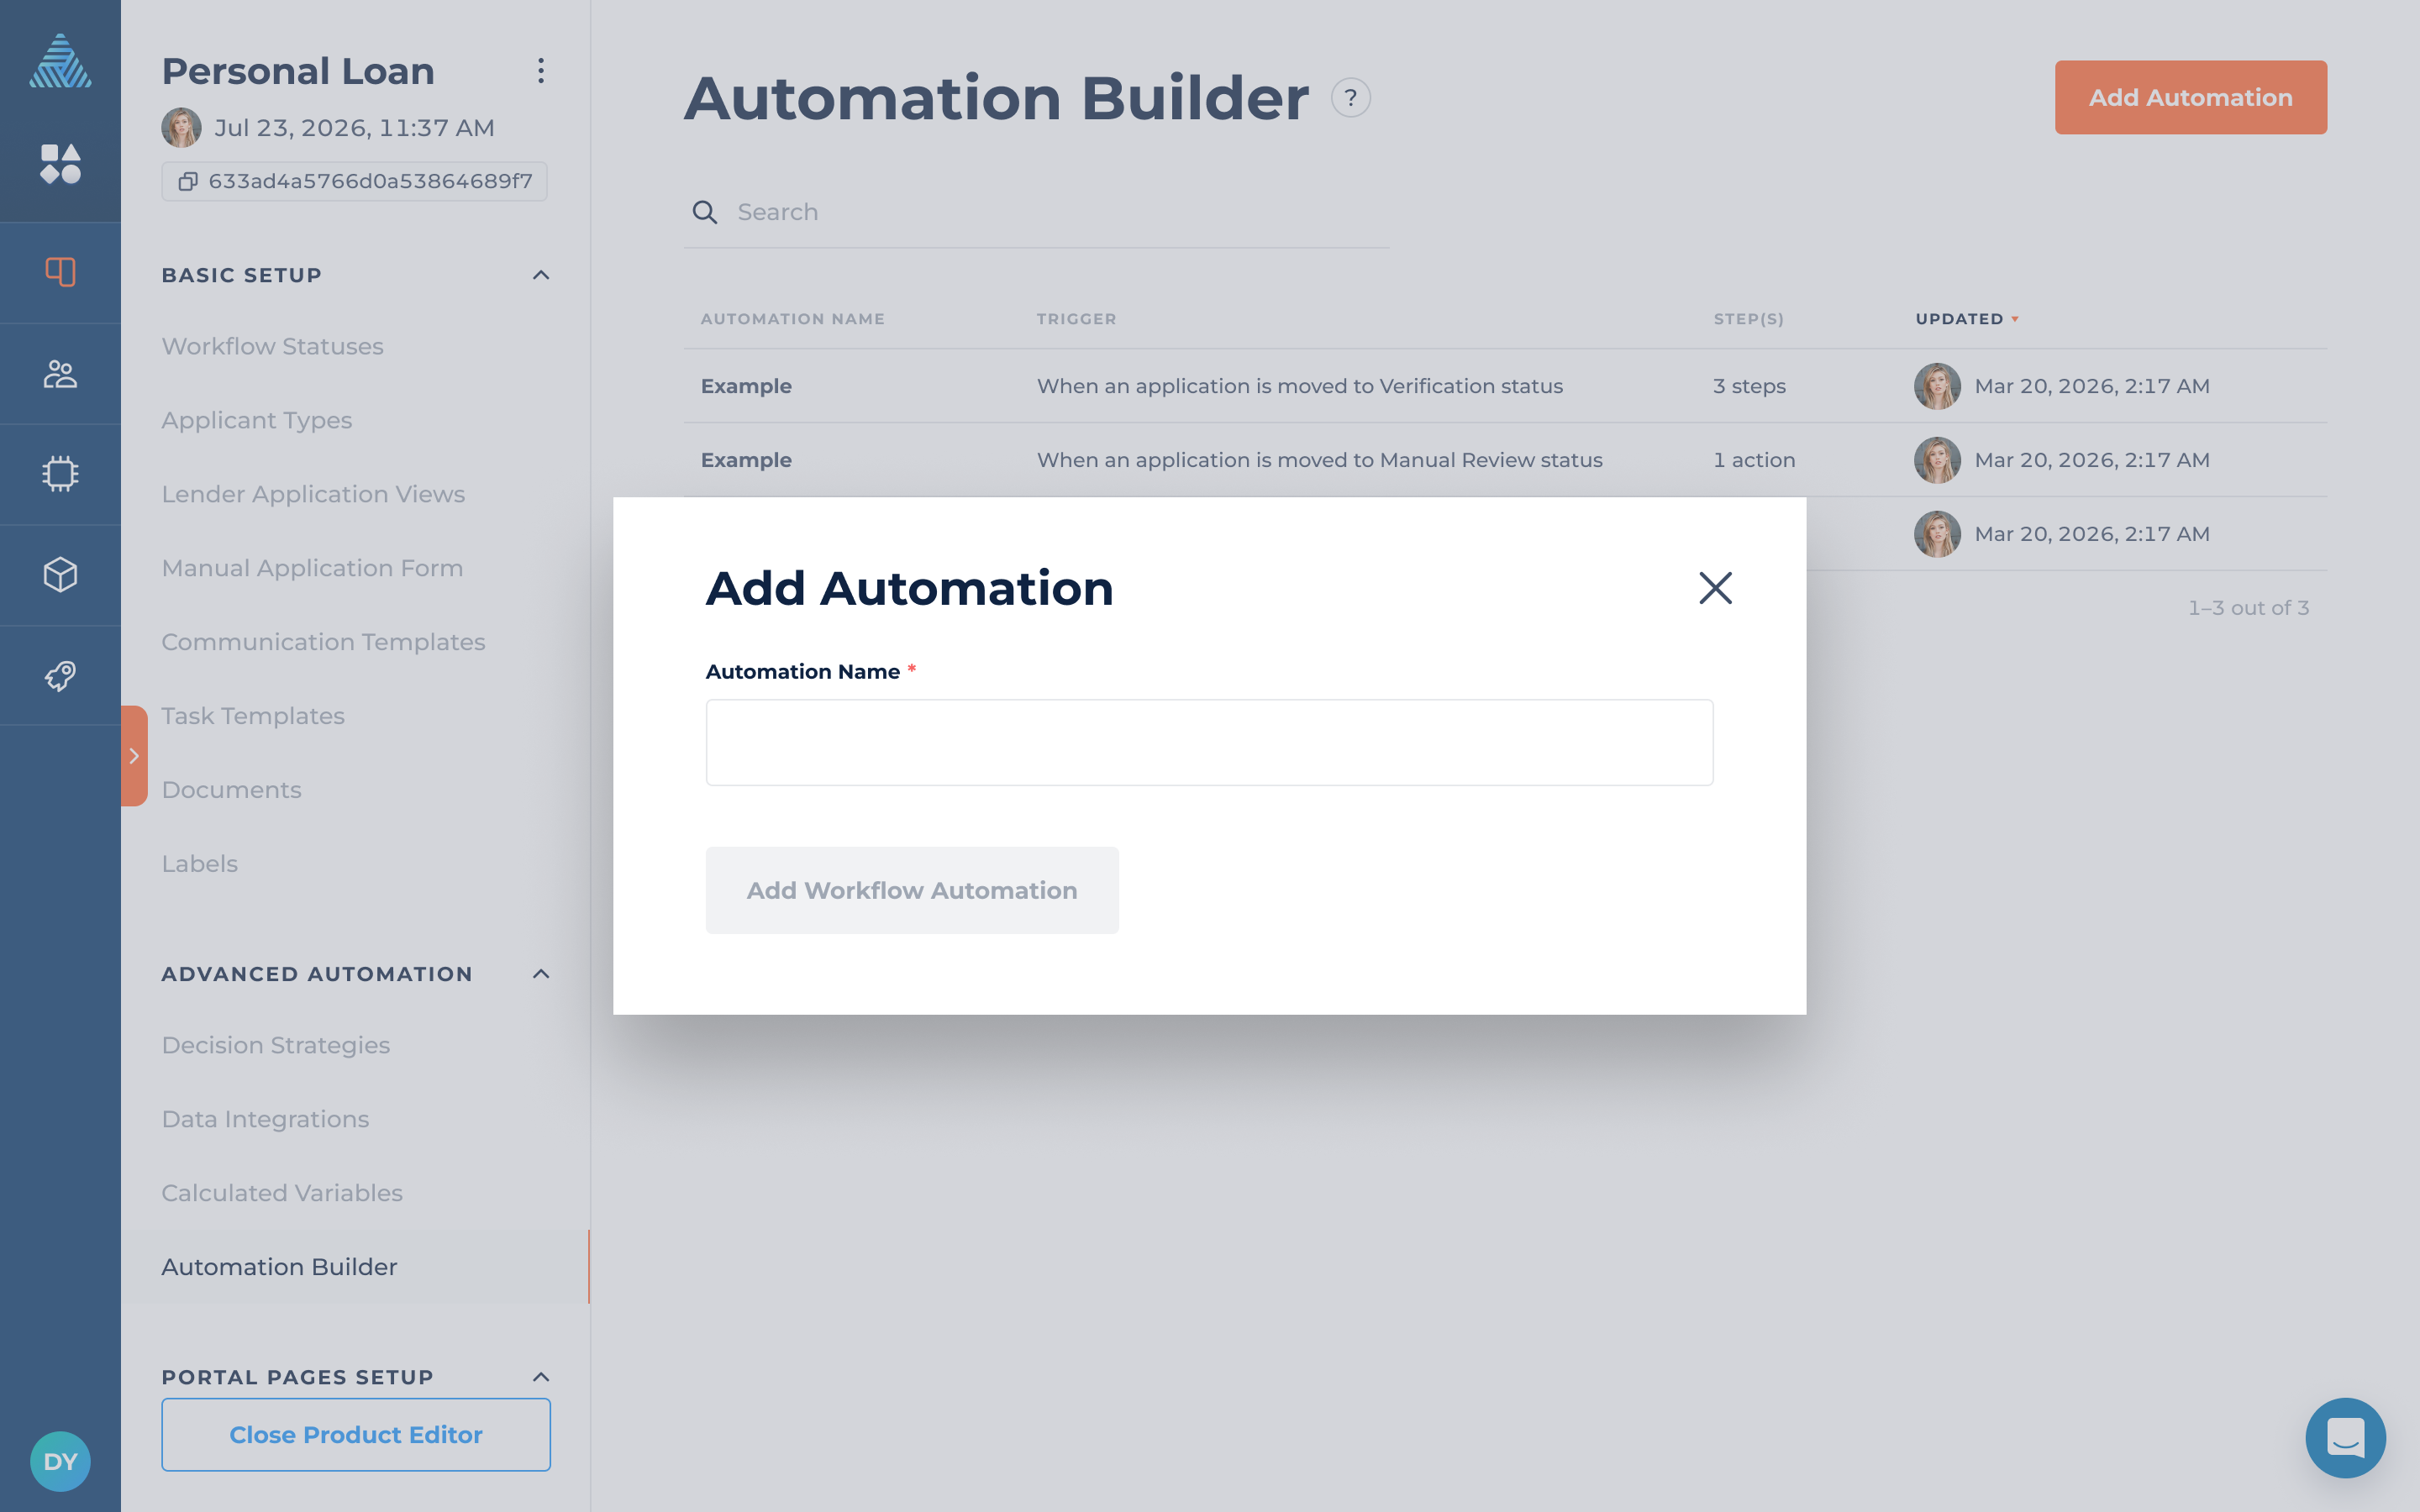
How To Add An Automation
To add an automation:
- Navigate to the "Automation Builder" section of your Loan Product.
- Click the “Add Automation” button.
- Provide a name for the automation.
After you have created the automation, you can begin editing it.
How To Edit An Automation
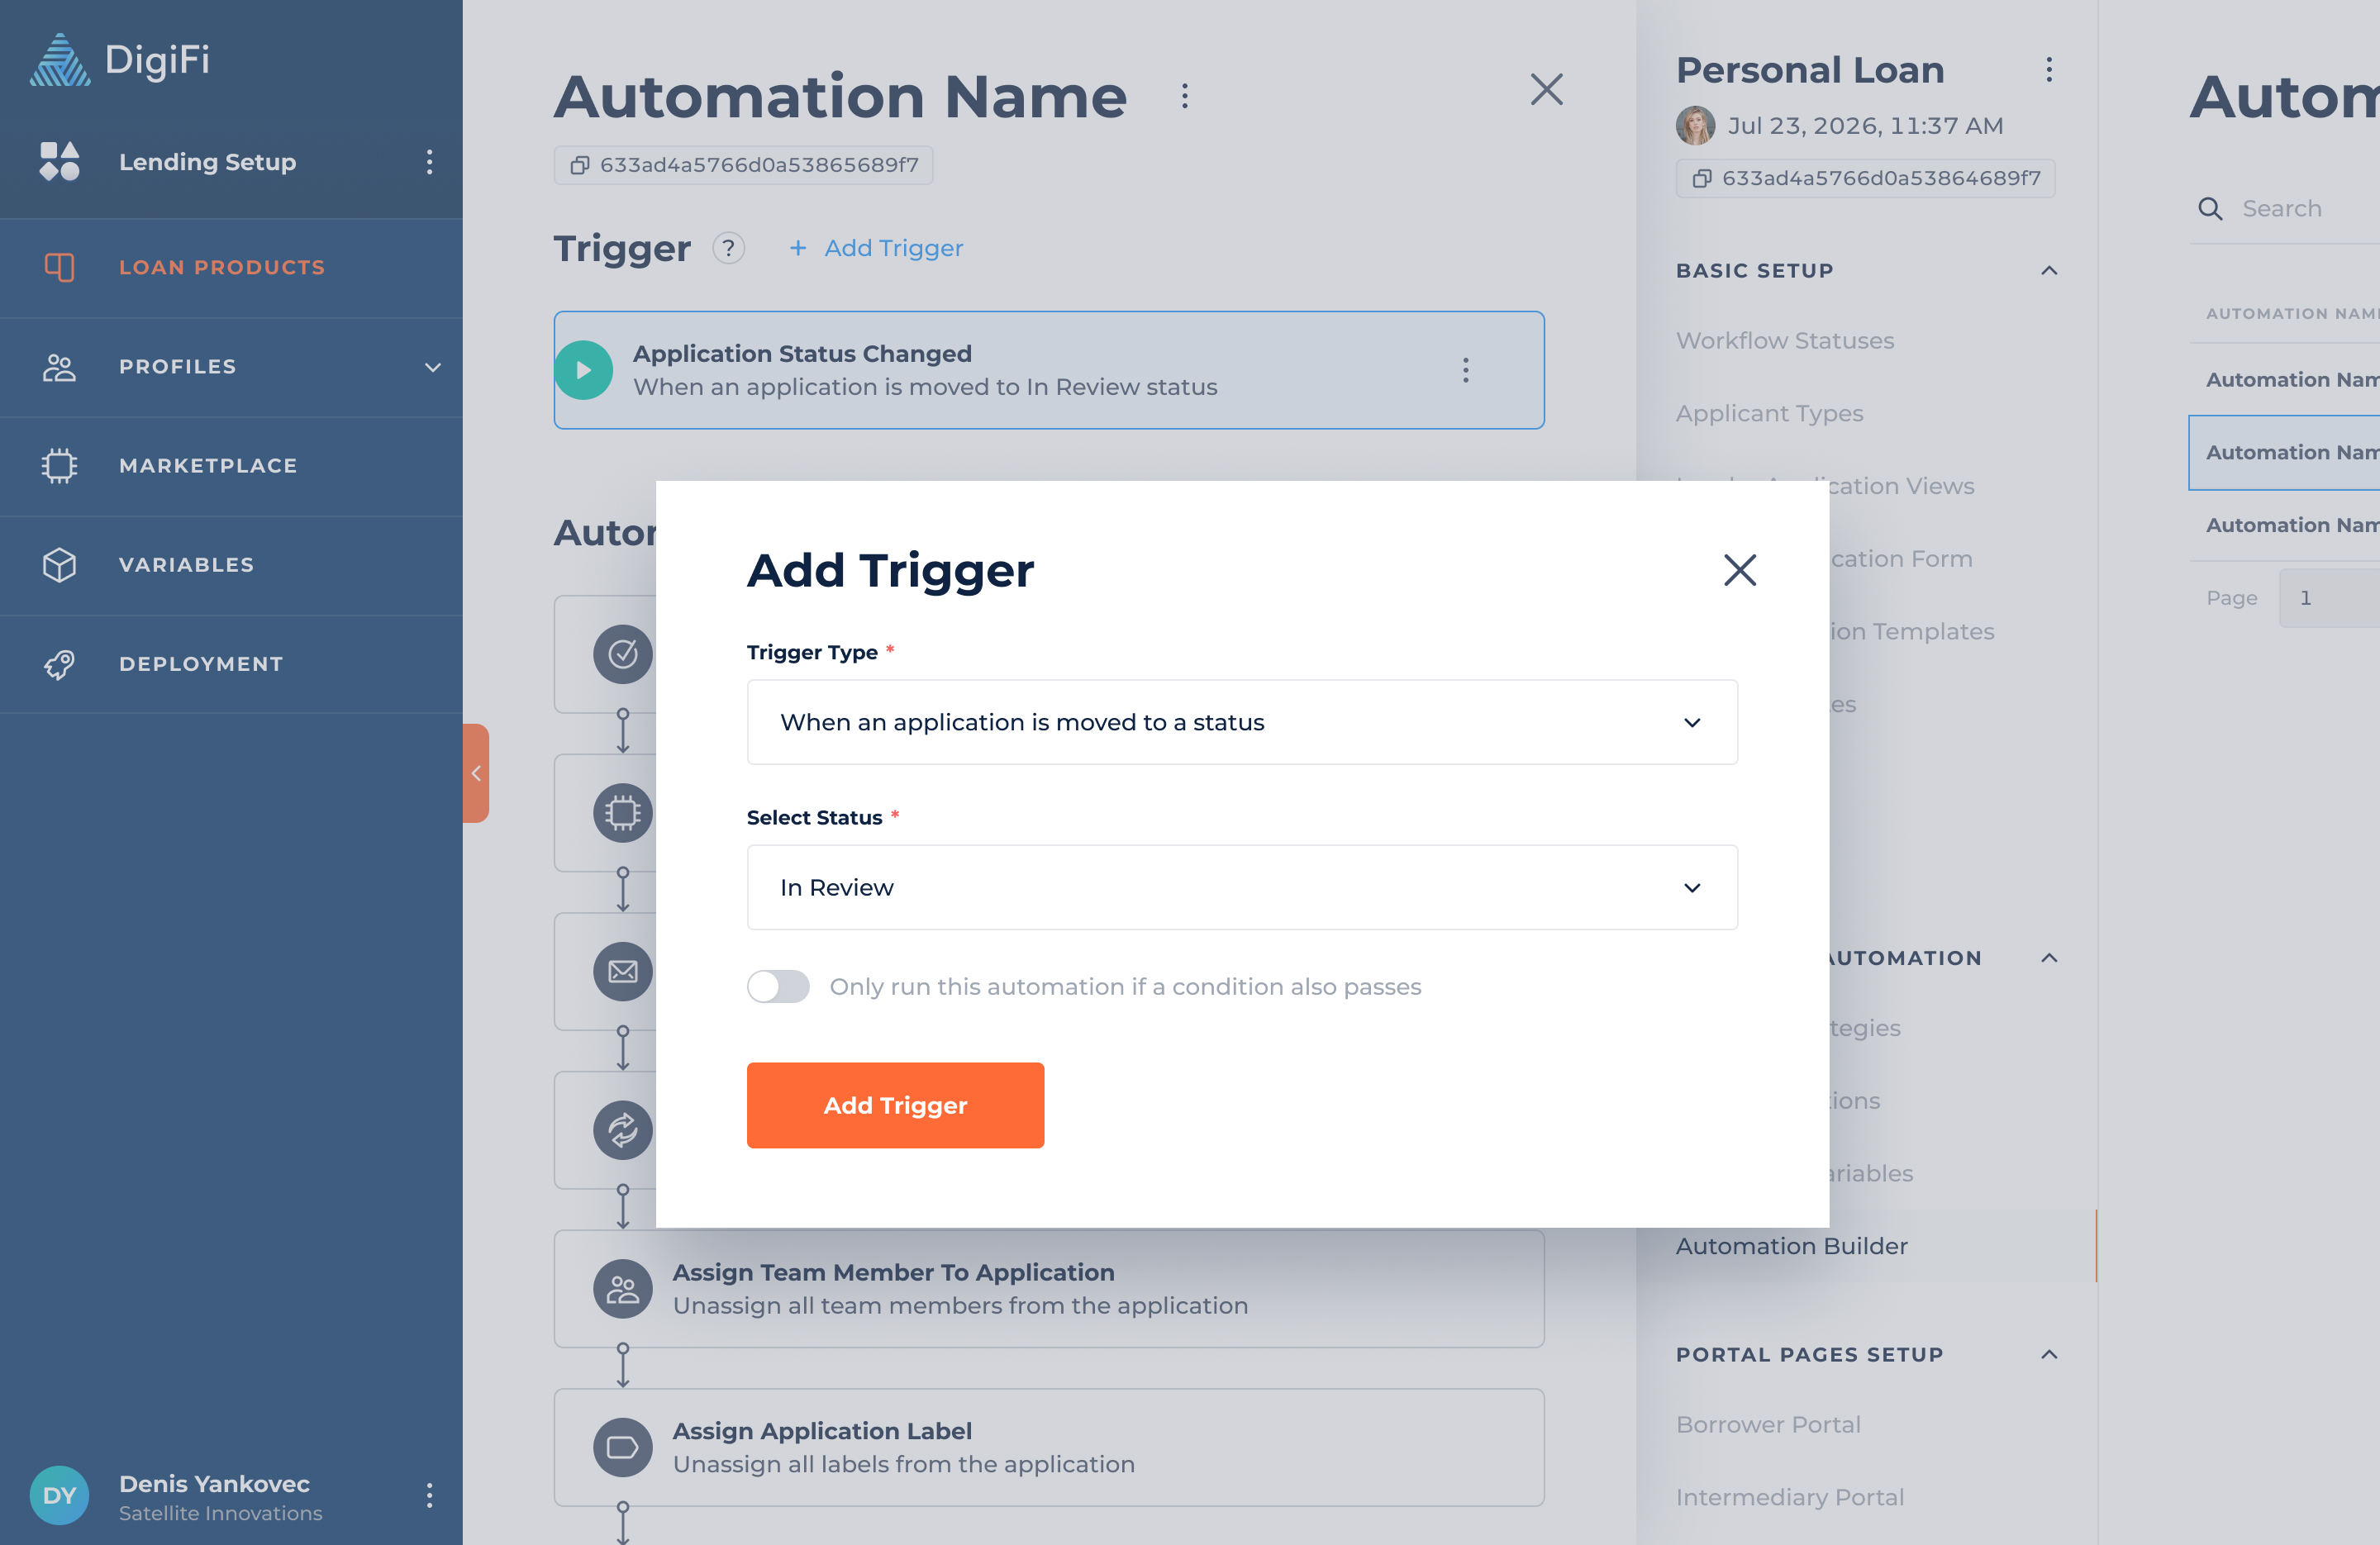
Triggers (General)
Each automation includes a "Trigger," which determines when the automation will run. Every time an application is updated, this trigger is checked and the automation begins if it is met.
To edit the trigger, open the automation and click the "Edit Trigger" button. A popup will appear in which you can choose a "Trigger Type," which is discussed below.
For each trigger type, you can also add a logical condition, and the automation will only run if that condition passes. Conditions are created using DigiFi's Formula Language and must return TRUE (boolean) or "true" (string) to pass.
Triggers (Status Change)
The first trigger type is "When an application is moved to a status." Automations with this trigger type will run when applications reach the workflow status you select here.
Triggers (Data Change)
The second trigger type is "When application data is updated." Automations with this trigger type will run when applications have a specific variable updated, which you'll select while editing the automation.

Please note that triggers related to data changes will only run when applications are updated - not when applications are initially created. If you want to run automation when an application is created, use the status trigger type.
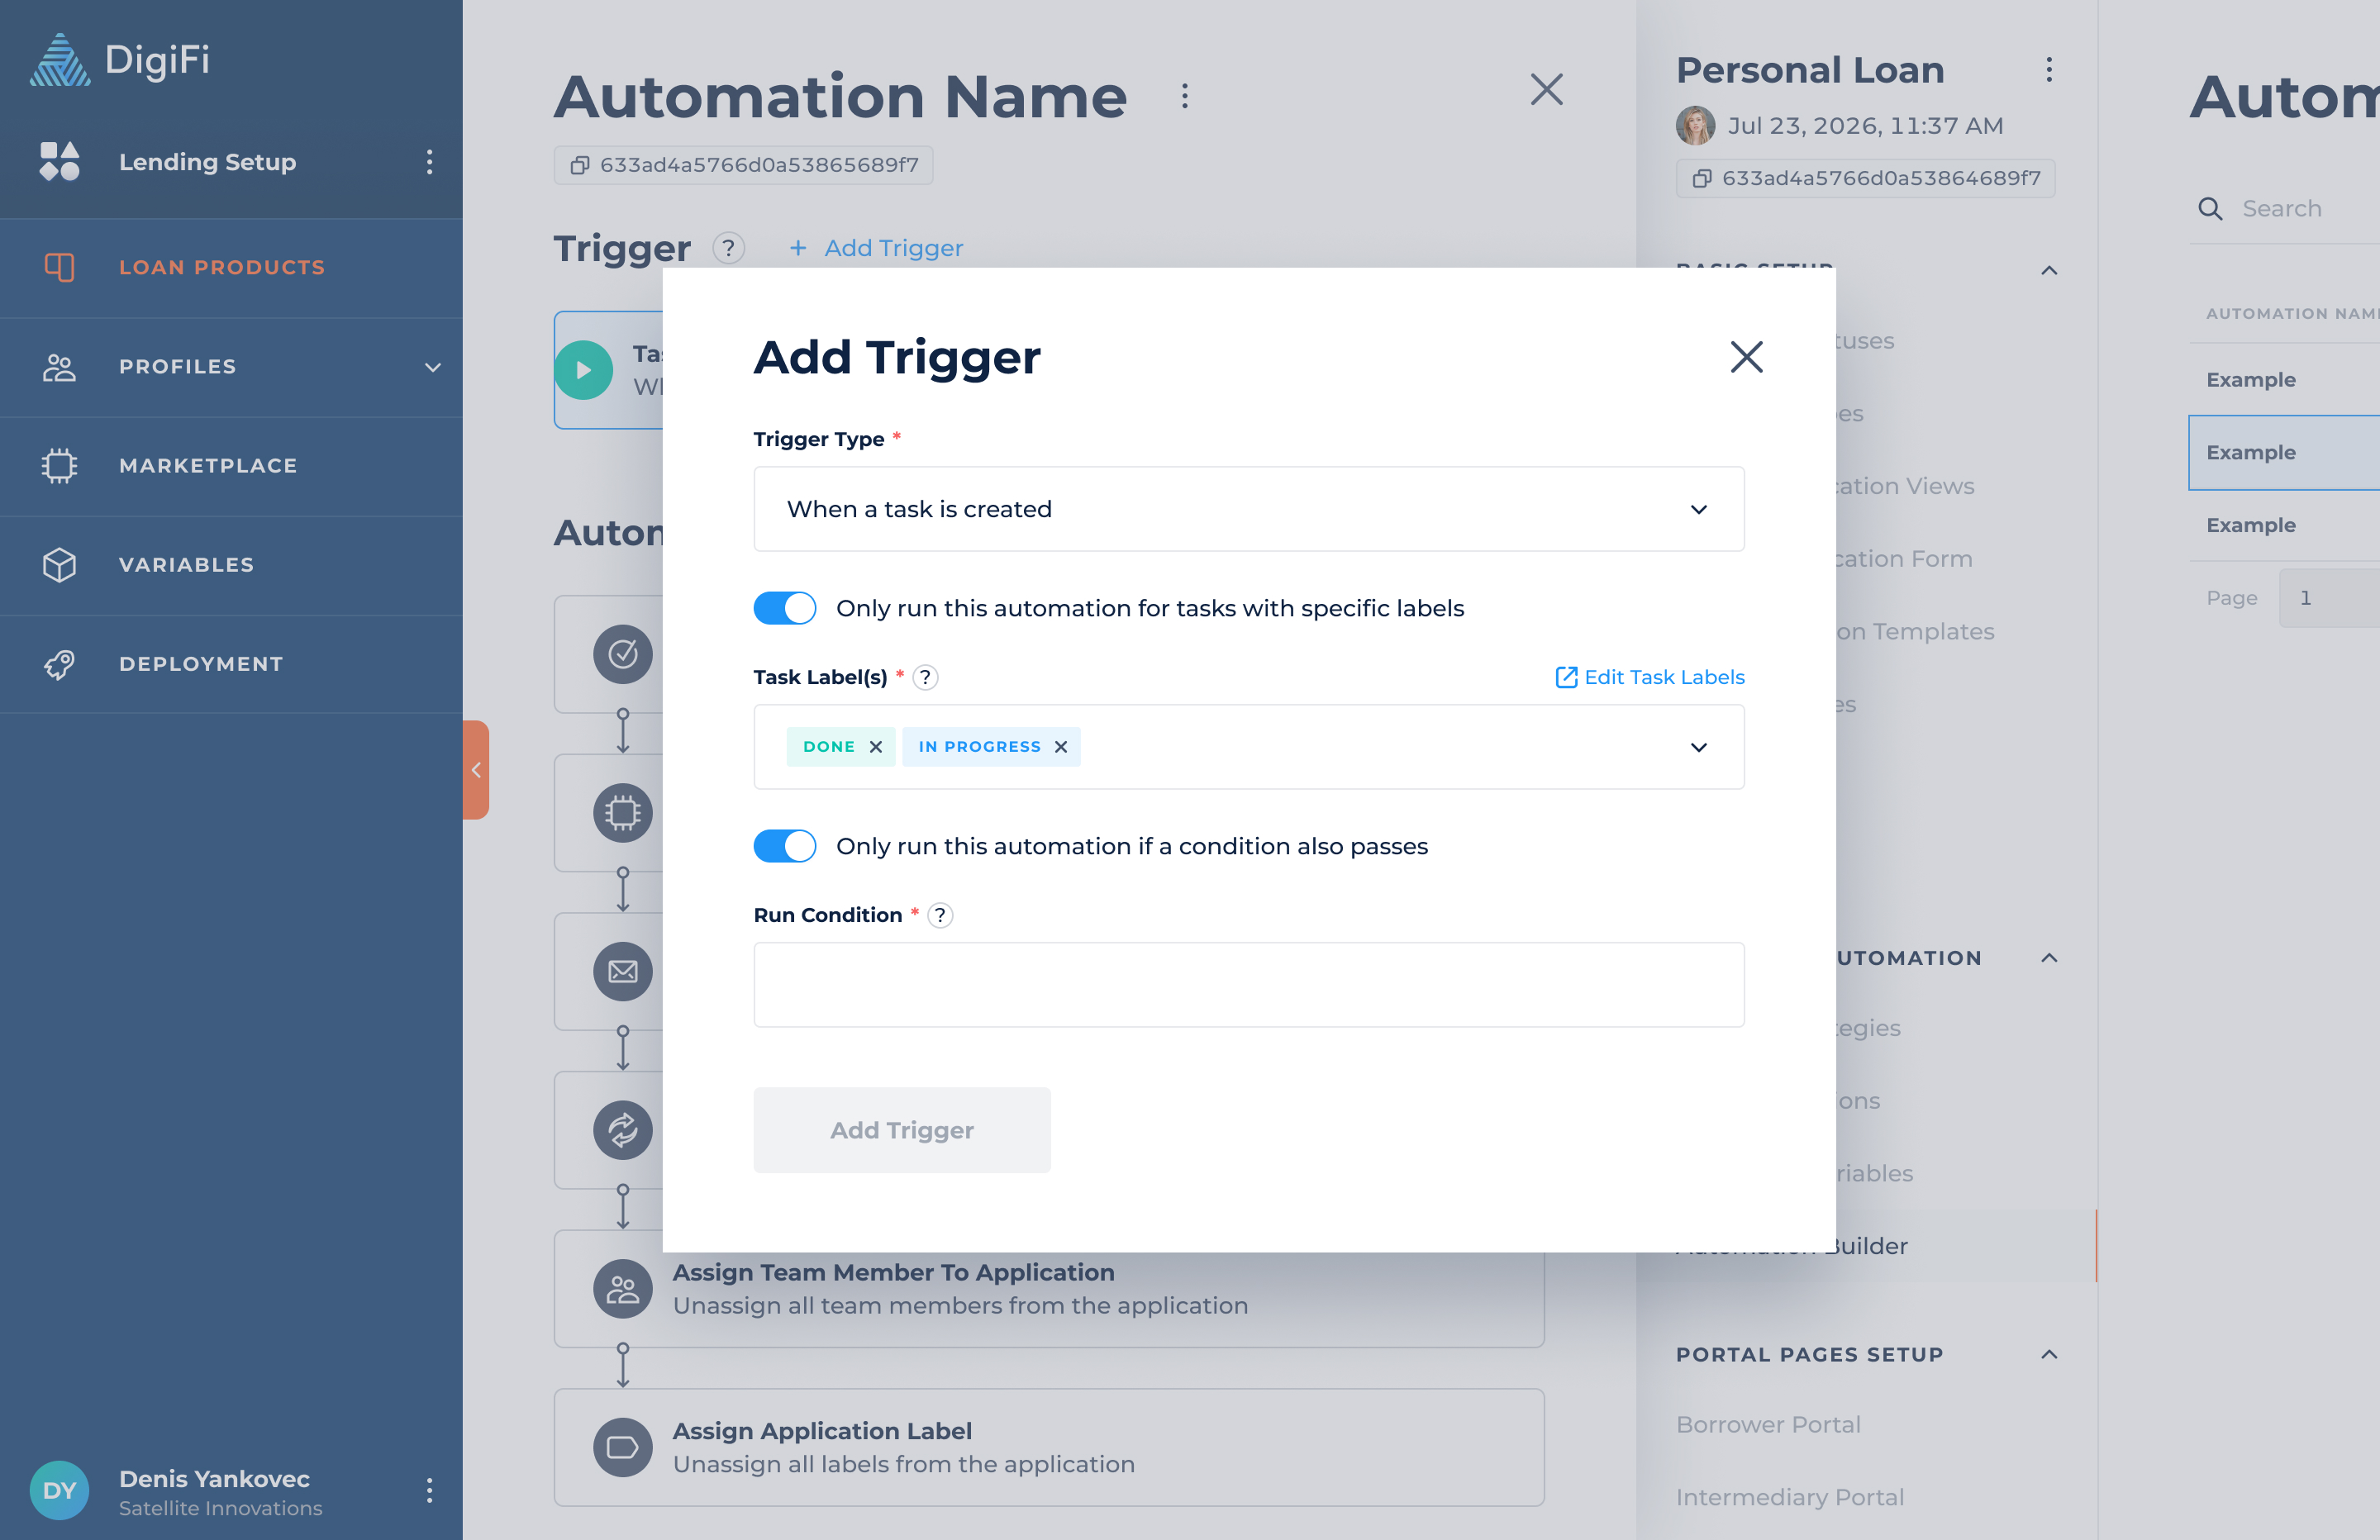
Triggers (Task Creation)
The third trigger type is "When a task is created." Automations with this trigger type will run when a task is created on the platform.
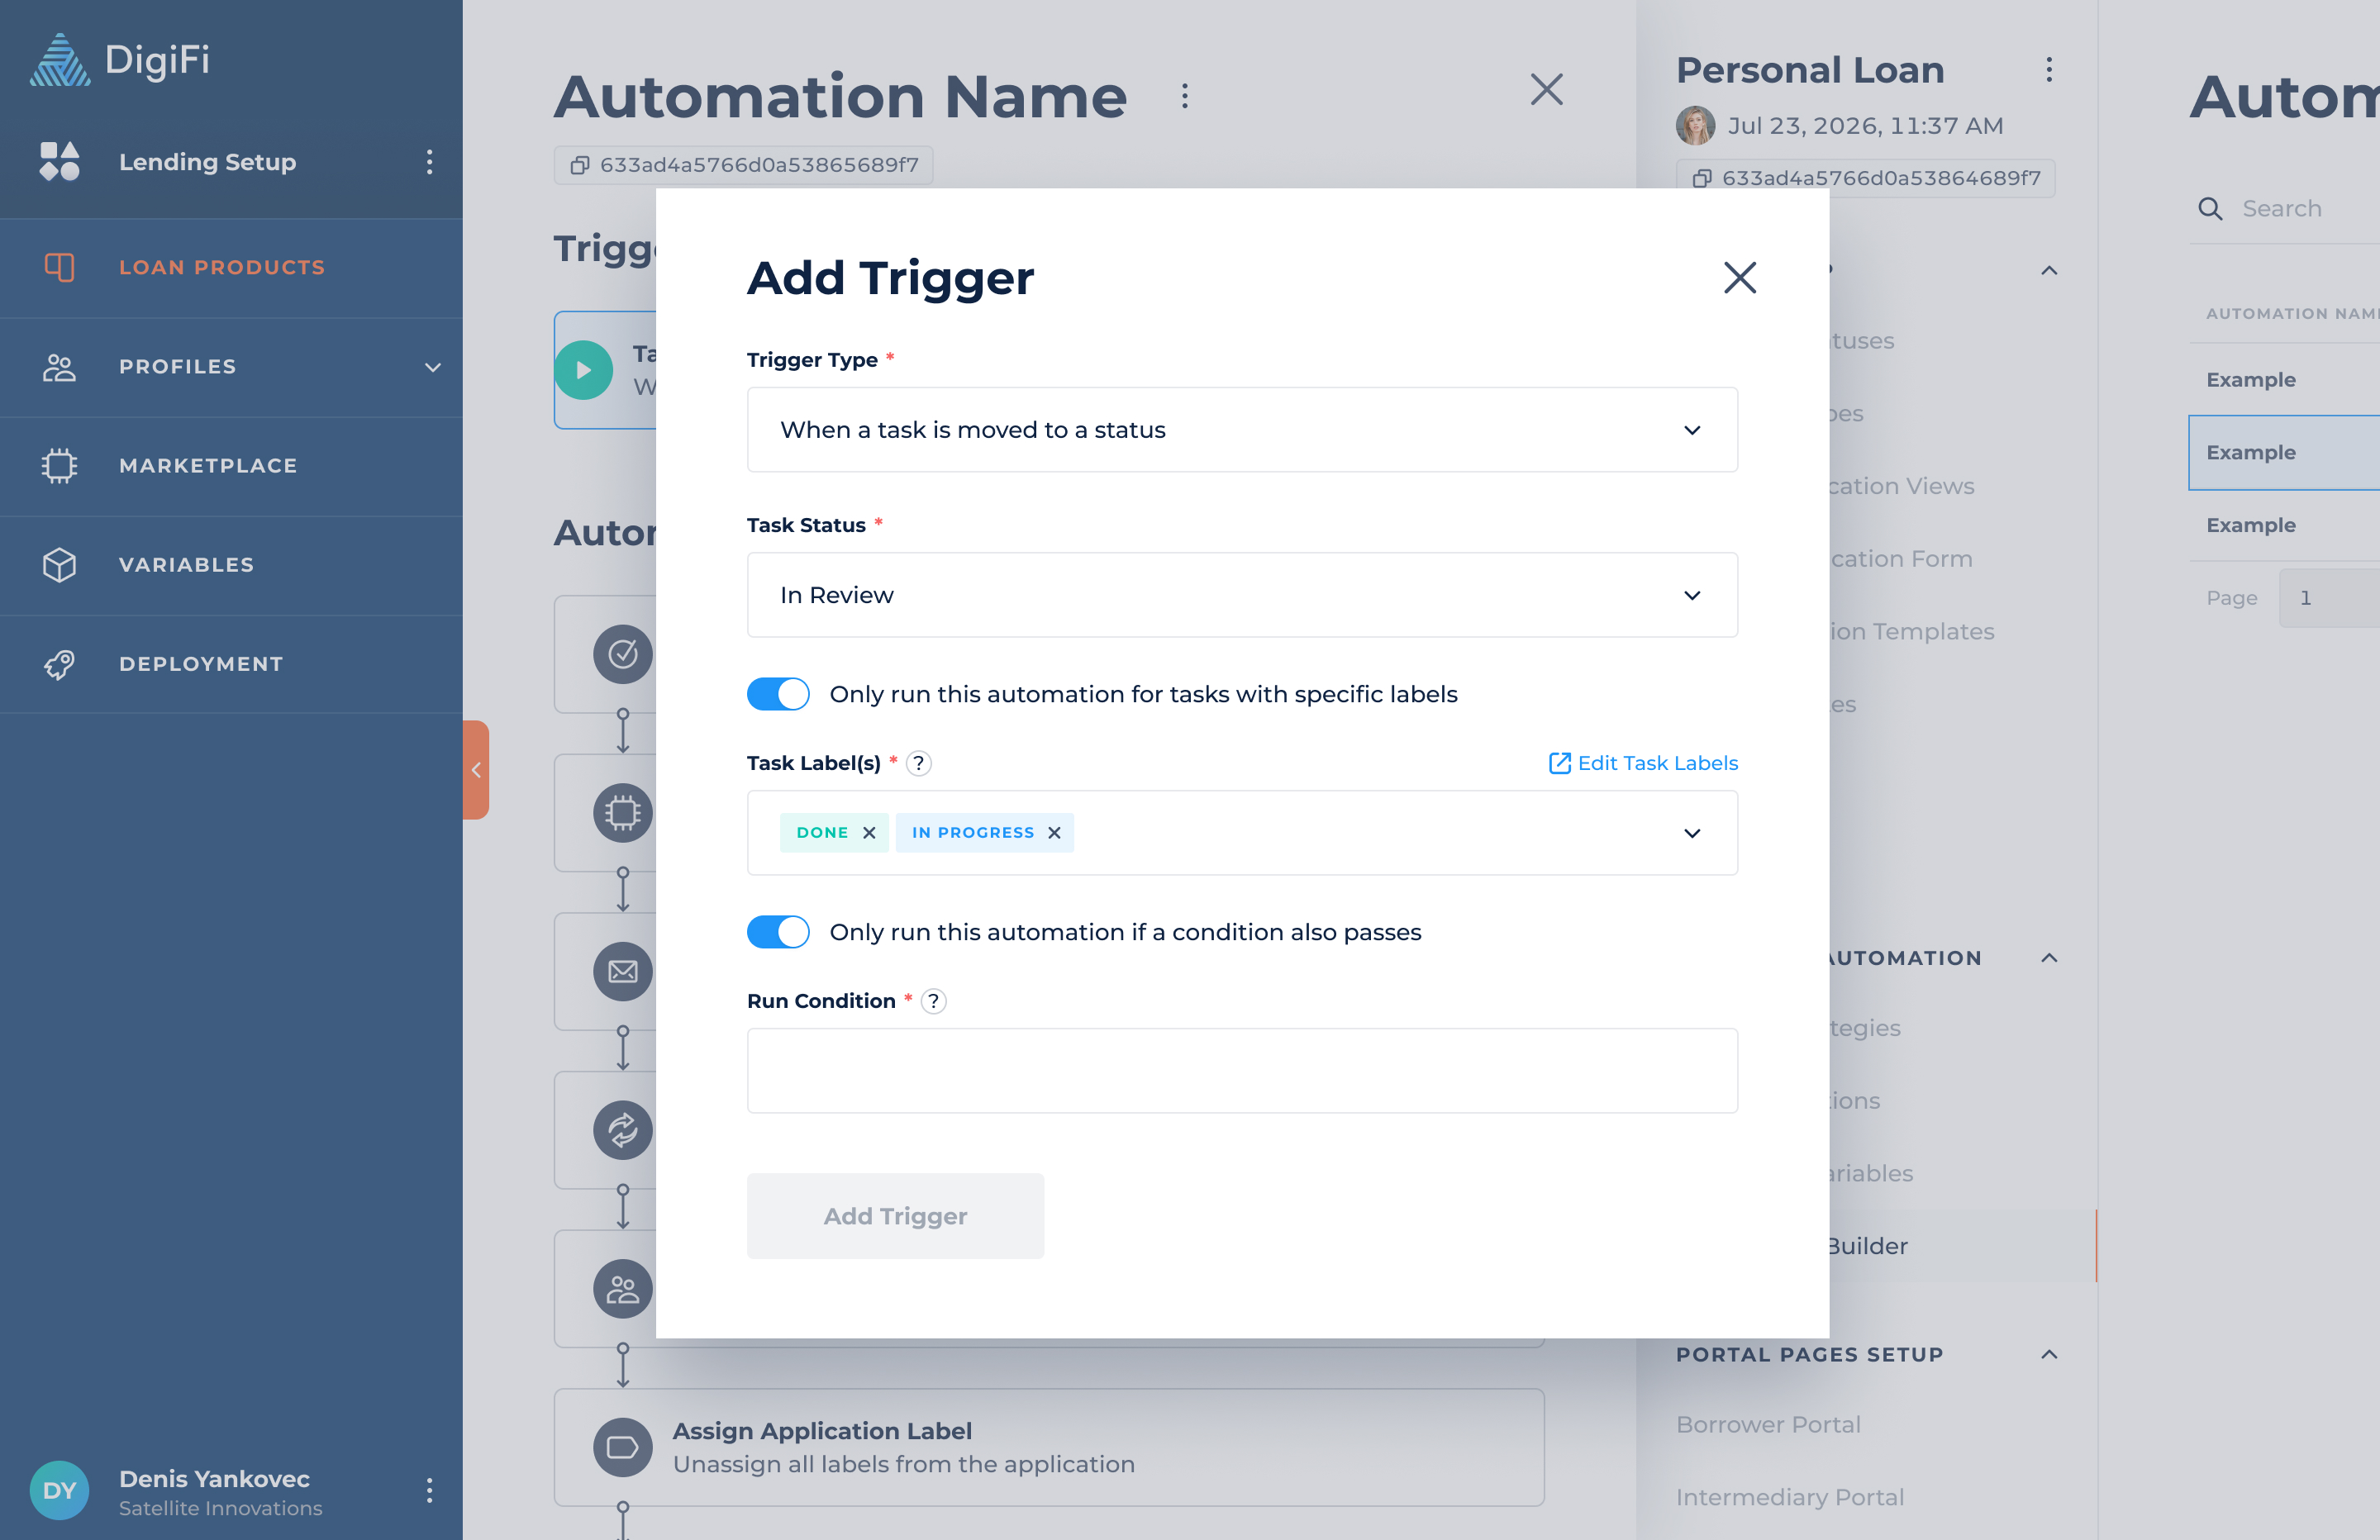
Additionally, you can activate the "Only run this automation for tasks with specific labels" toggle. The automation will then only run when a task is created on the platform and has a set of labels assigned.
Triggers (Task Status Change)
The fourth trigger type is "When a task is moved to a status." Automations with this trigger type will run when tasks reach the status you select from the dropdown list.
Additionally, you can activate the "Only run this automation for tasks with specific labels" toggle. The automation will then only run when the task reaches a specific status and has a set of labels assigned.
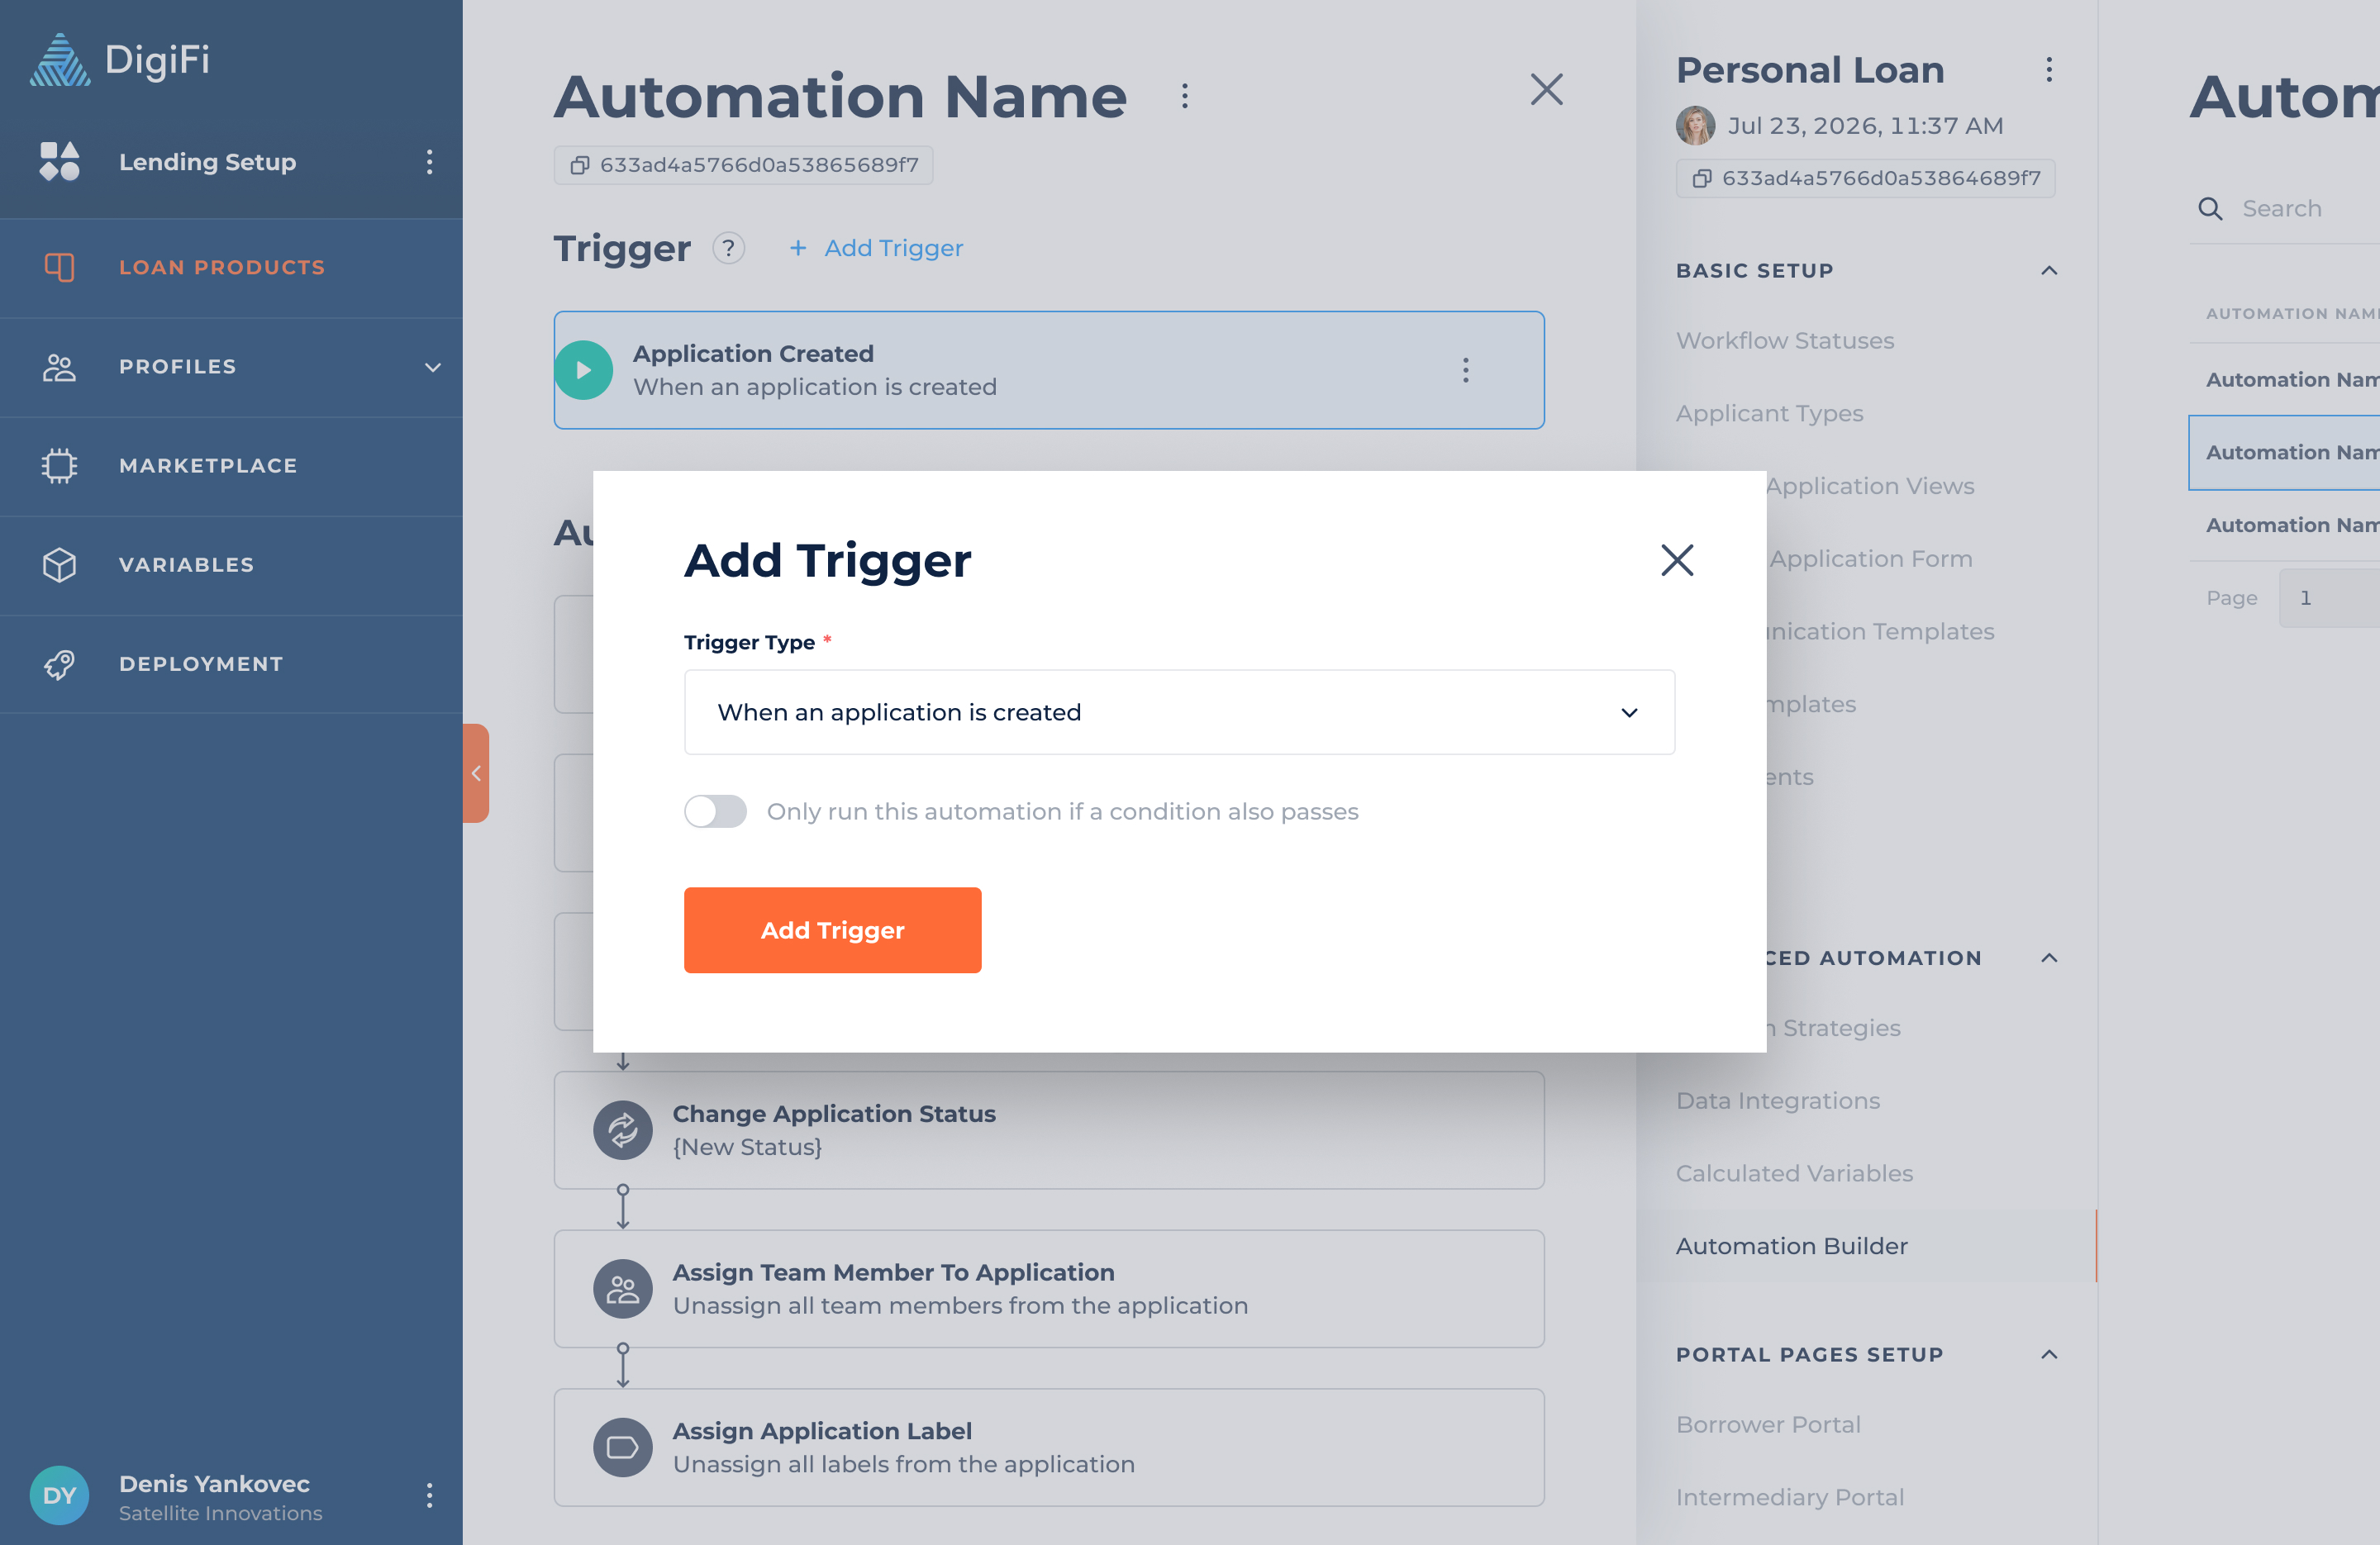
Triggers (Application Creation)
The fifth trigger type is "When an application is created." Automations with this trigger type will run when an application is created on the platform.
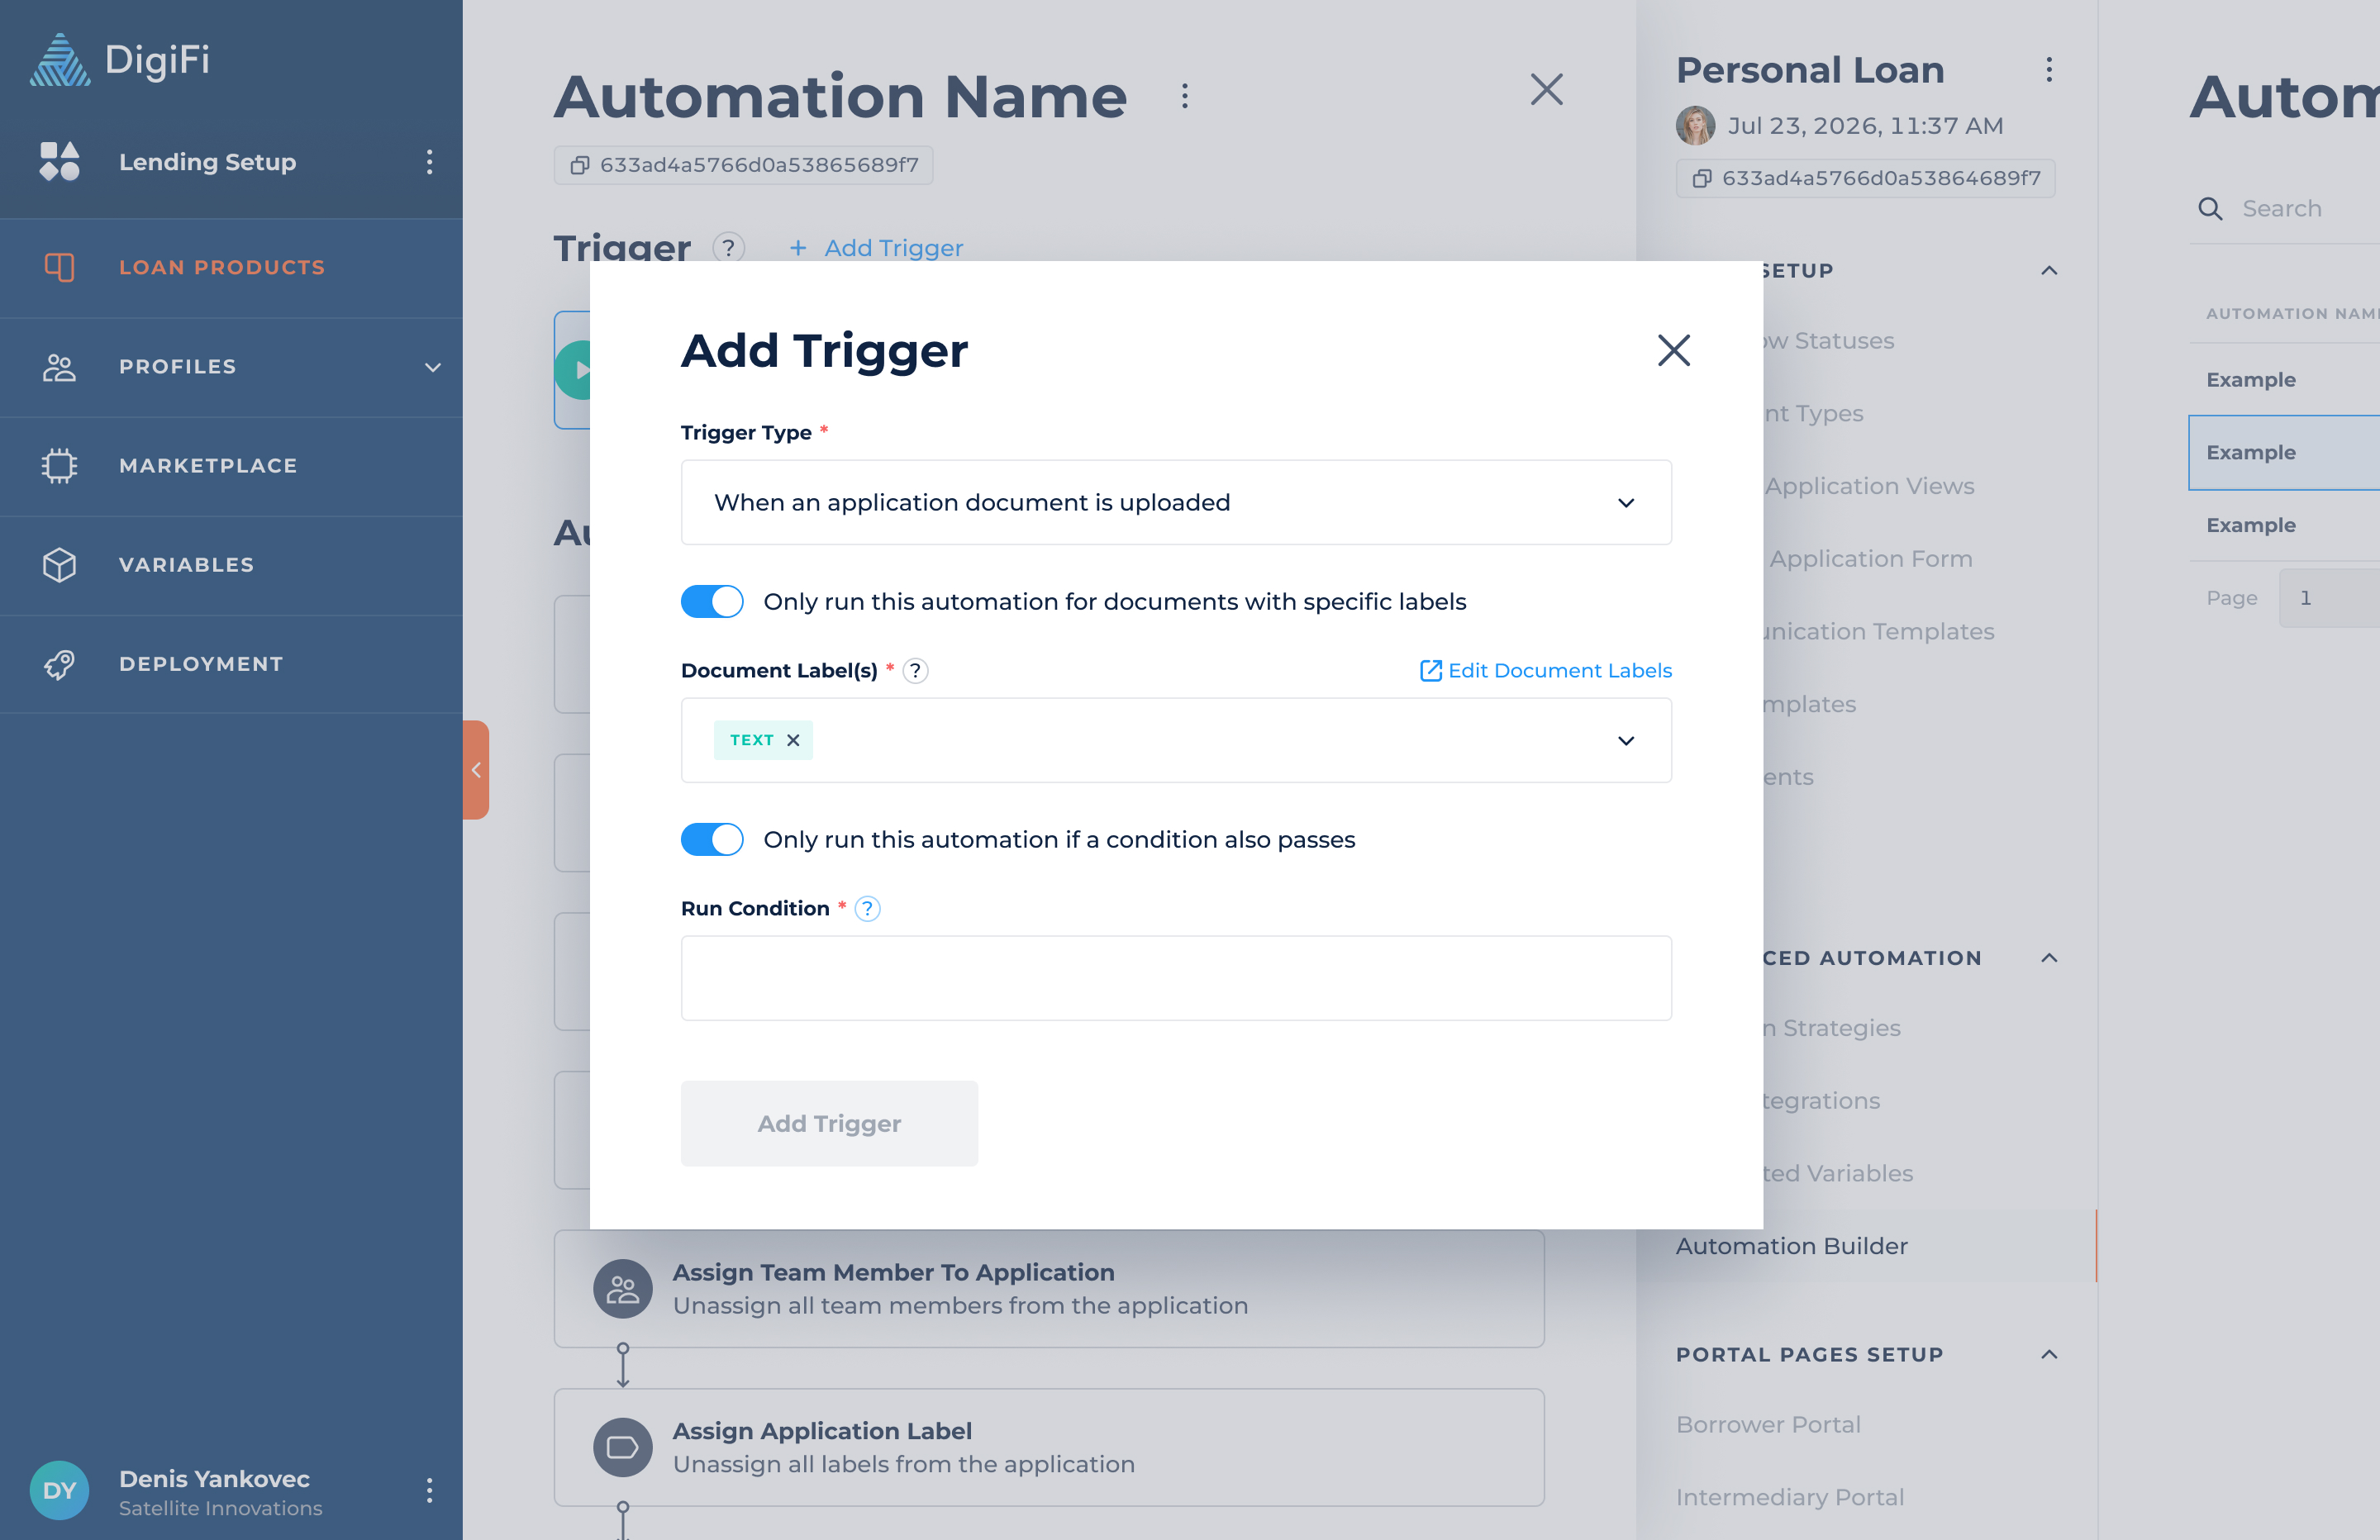
Triggers (Document Upload)
The sixth trigger type is "When an application document is uploaded." Automations with this trigger will run when a document is uploaded to an application.
Additionally, you can activate the "Only run this automation for documents with specific labels" toggle. The automation will then only run when the document has a set of labels assigned.
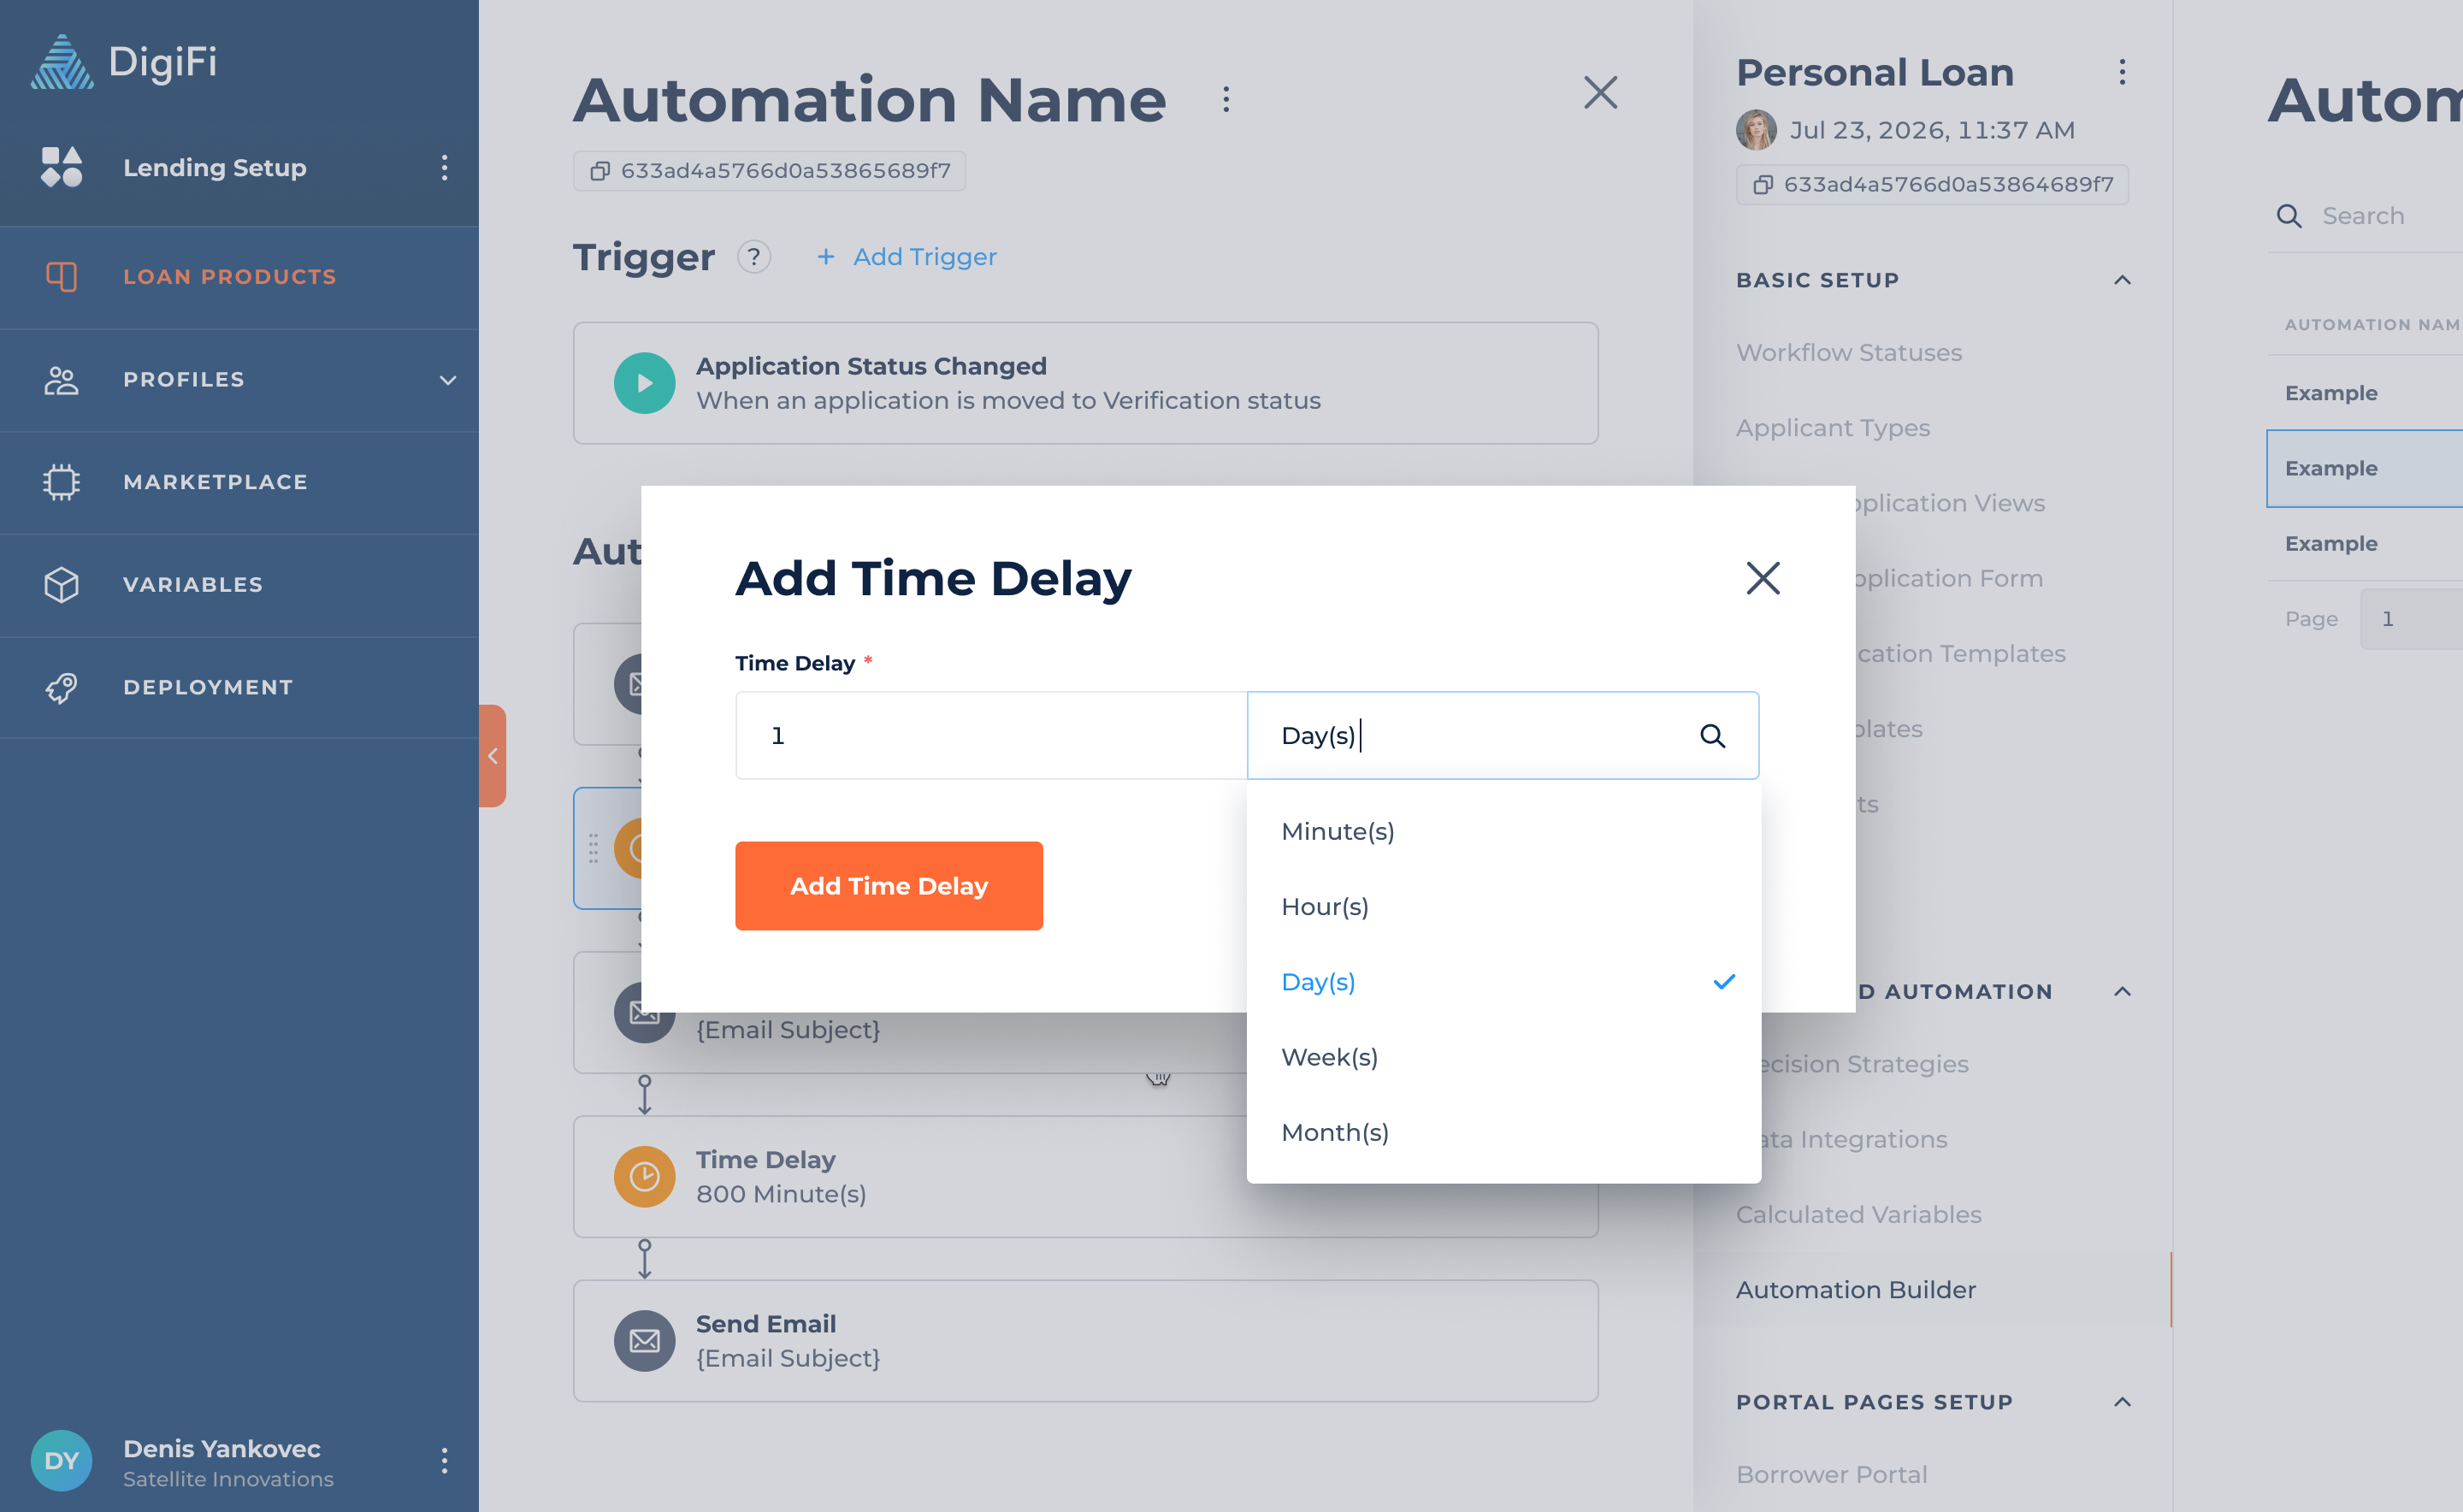
Time Delays (For Actions)
Time delays allow you to schedule specific actions to run automatically after a certain time or at regular intervals. Users can choose the length of the delay in minutes, hours, days, weeks and months.
Time delays should be added before any actions you want to delay.
For ExampleIf an application reaches a certain point in the process and is still stuck without moving forward, you can set up an automation to send reminder emails at regular intervals.
- Trigger: When an application is moved to Review status
- Automation Steps:
- Time Delay: Wait 5 Day(s)
- Action: Send Email (Reminder)
- Time Delay: Wait 5 Day(s)
- Action: Send Email (Reminder)
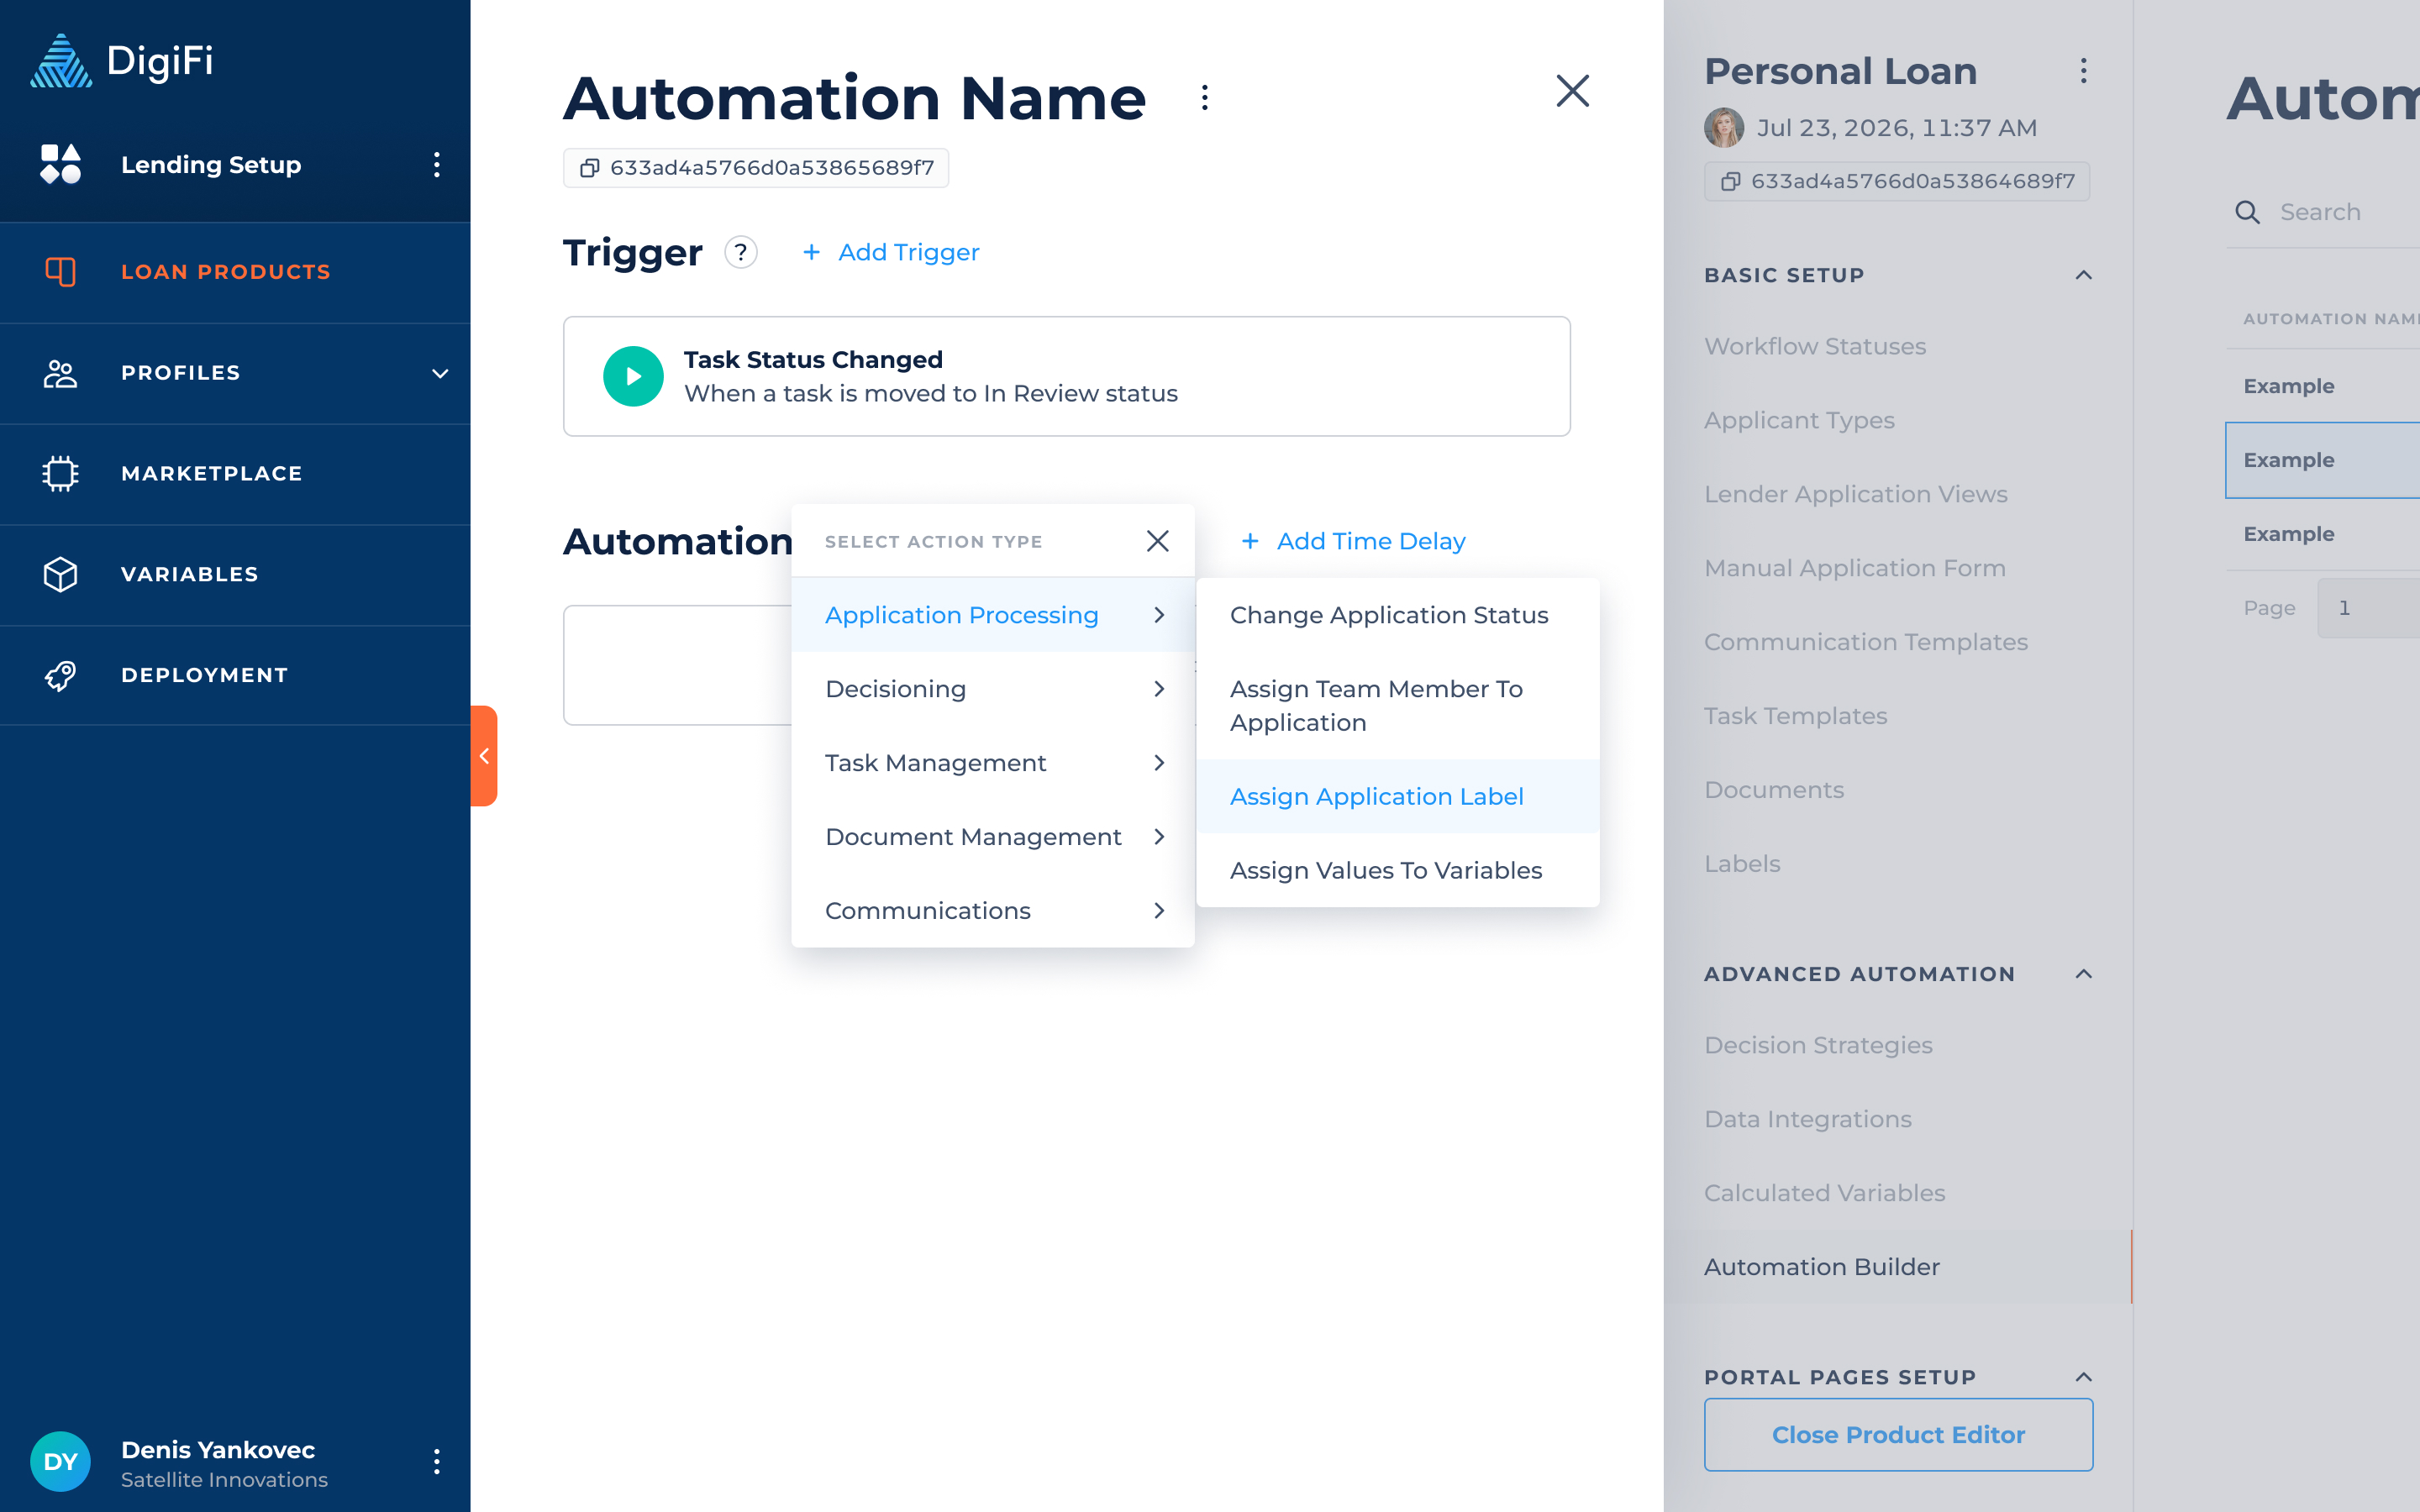
Actions (General)
Actions are automated processes that run when a trigger is activated. They are organized into four sections: Application Processing, Task Management, Document Management, and Communication. Below is a description of each section and action type available in the automation builder.
Application Processing
A set of actions to automate application processing, such as changing the application status, running decisioning, and more.
| Action Type | Description |
|---|---|
| Change Application Status | Lets you automatically move applications to another step in the application process. |
| Assign Team Member to Application | Lets you automatically assign (or unassign) team members to applications. |
| Assign Application Label | Lets you automatically assign (or unassign) labels to applications to categorize them in a simple, visual way. |
| Assign Values To Variables | Lets you assign static values to application variables. |
Decisioning
A set of actions used to automate decision logic execution and data-driven evaluations within workflows.
| Action Type | Description |
|---|---|
| Run Decision | Lets you automatically trigger decision processes. |
| Run Integration | Lets you automatically trigger data Integrations. |
| Champion-Challenger | Lets you automatically trigger Champion-Challenger. |
Task Management
A set of actions to automate task management processes, such as task creation, label assignment, and other task updates.
| Action Type | Description |
|---|---|
| Create Task | Lets you automatically generate reusable application tasks based on configured task templates. |
| Change Task Status | Lets you change the status of an existing task. |
| Assign Task | Lets you update the team member assignment for an existing task. |
| Assign Task Label | Lets you assign or unassign labels on an existing task. |
| Change Task Instructions | Lets you modify the task instructions for an existing task. |
| Change Due Date | Lets you change the due date of an existing task. |
| Run AI Agent | Lets you automatically process a task using the AI Agent. |
Document Management
A set of actions to automate document management processes, such as generating documents, requesting uploads, and more.
| Action Type | Description |
|---|---|
| Assign Document Label | Lets you assign or unassign labels to an existing document. |
| Generate Document | Lets you automatically generate dynamically populated documents . |
| Request Document Upload | Lets you automatically send a document upload request to the borrower, co-borrower, or intermediary. |
| Send Document for E-Signature | Lets you automatically send documents for e-signature using the Docusign or PandaDocintegrations. |
Communications
A set of actions to automate communication processes, such as sending emails to borrowers and intermediaries.
| Action Type | Description |
|---|---|
| Send Email | Lets you automatically send emails to team members, borrowers, co-borrowers, or intermediaries using reusable communication templates. Emails will be sent using your SendGrid integration and Company Branding, both of which must be set up to use this feature. |
| Send Text Message | Lets you automatically send text messages to borrowers, co-borrowers, or intermediaries using reusable communication templates. Messages are sent via Twilio integration and tracked in the application and displayed in the Communications section. |
| Send Invitation to Borrower Portal | Lets you automatically send invitations to the borrower portal to the borrower associated with the application. |
Each automation can contain one or more actions, enabling you to combine multiple actions within an automation flow to enable synchronous, multi-step processing. If you have added multiple actions, you can drag and drop them to change the order of execution.
For each of the action types you can also add a logical condition, and the action will only run if that condition passes. Conditions are created using DigiFi's Formula Language and must return TRUE (boolean) or "true" (string) to pass. This advanced feature provides the powerful ability to only run certain actions under very specific circumstances.
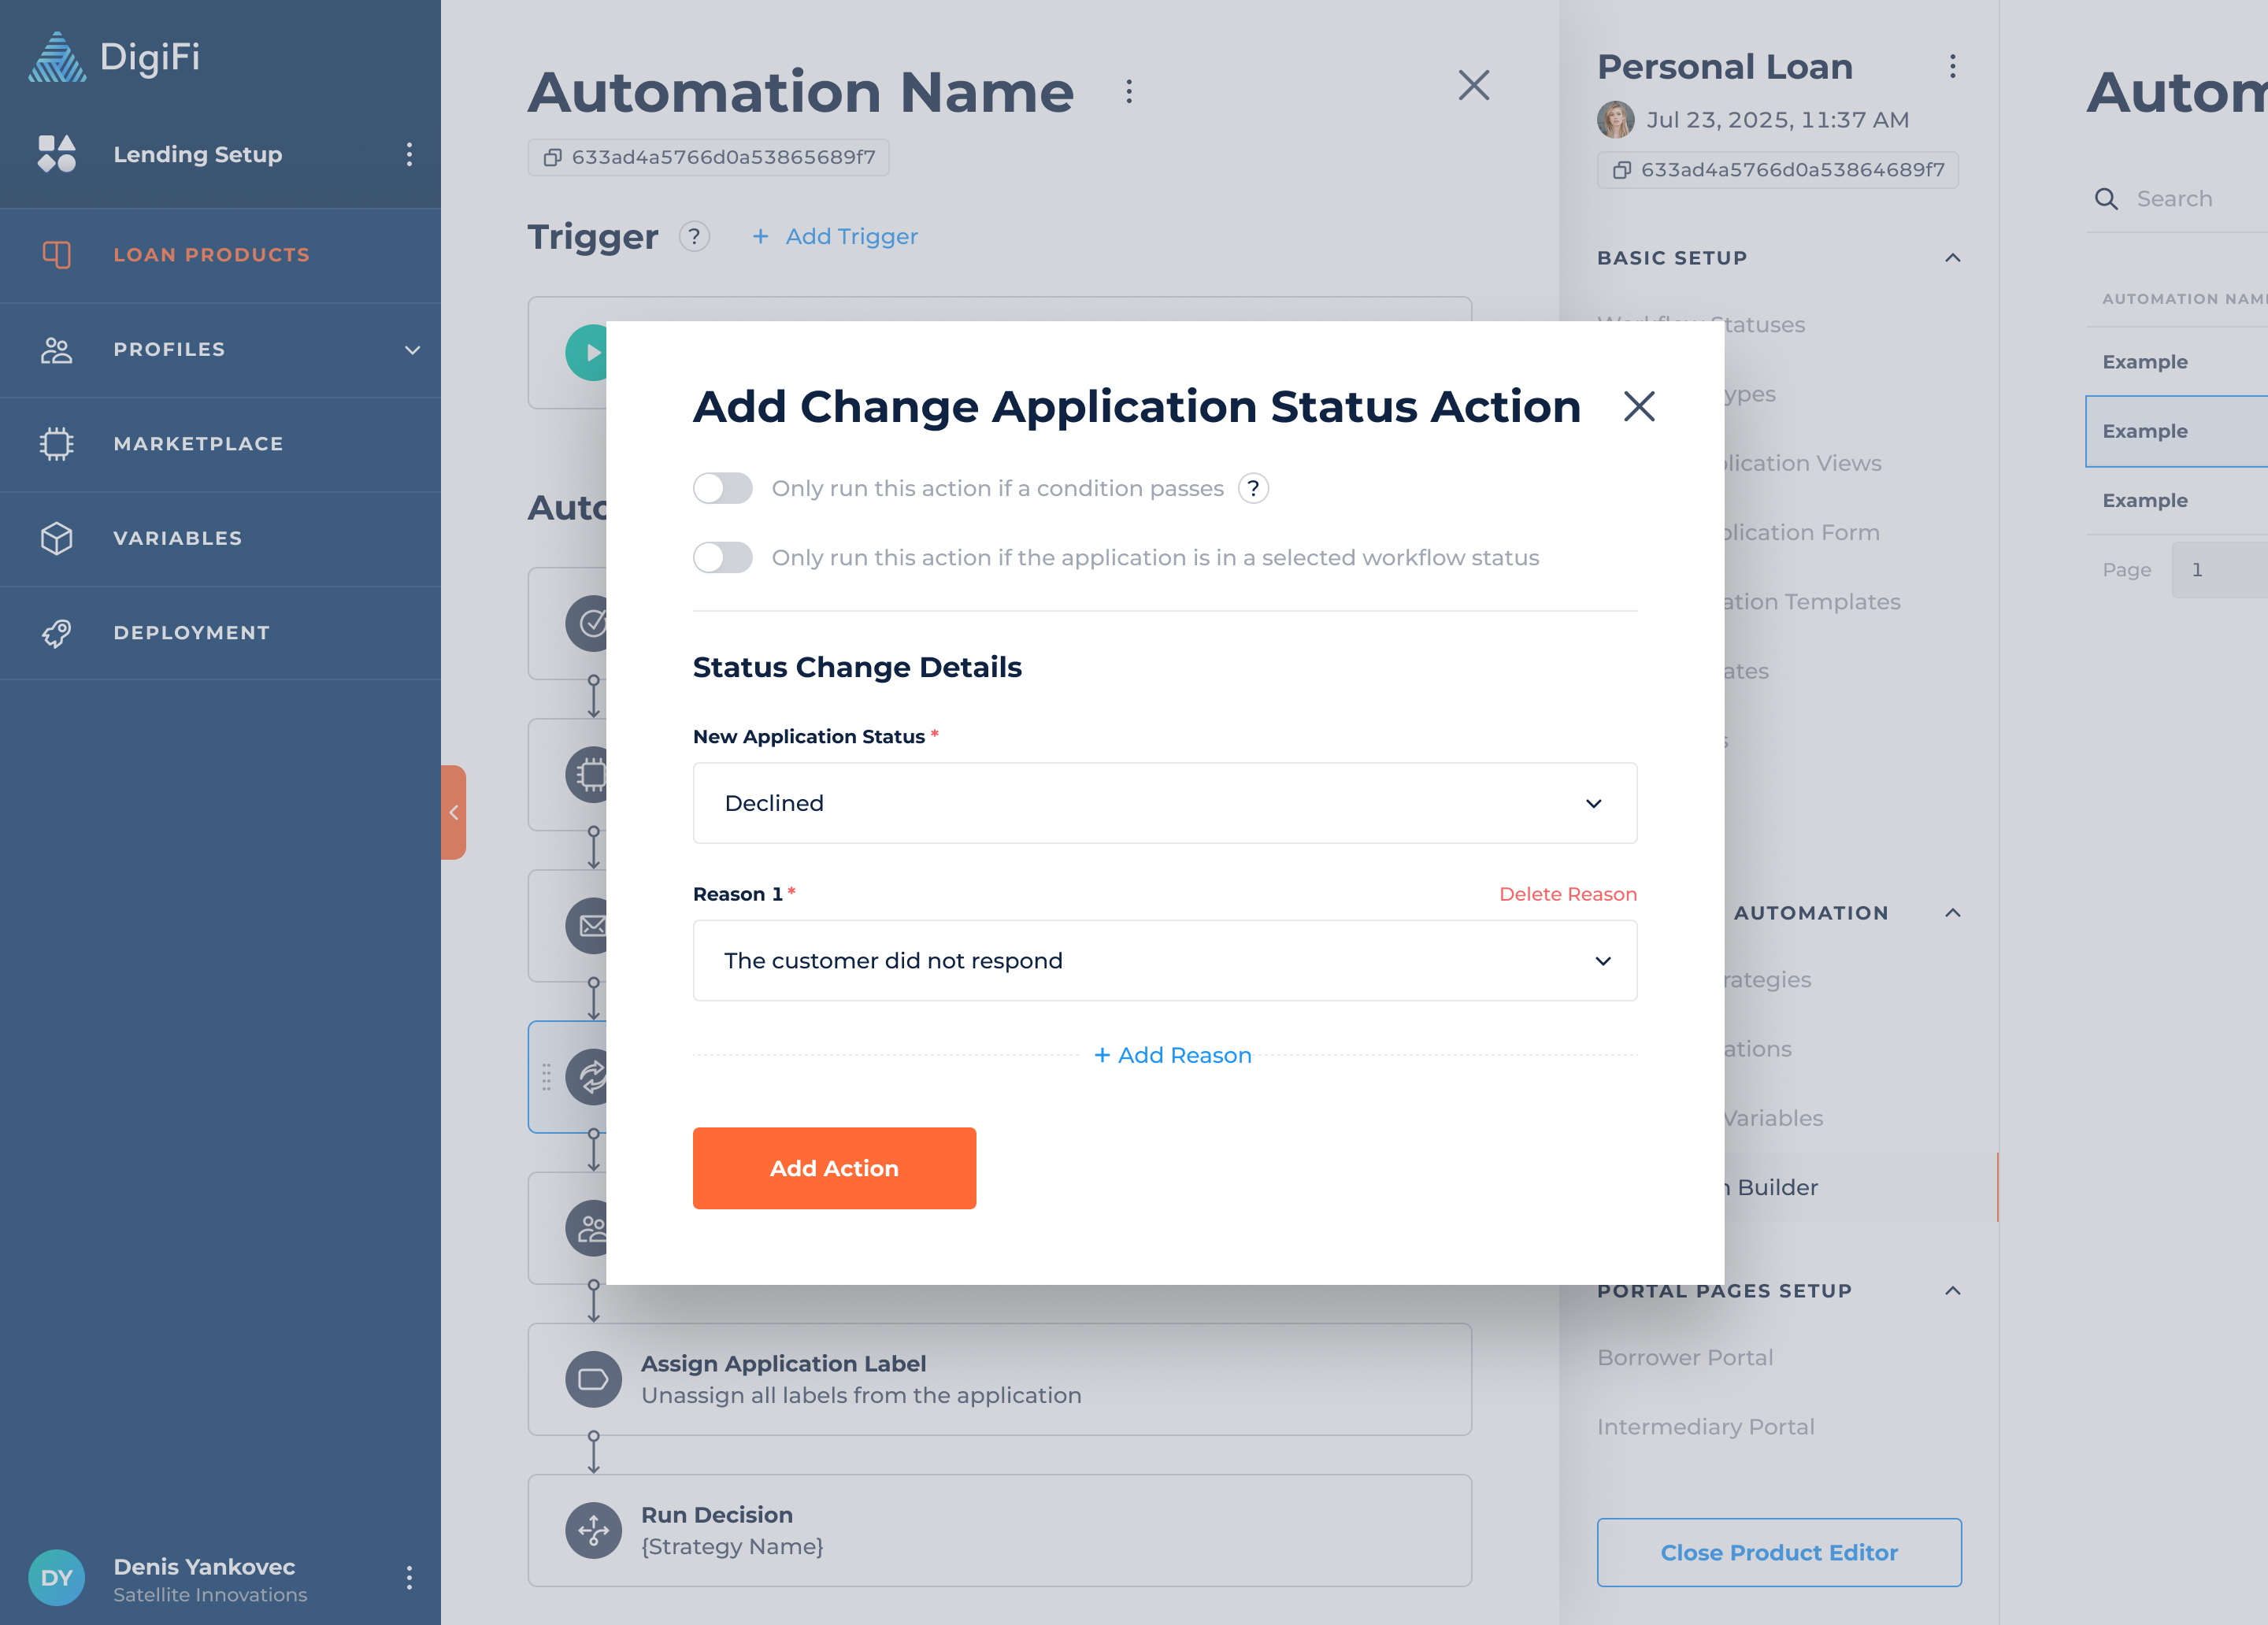
Actions (Change Status)
The "Change Application Status" action type lets you automatically move an application to another step of the application workflow.
When you add a “Change Application Status” action, you'll be asked to provide the following information:
- Only change application status if a condition passes, which lets you add conditionality to the status change automation (in addition to the workflow status trigger). Conditions are created using DigiFi's formula language and must return TRUE (boolean) or "true" (string) to pass.
- Only run this action if the application is in a selected workflow status, which lets you execute actions based on the application's current workflow status.
- New Application Status, which is the status the applications will be moved to.
Decline reasons can be set in the "Status change" action.You can state the decline reasons automatically by selecting the final rejection application status.
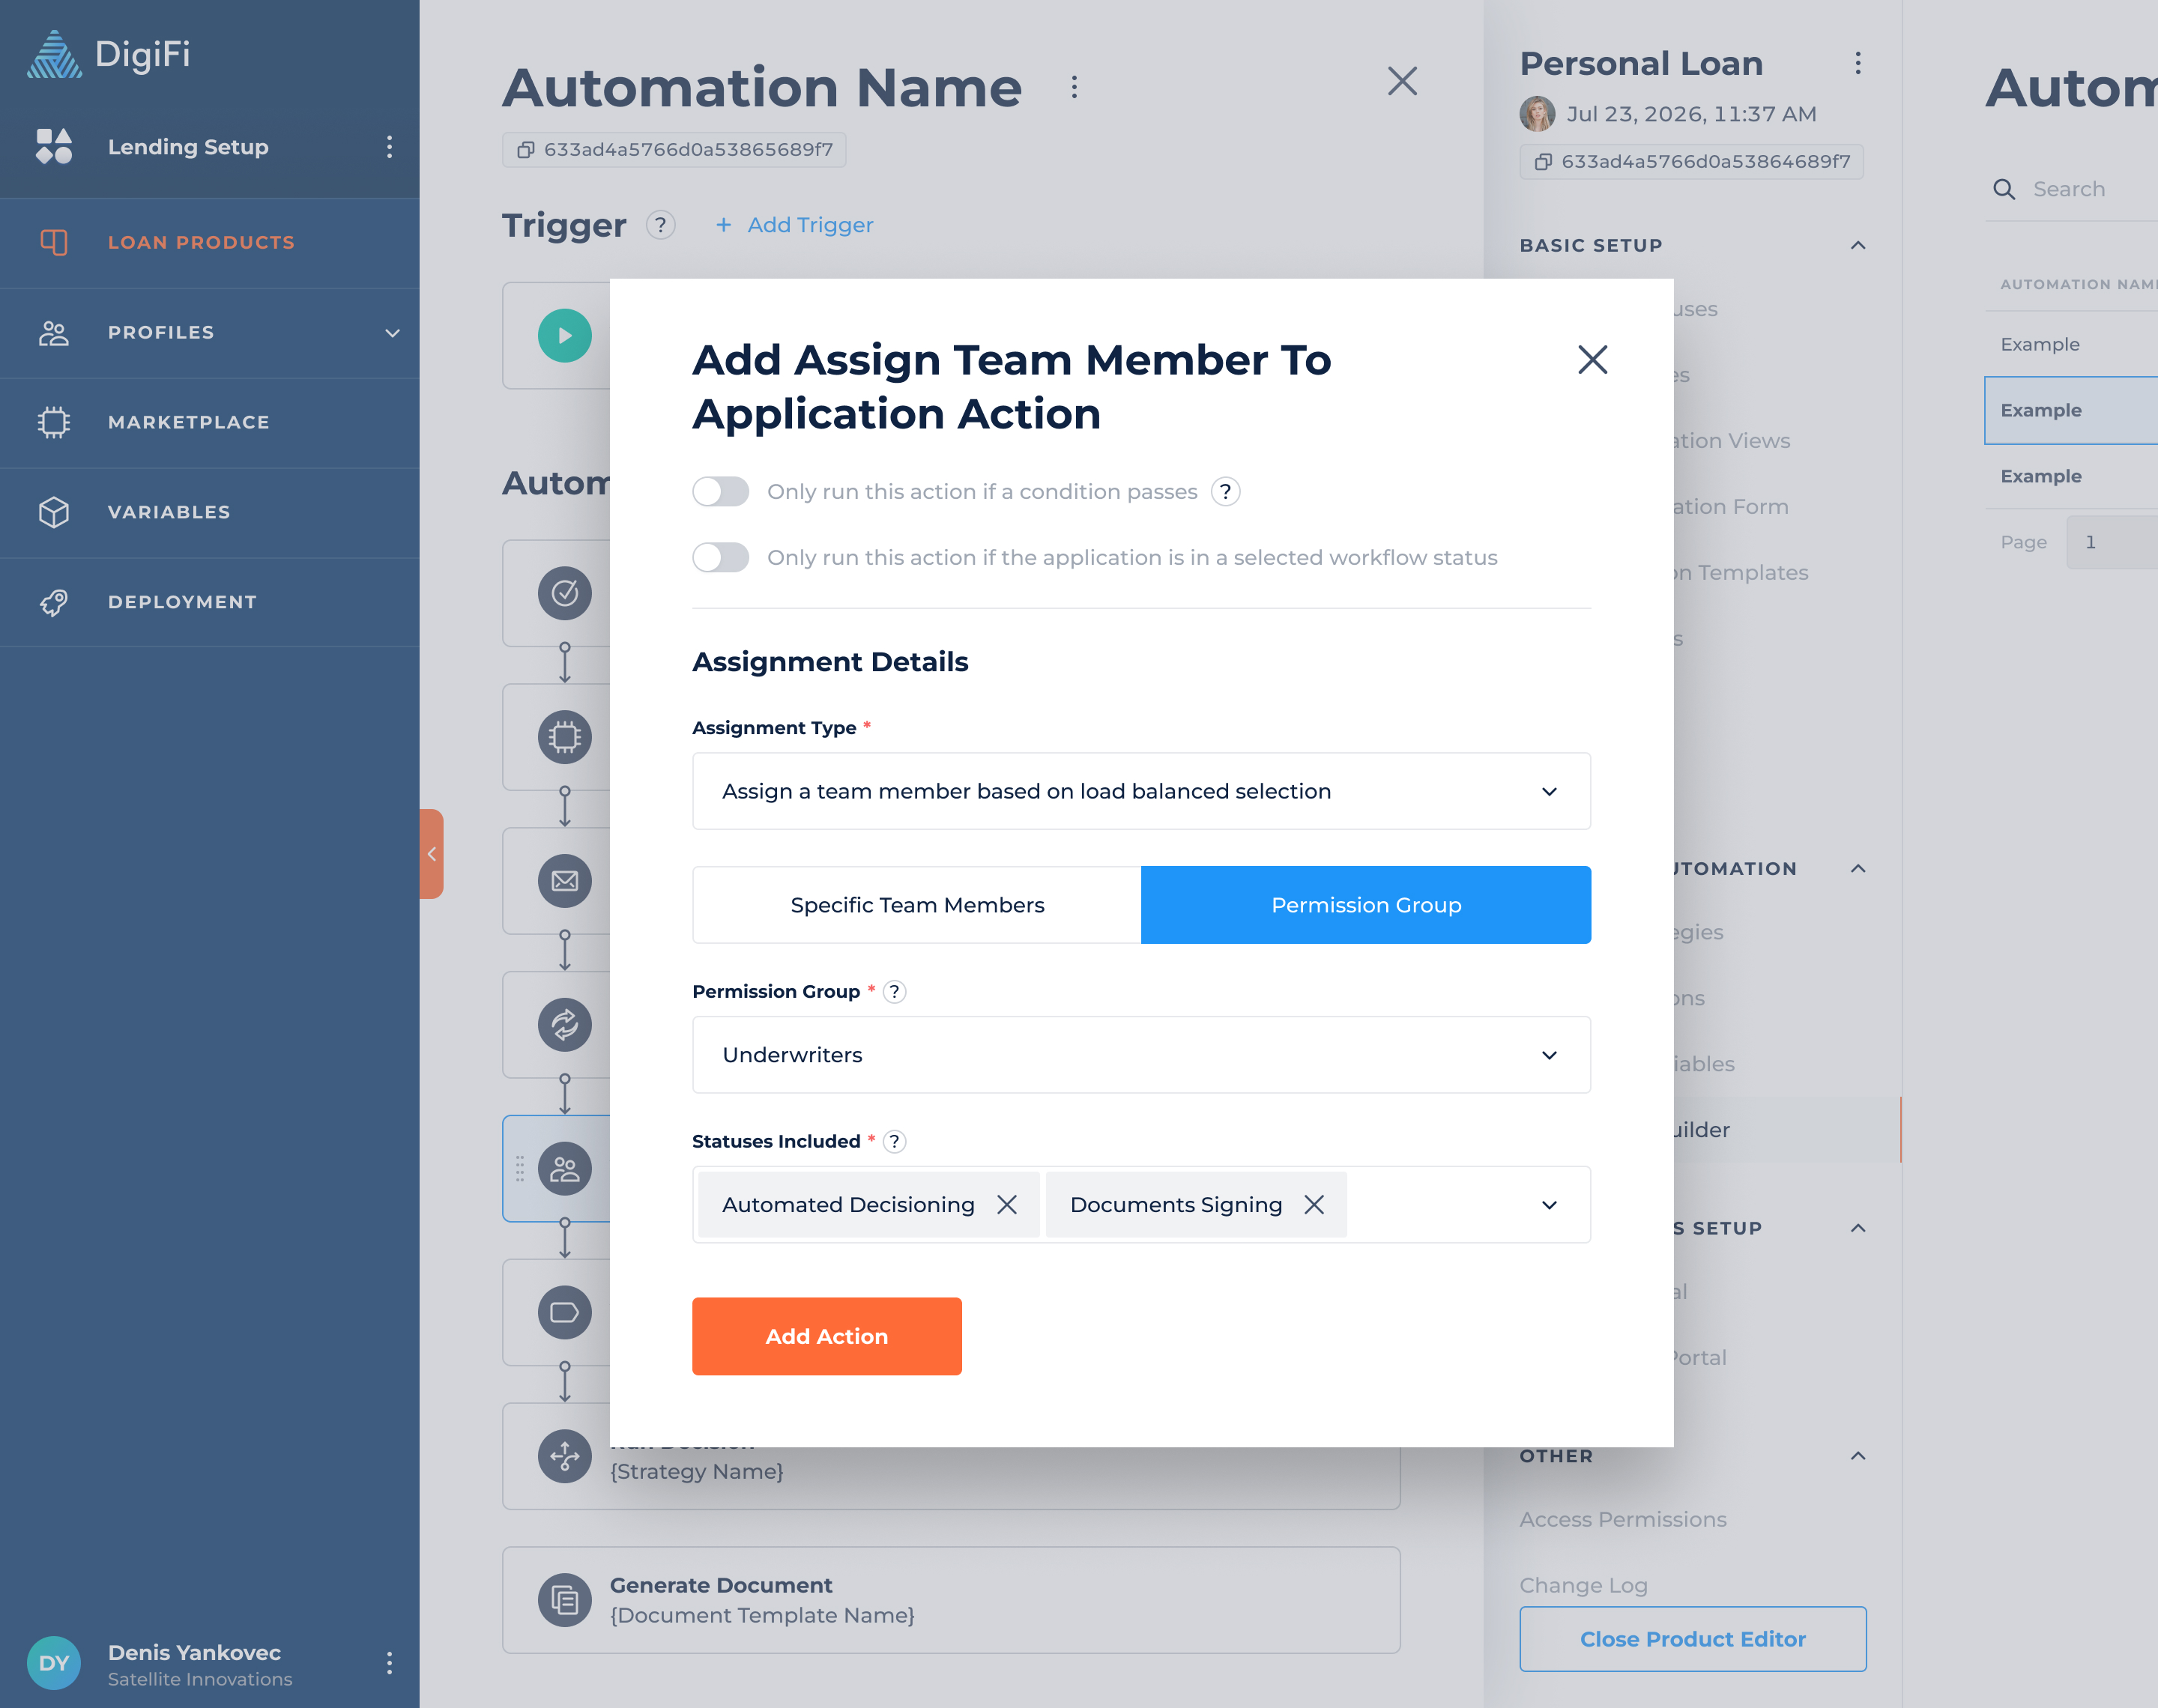
Actions (Assign Team Member)
Assigning team member(s) to applications lets them know what to work on next. The DigiFi platform provides the ability to automate the assignment (or un-assignment) of team members to applications.
When you add an “Assign Team Member to Application” action, you'll be asked to provide the following information:
- Only re-assign team members if a condition passes, which lets you add conditionality to the action. Conditions are created using DigiFi's formula language and must return TRUE (boolean) or "true" (string) to pass.
- Only run this action if the application is in a selected workflow status, which lets you execute actions based on the application's current workflow status.
- Assignment Type, which offers six options for automatically assigning or unassigning team members to applications.
- Assign a team member based on load balanced selection will assign team members with fewer assigned applications in the selected statuses. You have the option to assign either specific team members or a permission group, and select which statuses will be included in the load-balanced selection.
- Assign a team member based on round-robin selection will assign an equal number of created applications to the team members you select (using a round-robin process).
- Assign specific team members will assign the same team member(s) to applications.
- Assign all members from a permission group will assign all team member(s) from a permission group to applications.
- Assign the team member who created the application will assign the team member that completed the application form.
- Unassign all the team members from the application will unassign all team members from the application.
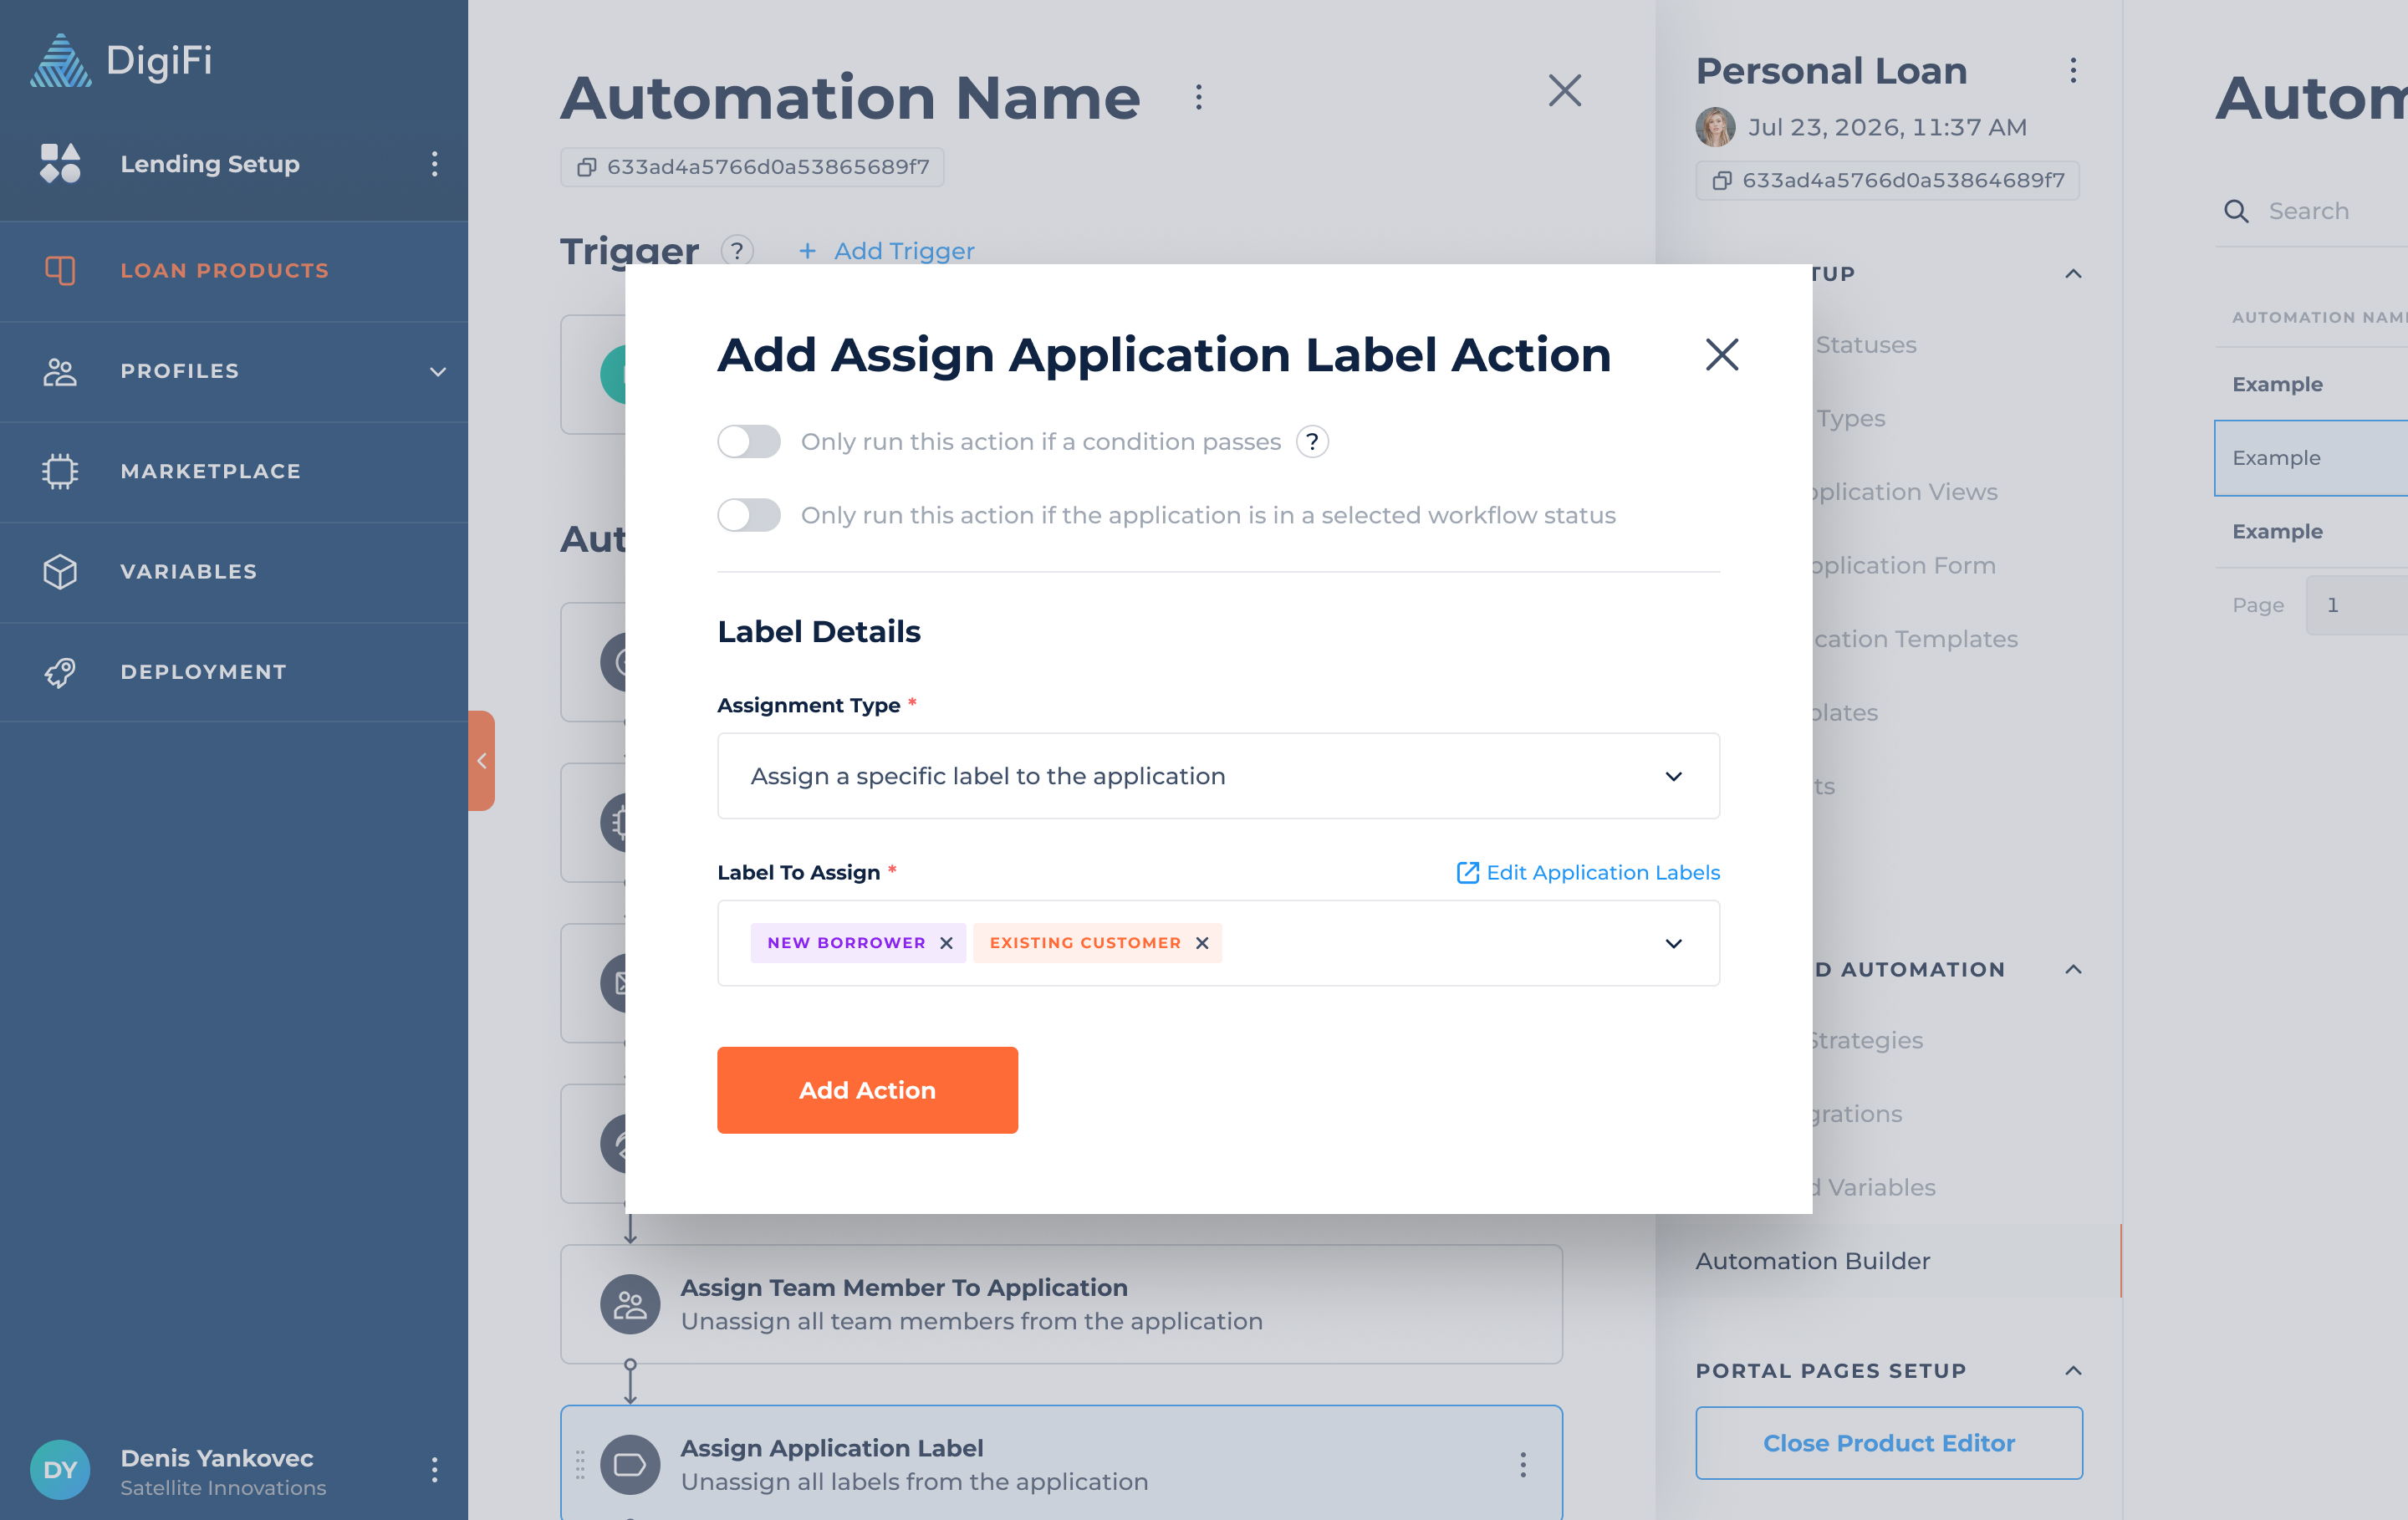
Actions (Assign Application Label)
The "Assign Application Label" action type lets you automatically trigger label assignments that can be added to applications to categorize them in a simple, visual way. Labels appear as small color elements on the applications board and larger colored text elements on the application detail view.
When you add an “Assign Application Label” action, you'll be asked to provide the following information:
- Only assign labels if a condition passes, which lets you add additional conditionality to the action. Conditions are created using DigiFi's formula language and must return TRUE (boolean) or "true" (string) to pass.
- Only run this action if the application is in a selected workflow status, which lets you execute actions based on the application's current workflow status.
- Assignment Type, specifies how labels should be assigned or removed from the application. The available options are:
- Assign a specific label to the application, adds the selected label to the application without changing any existing labels.
- Unassign a specific label from the application, removes only the selected label, leaving others unchanged.
- Unassign all and assign new labels to the application, removes all existing labels and replaces them with the selected label(s).
- Unassign all labels from the application, removes all labels from the application.
- Labels To Assign, which lets you select specific labels to assign if you selected an option with assignment.
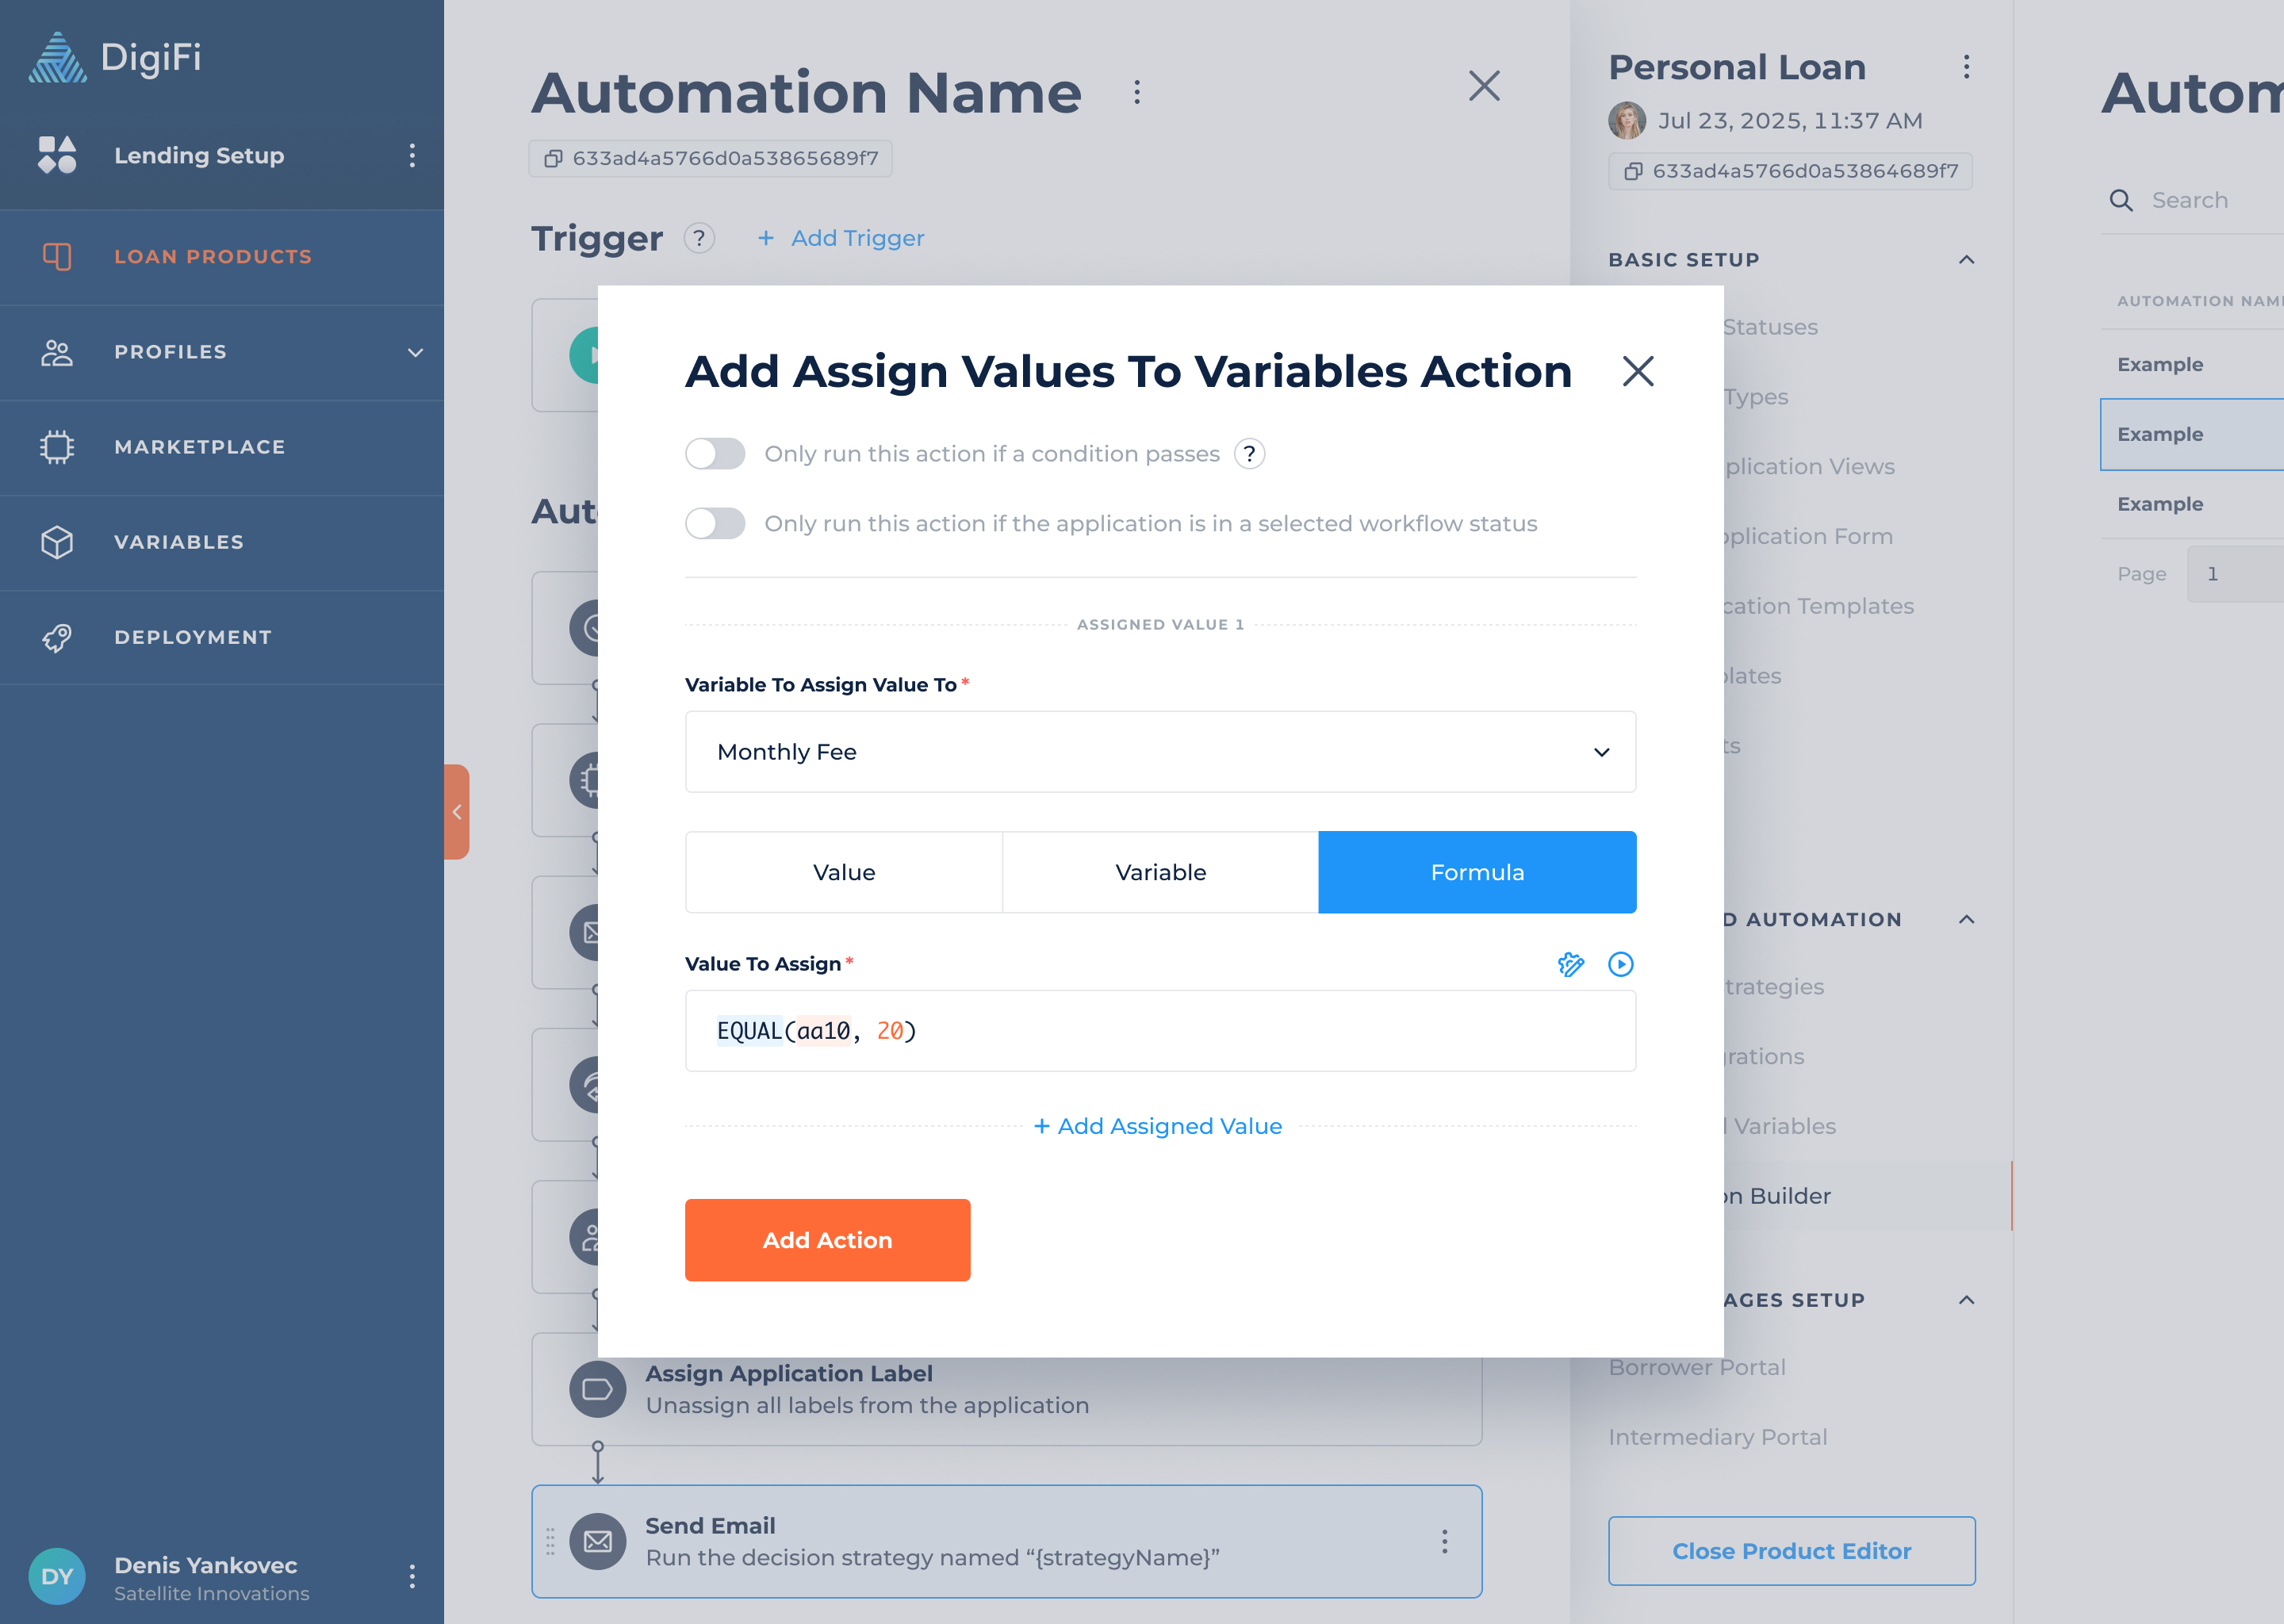
Actions (Assign Values)
The “Assign Values” action lets you assign static values to application variables.
When you add an “Assign Values” action, you’ll be asked to provide the following information:
- Only assign values if a condition passes, which lets you add conditionality to the assign values automation (in addition to the workflow status trigger). Conditions are created using DigiFi's formula language and must return TRUE (boolean) or "true" (string) to pass.
- Only run this action if the application is in a selected workflow status, which lets you execute actions based on the application's current workflow status.
- Variable To Assign Value To, lets you select a variable you’d like to assign a static value to.
- Value To Assign, lets you assign value, variable or formula results.
You can assign values to multiple variables per action.
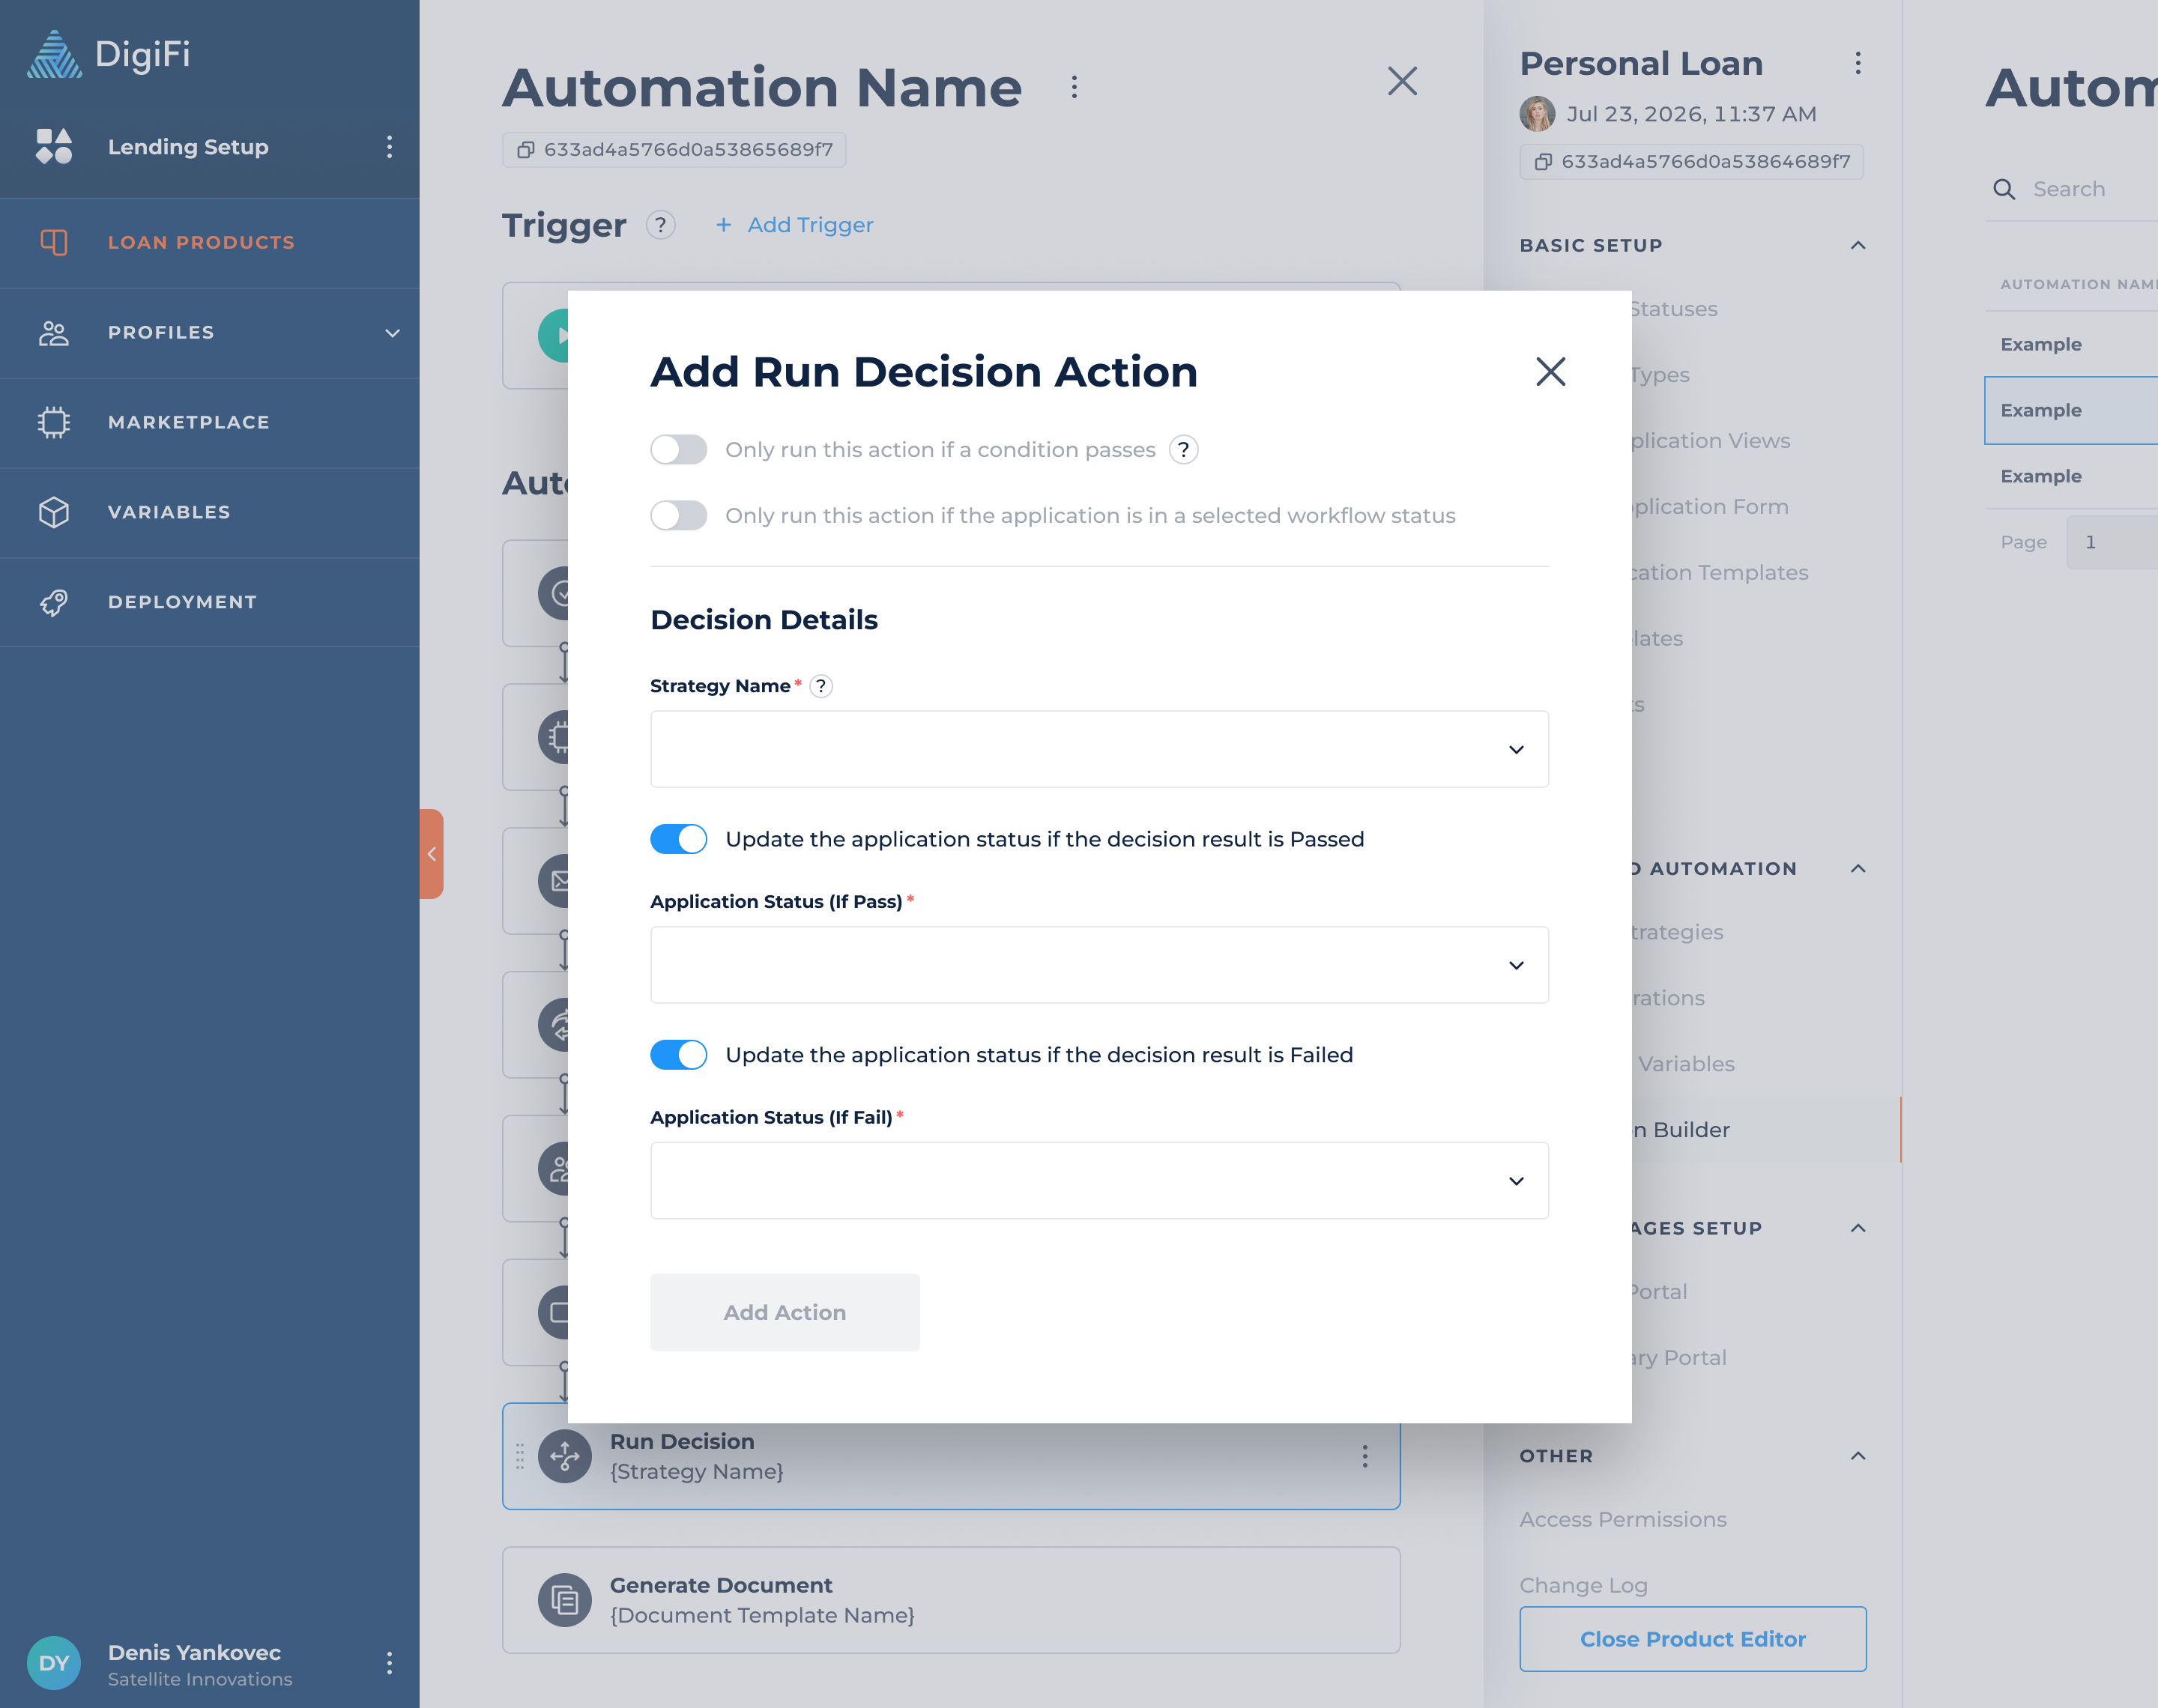
Actions (Run Decision)
The "Run Decision" action type lets you automatically run Decision Strategies. This functionality is recommended for lenders that want to automatically run underwriting strategies, verification logic or other decisions as applications progress through workflow statuses or have data updates.
For ExampleWhen a new application is created you may want to automatically perform automated underwriting. Once your decision strategy is set up with the appropriate logic, the decision process can be automated using this feature.
When you add a “Run Decision” action, you'll be asked to provide the following information:
- Only run this decision strategy if a condition passes, which lets you add conditionality to the automation (in addition to the workflow status trigger). Conditions are created using DigiFi's formula language and must return TRUE (boolean) or "true" (string) to pass.
- Only run this action if the application is in a selected workflow status, which lets you execute actions based on the application's current workflow status.
- Strategy Name, which is the decision strategy that will run.
- Update the application status if the decision result is Passed, which is an optional toggle that lets you select a workflow status to move the application to if the decision passes.
- Update the application status if the decision result is Failed, which is an optional toggle that lets you select a workflow status to move the application to if the decision fails. If you select the "Rejected" status, you can also add decline reasons, which will be automatically applied to the application.
Outputs of Run Decision actions are saved to the application and can be used for the next automation action.
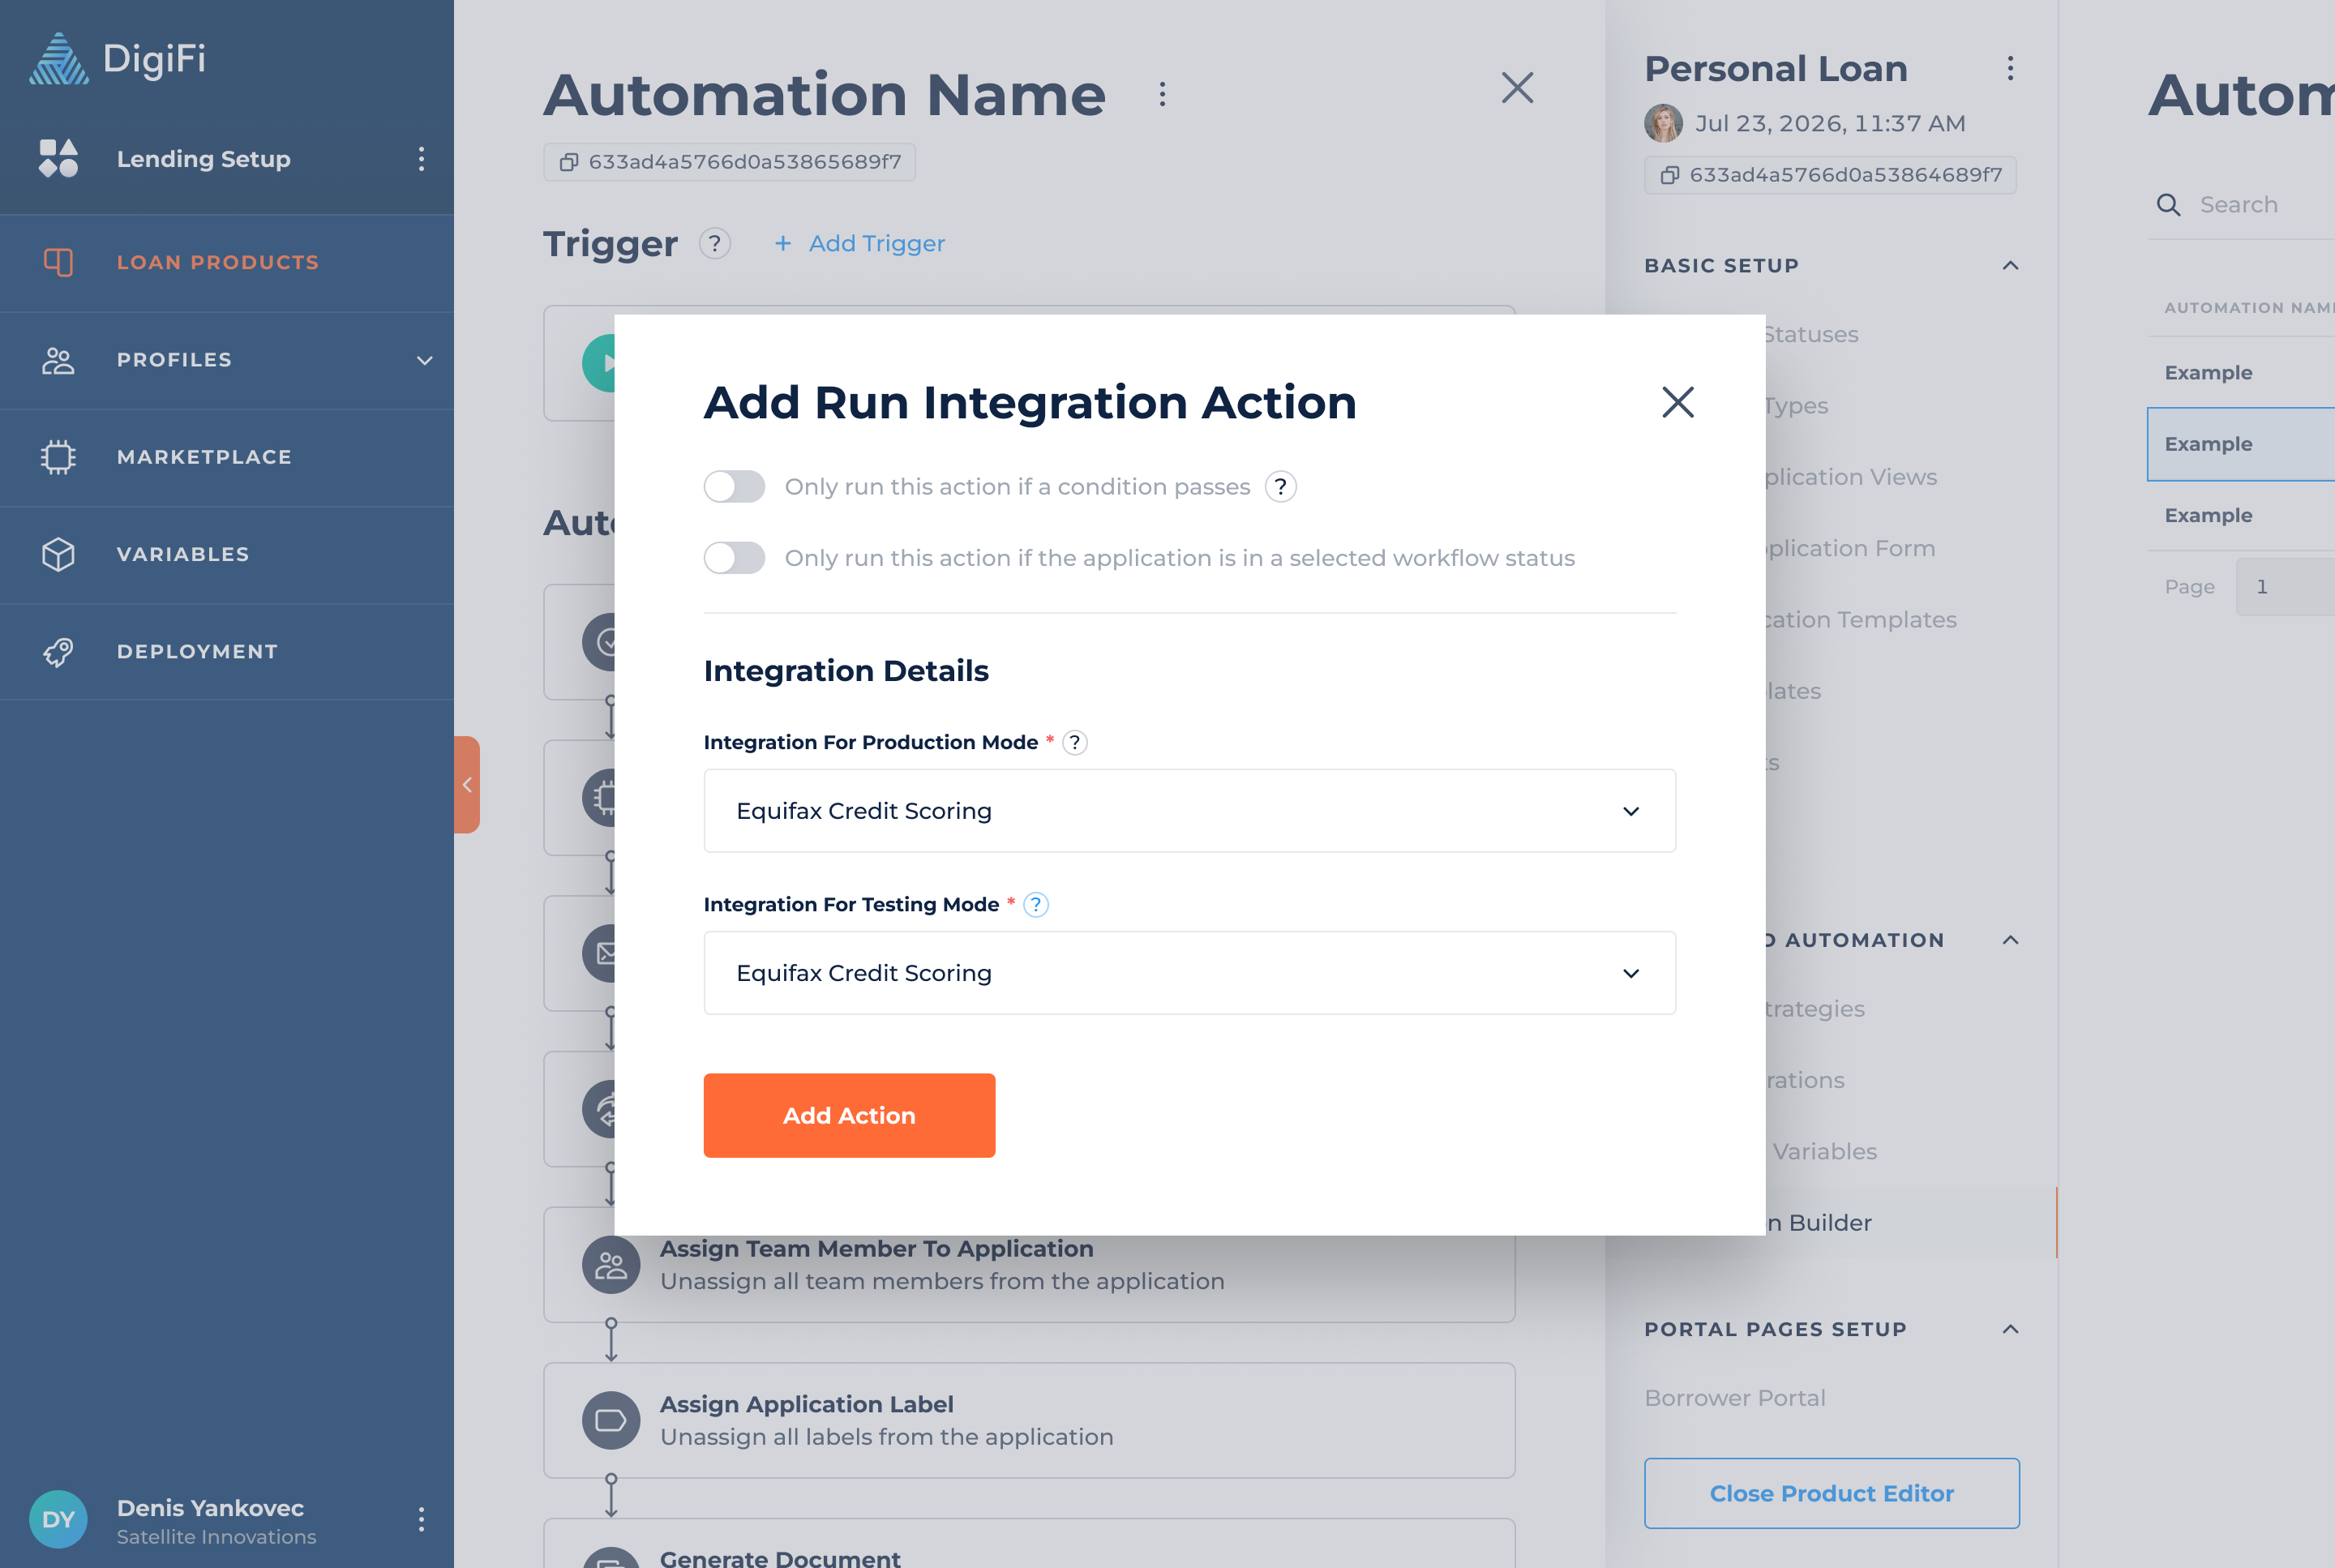
Actions (Run Integration)
The "Run Integration" action type lets you automatically run Data Integrations. This functionality is recommended for lenders that want to automatically run integrations as applications progress through workflow statuses or have data updates.
For ExampleWhen a new application is created you may want to automatically retrieve the applicant's credit file. Once your data integration is set up with the appropriate logic, the integration can be automated using this feature.
When you add a “Run Integration” action, you'll be asked to provide the following information:
- Only run this integration if a condition passes, which lets you add conditionality to the automation (in addition to the workflow status trigger). Conditions are created using DigiFi's formula language and must return TRUE (boolean) or "true" (string) to pass.
- Only run this action if the application is in a selected workflow status, which lets you execute actions based on the application's current workflow status.
- Integration Name, which is the integration that will run.
Actions (Champion-Challenger)
The "Champion-Challenger" action type lets you automatically run and compare multiple decision strategies as part of an automation workflow. This functionality is recommended for lenders who want to evaluate alternative decision logic using real application data before fully rolling changes into production.
Champion-Challenger can be used to test new underwriting rules, verification logic, or pricing strategies while applications move through workflow statuses or when application data is updated. For more information on setting up and using the Champion-Challenger action, watch the following video.
For ExampleWhen a new application is created, you may want to compare a new underwriting strategy against the current live strategy. Using Champion-Challenger, you can either split traffic between strategies (A/B Testing) or run new strategies silently in parallel (Shadow Testing) to measure performance without impacting live decisions.
When you add a "Champion-Challenger" action, you’ll be asked to provide the following information:
- Only run this integration if a condition passes, which lets you add conditionality to the automation (in addition to the workflow status trigger). Conditions are created using DigiFi's formula language and must return TRUE (boolean) or "true" (string) to pass.
- Only run this action if the application is in a selected workflow status, which lets you execute actions based on the application's current workflow status.
Testing Mode
Choose how strategies are evaluated:
- A/B Testing: Distributes applications across multiple strategies based on assigned traffic percentages.
- Percentage distribution must total 100%, with an option to distribute equally.
- Supports up to 5 strategies in a single test.
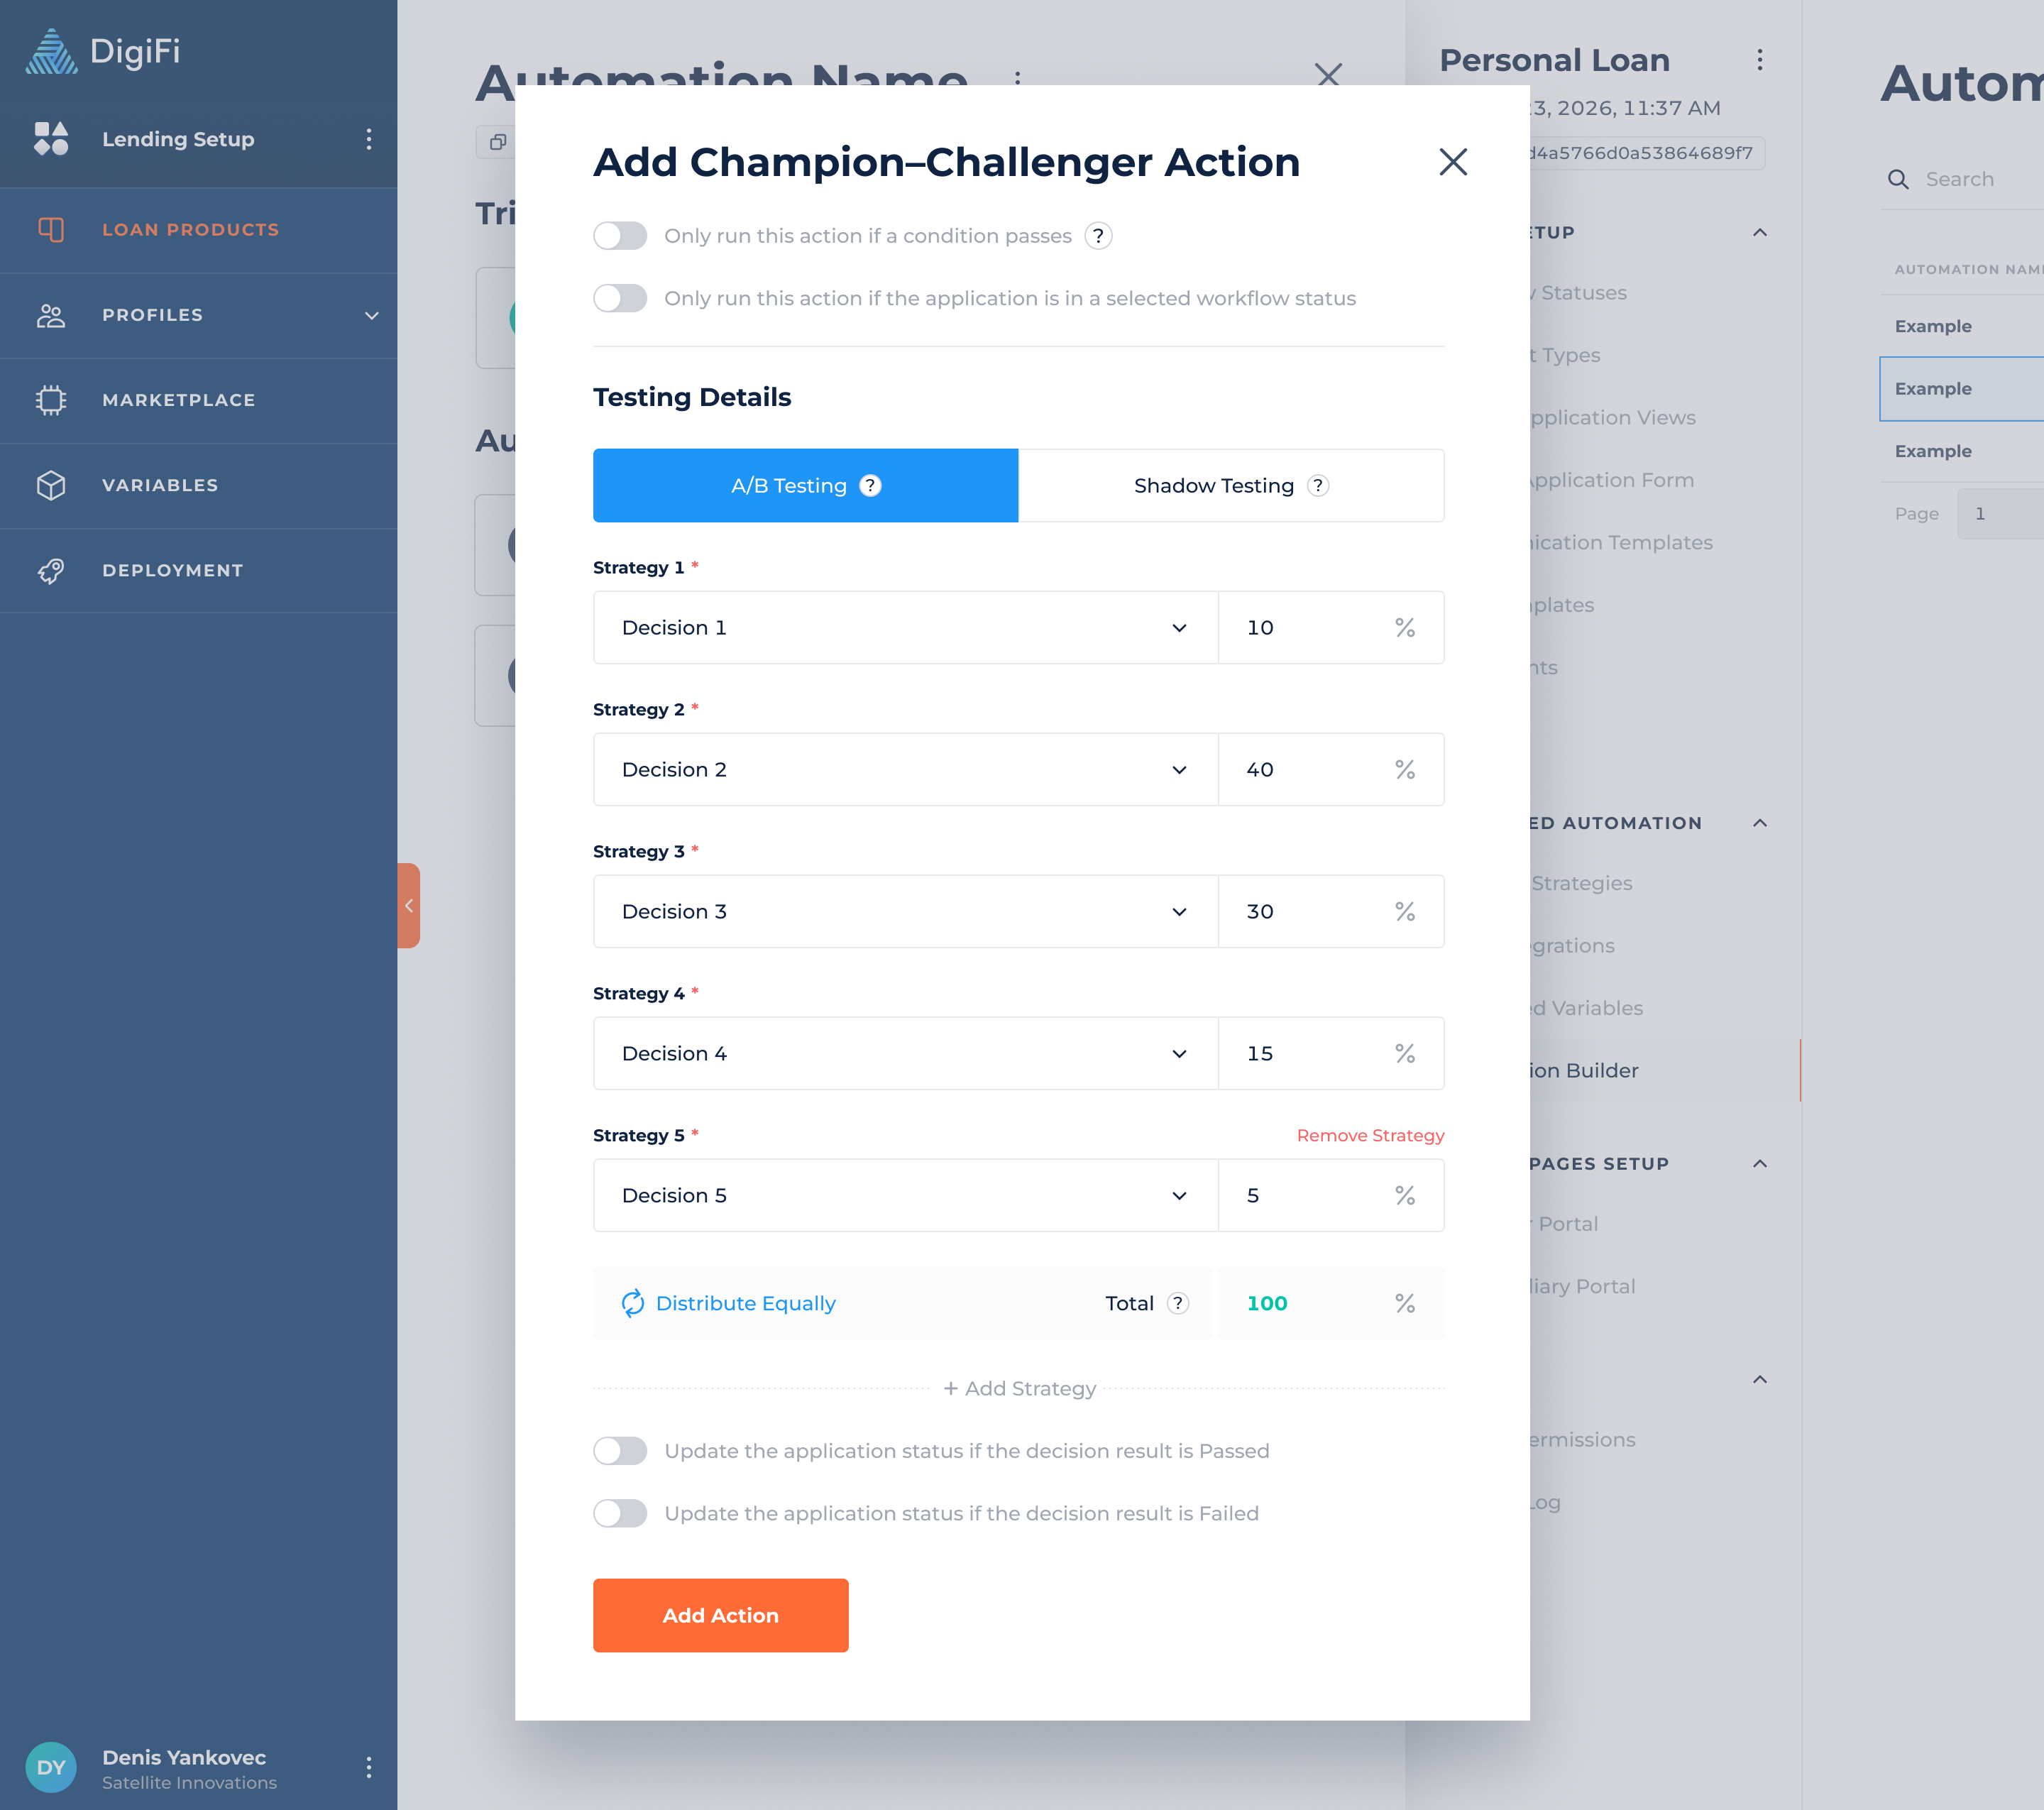
- Shadow Testing: Runs challenger strategies in parallel with the champion strategy without affecting live decisions.
- Executes the Champion strategy as the live decision.
- Runs up to 5 Challenger strategies in parallel (“shadow mode”).
- Challenger results are recorded for analysis but do not update application data.
In the application history and application data output, only one strategy result is recorded. Challenger strategies do not impact the application’s data or decision outcome. You can review and compare challenger strategy results directly within the application.
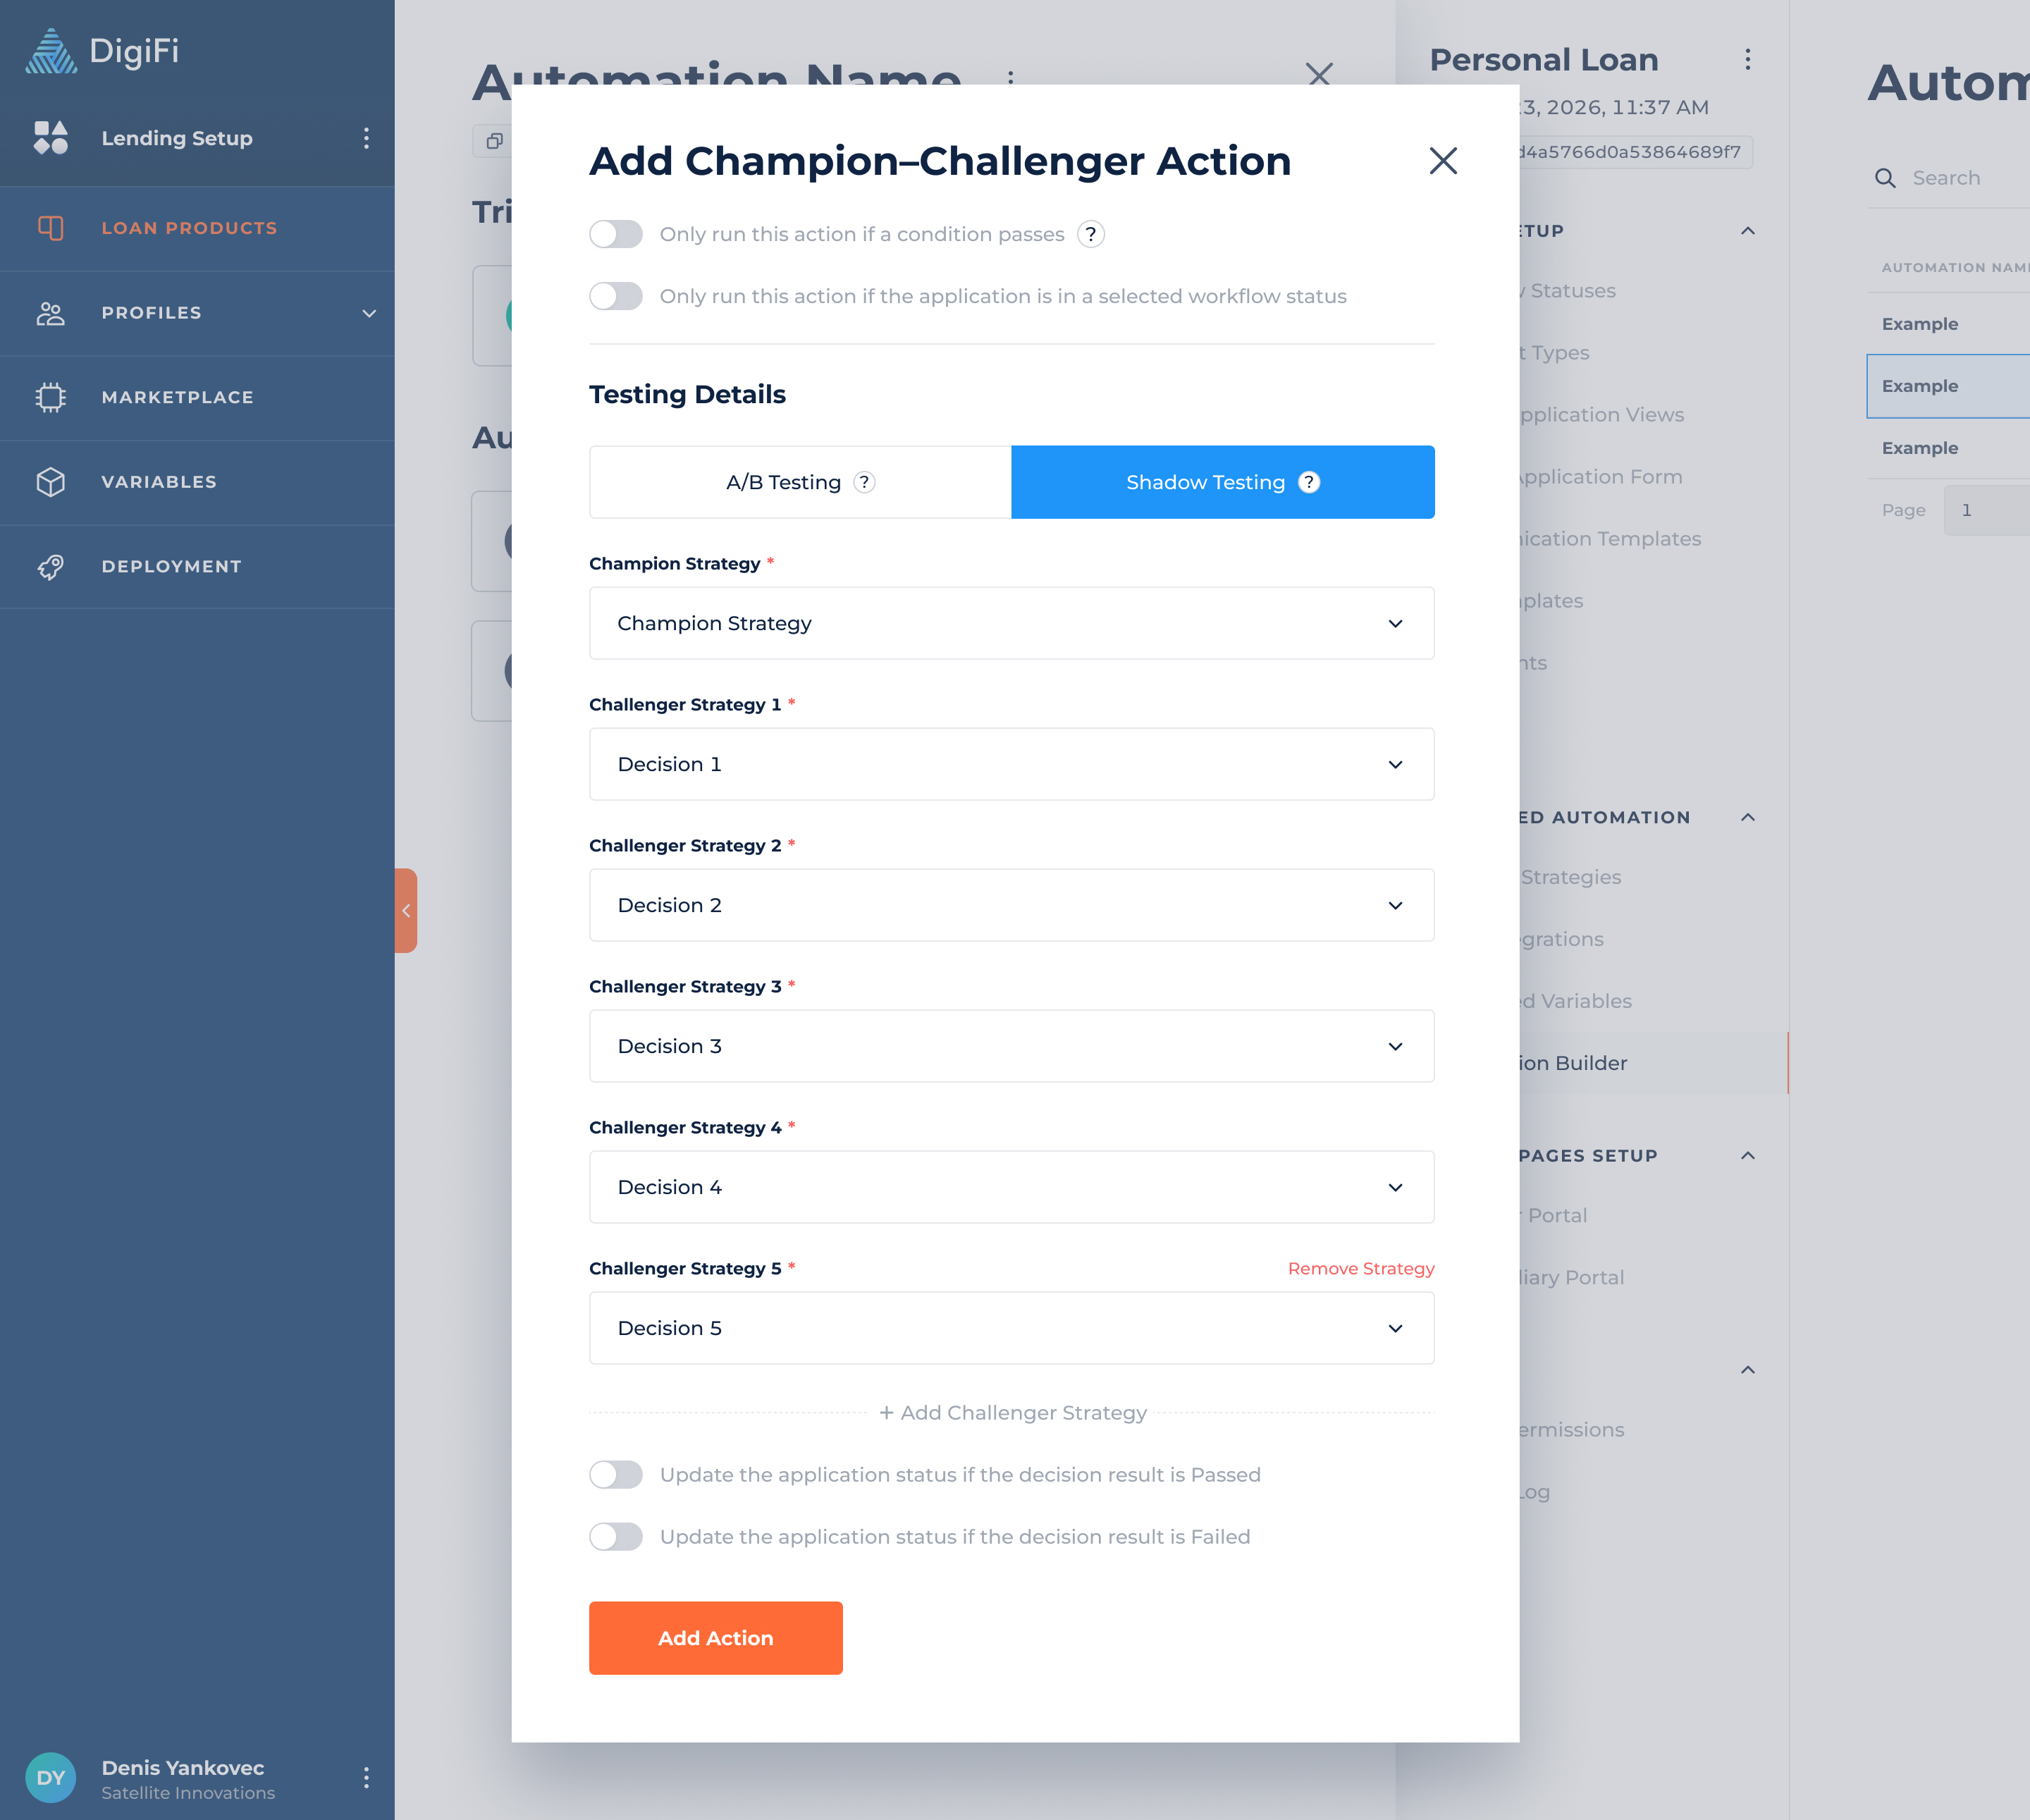
- Update the application status if the decision result is Passed, which is an optional toggle that lets you select a workflow status to move the application to if the decision passes.
- Update the application status if the decision result is Failed, which is an optional toggle that lets you select a workflow status to move the application to if the decision fails. If you select the "Rejected" status, you can also add decline reasons, which will be automatically applied to the application.
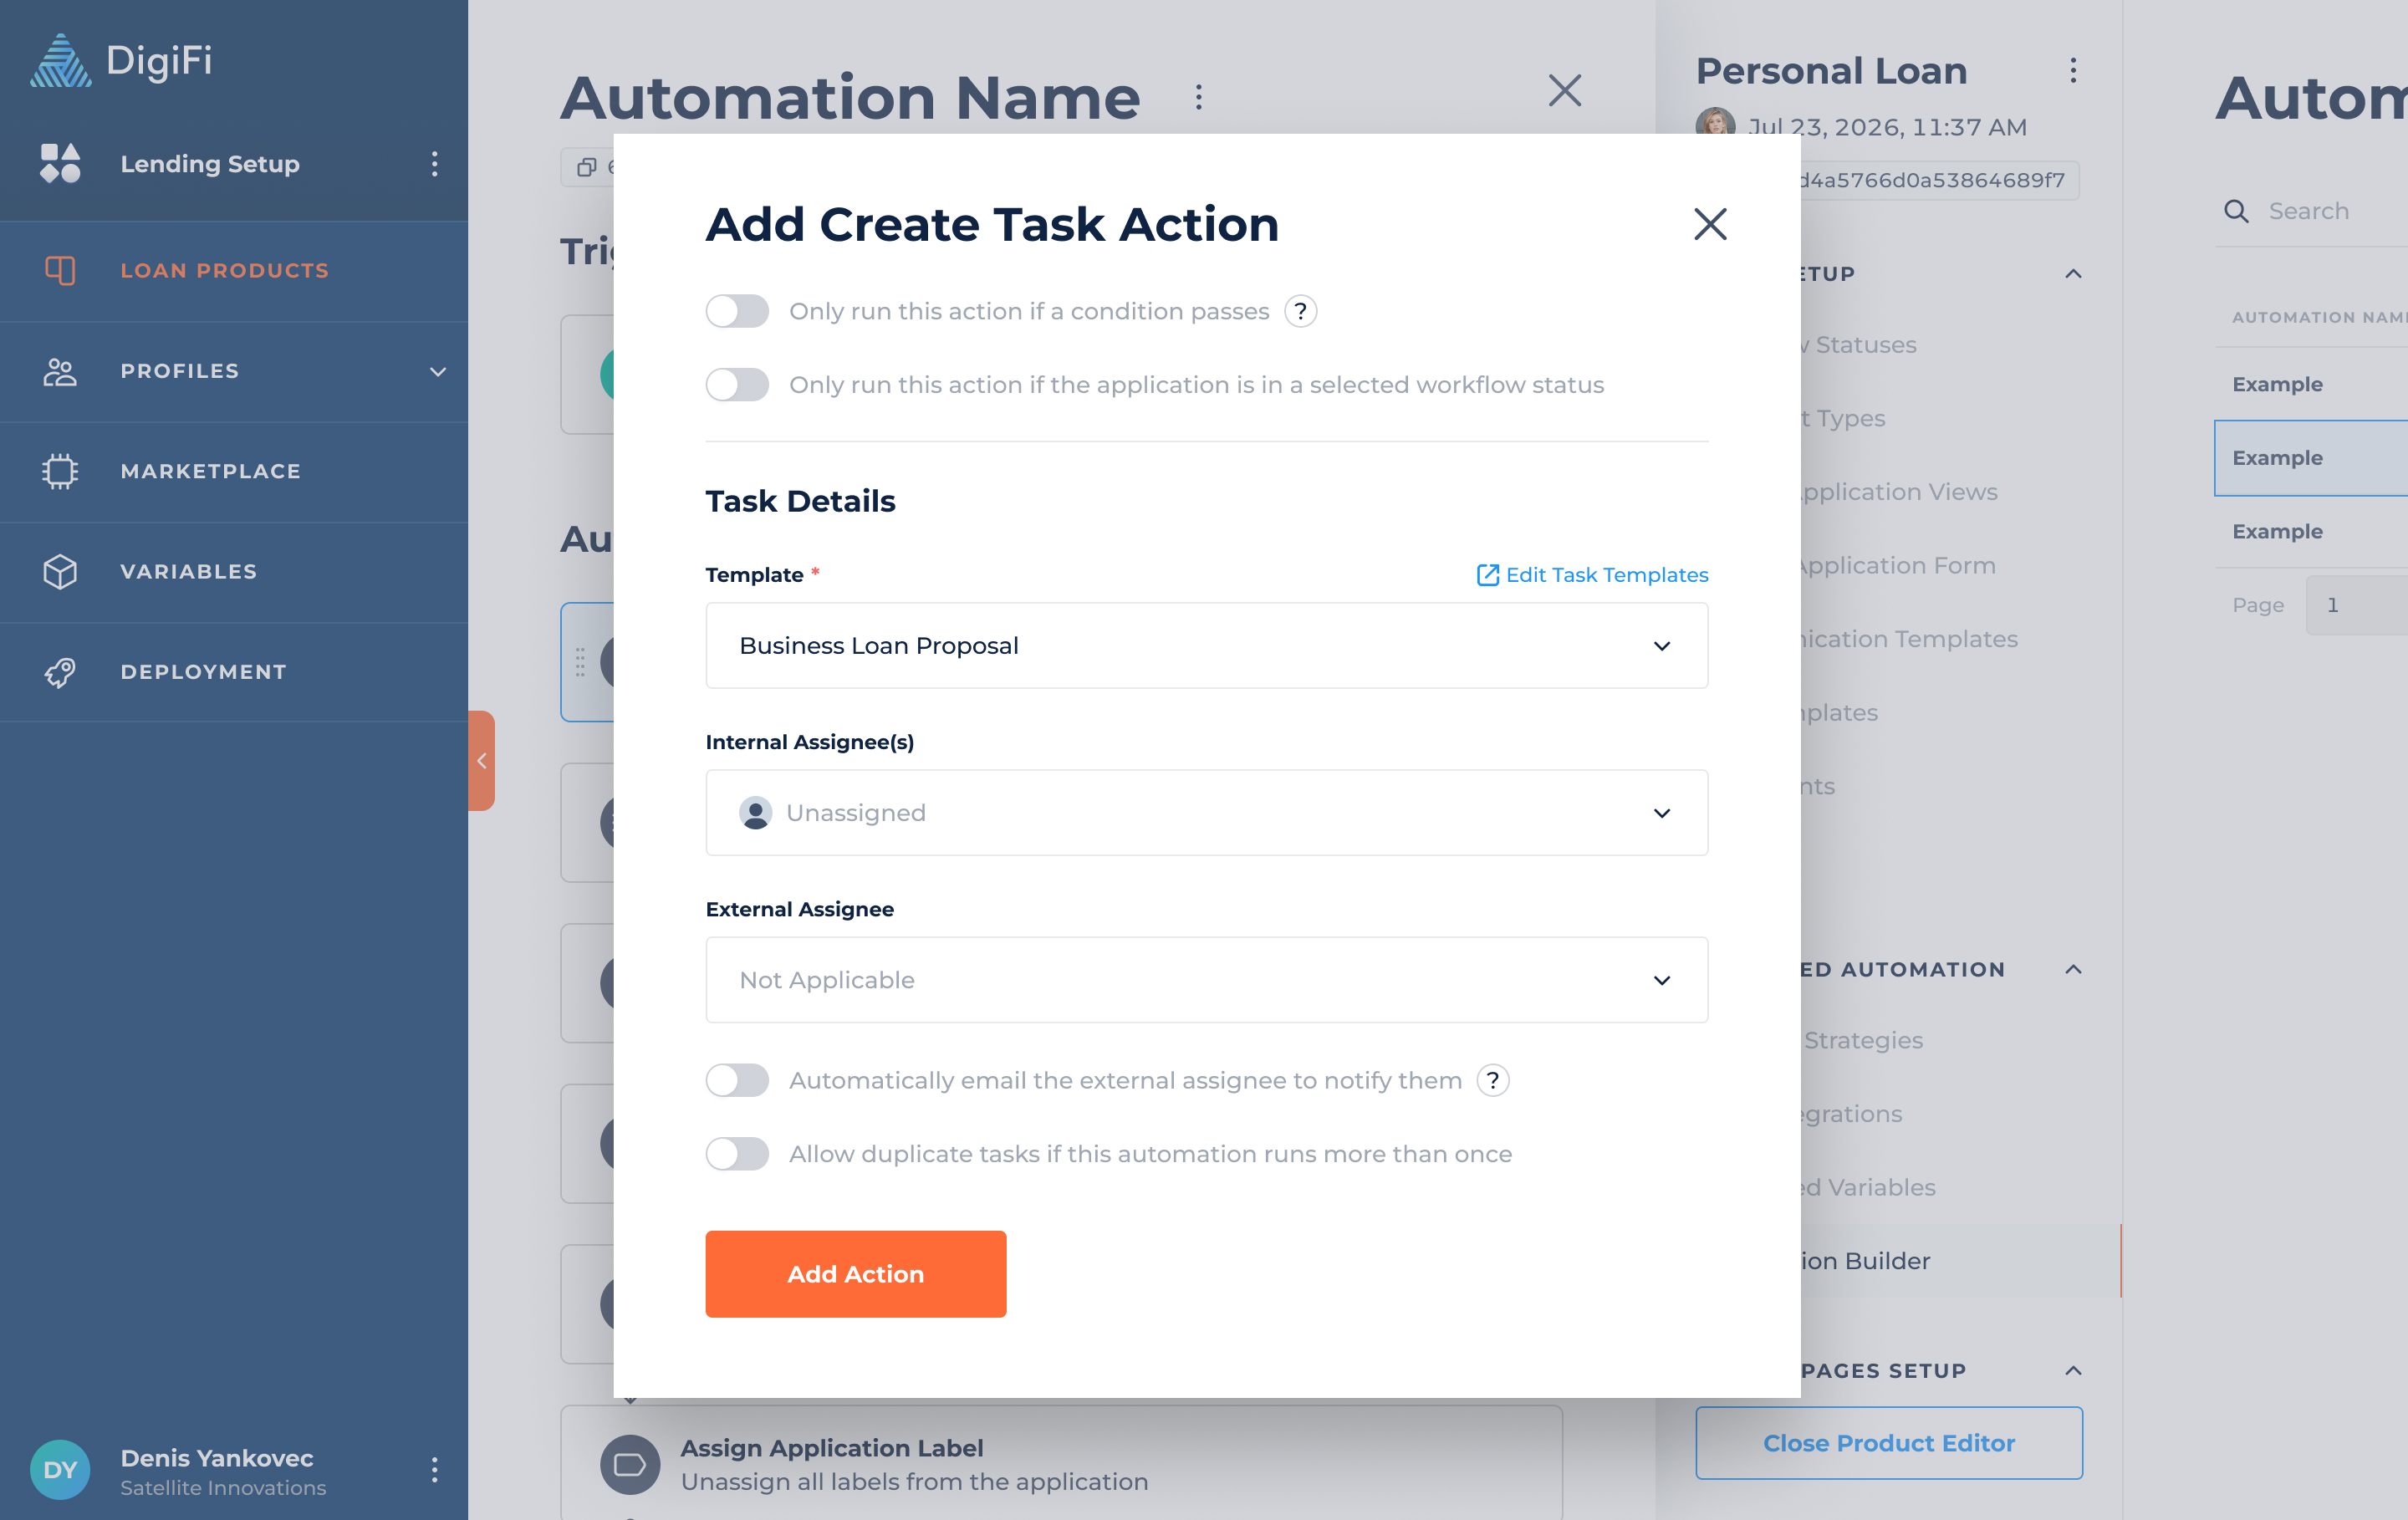
Actions (Create Task)
The "Create Task" action type lets you automatically generate application tasks based on reusable task templates, which are helpful to:
- Provide a clear and consistent application workflow for your team members.
- Notify your borrowers and intermediaries about outstanding items.
- Consolidate all relevant information about a specific piece of work in one place.
Tasks created through automation inherit the configuration defined within the selected task template, including:
- Task title
- Internal and external instructions
- Due dates and due times
- Task labels
- Displayed variables
- Workflow restrictions
- Automatic task completion conditions
For ExampleIf you always need to review and confirm the applicant's income in the workflow status of "Verification", you can create a standard task that will automatically be added to each application at that step. This task could include:
- Variables such as "Borrower Stated Income" and "Borrower Verified Income."
- Documents uploaded by the borrower to verify their income.
- Comments from your team members or the borrower regarding the verification process.
- Blocked workflow status of "Approved" so that applications can't be finalized until this task is complete.
To add a Create Task action, click "Add Action" and select “Create Task." You'll be asked to provide the following information:
- Only create this task if a condition passes, which lets you add conditionality to task creation (in addition to the workflow status trigger). Conditions are created using DigiFi's formula language and must return TRUE (boolean) or "true" (string) to pass.
- Only run this action if the application is in a selected workflow status, which lets you execute actions based on the application's current workflow status.
- Task Template, which lets you select the reusable task template that will be used to generate the task.
- Internal Assignee(s), which lets you select the team members assigned to the task.
- External Assignee, which lets you select the borrower/intermediary assigned to the task.
- Automatically email the external assignee to notify them, which will send an email to the external assignee that describes the task and provides a link to upload a file.
- Allow duplicate tasks if this automation runs more than once, if enabled, the automation will create a new task each time it runs, even if a task with the same parameters already exists.
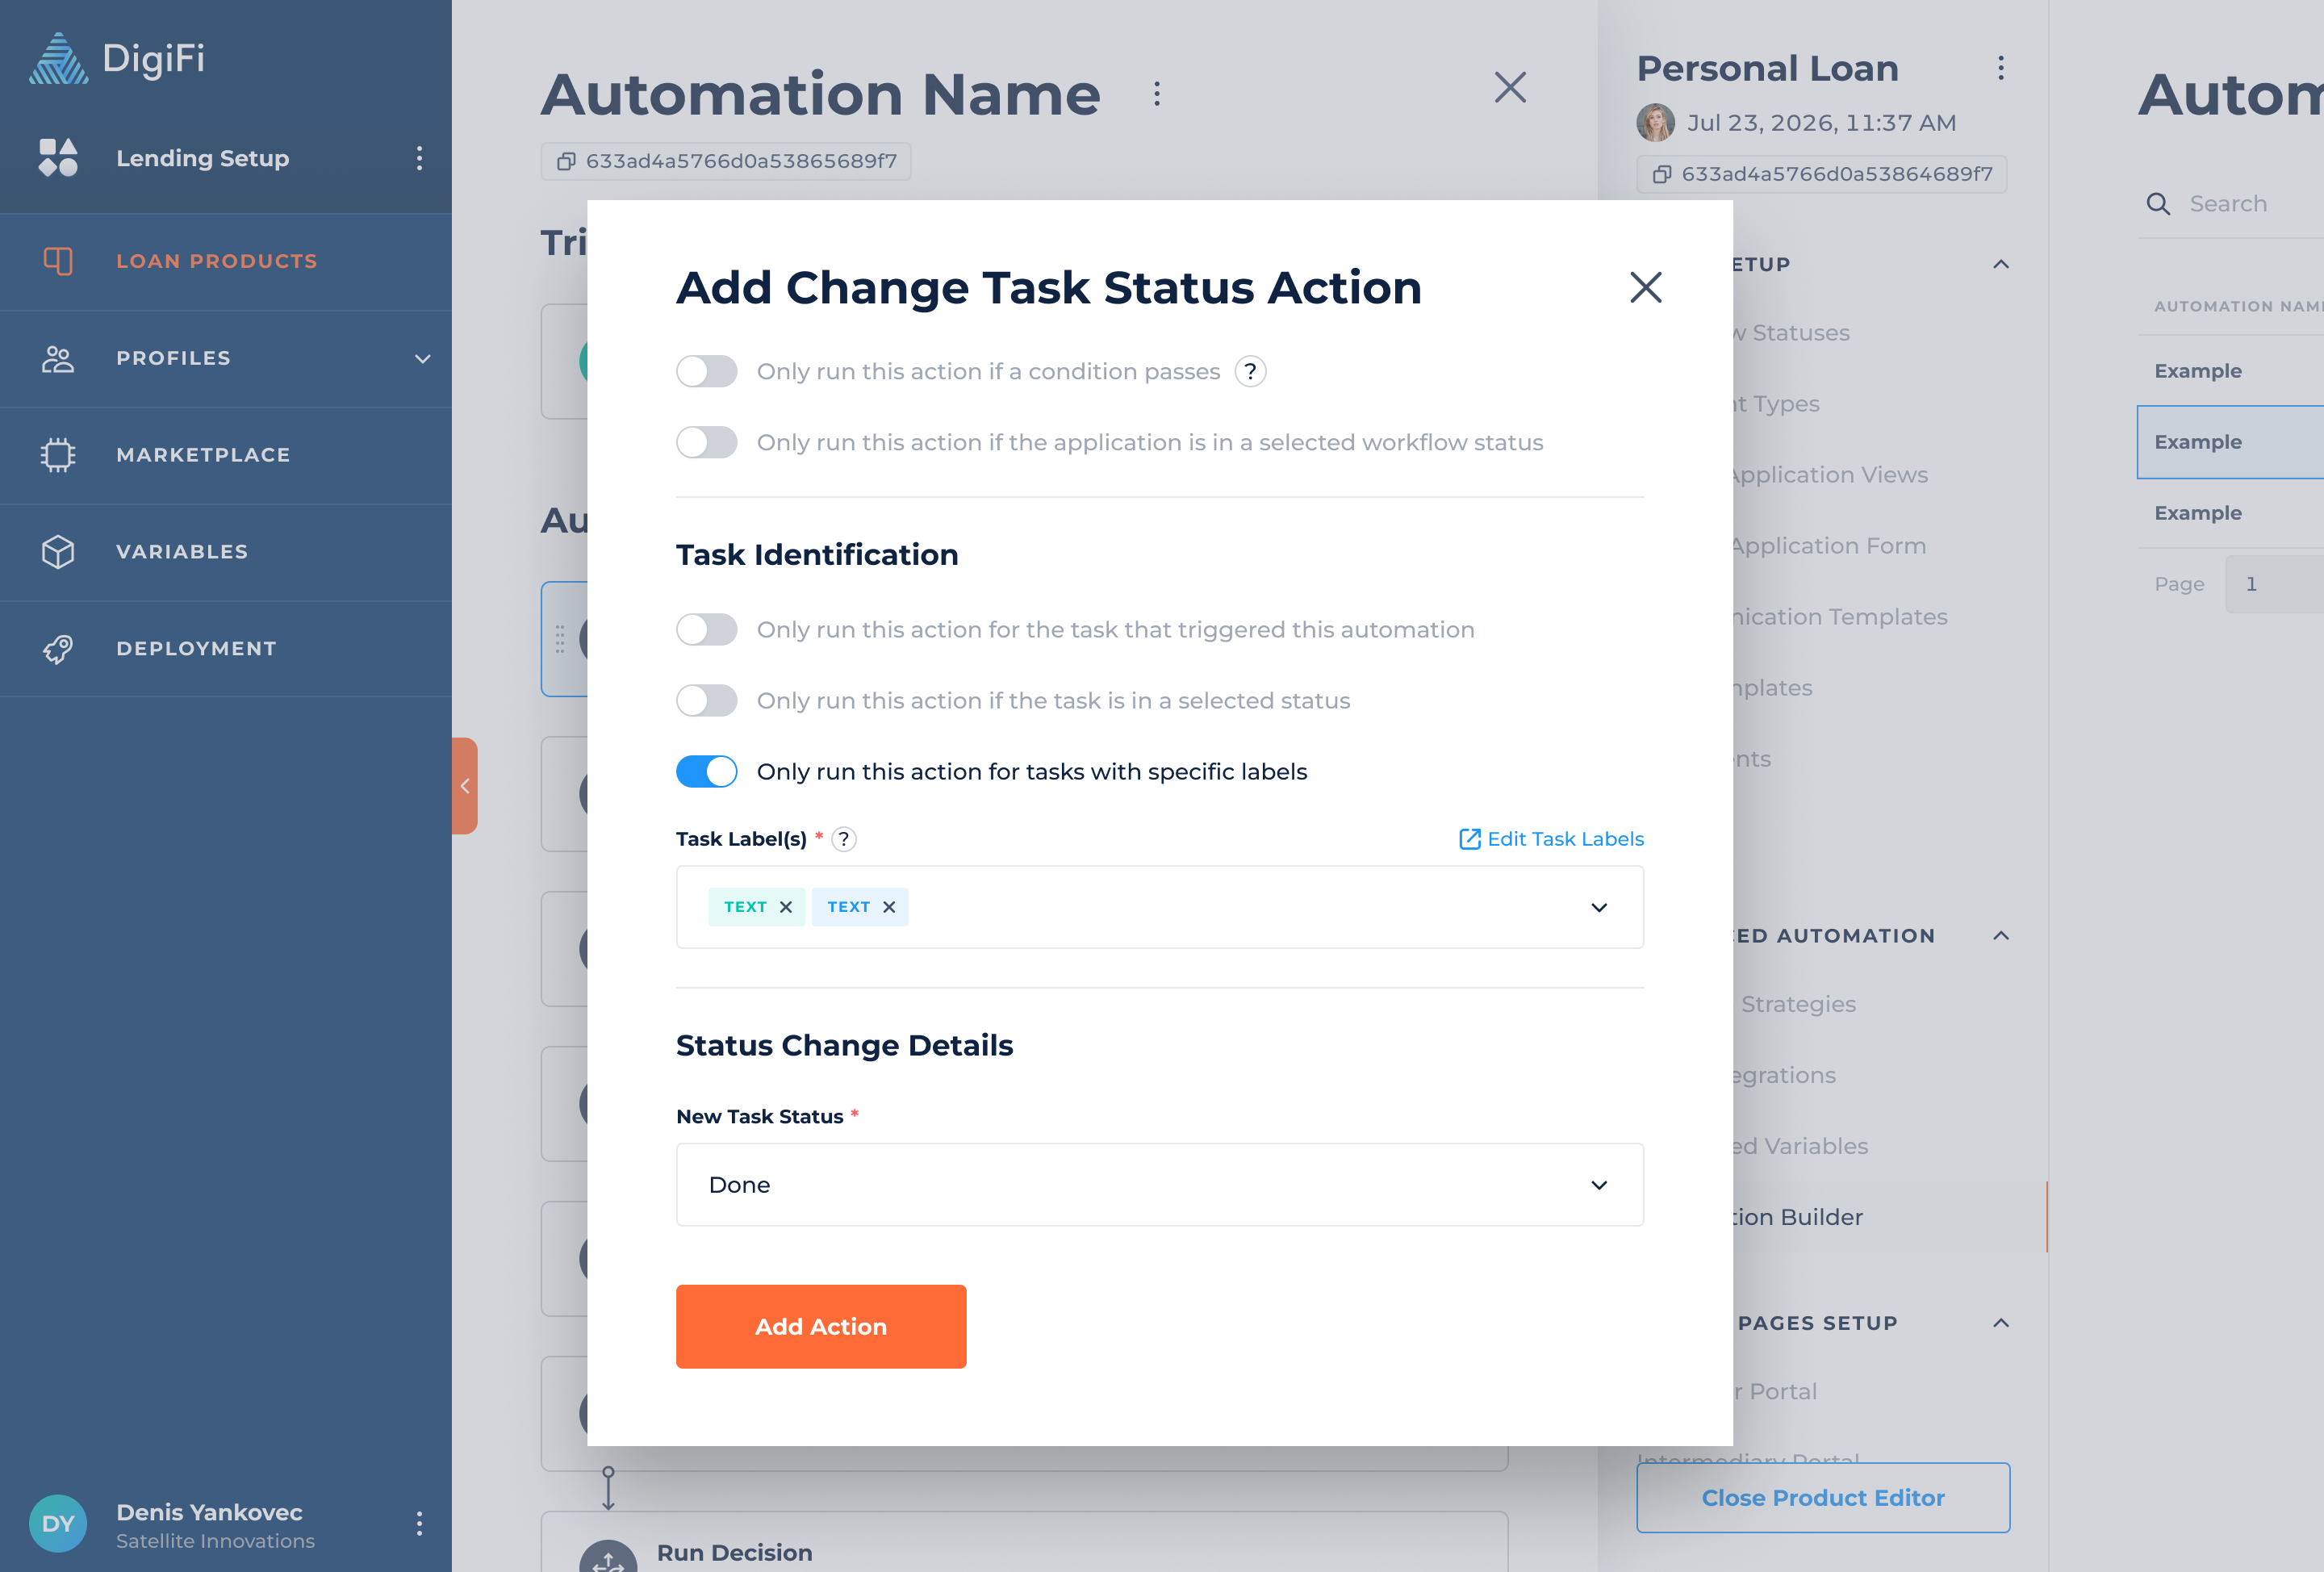
Actions (Change Task Status)
The "Change Task Status" action allows you to automatically update the status of existing application tasks.
When configuring this action, you can define how the task is identified using the following options:
- Only run this action for the task that triggered this automation, this option is only applicable if the trigger is "When a task is created" or "When a task is moved to a status."
- Only run this action if the task is in a selected status, allows you to specify which task statuses must be met for the action to run.
- Only run this action for tasks with specific labels, allows you to filter tasks by label, so the action only applies to those with the selected labels.
After defining the task identification criteria, you will select the new task status to apply.
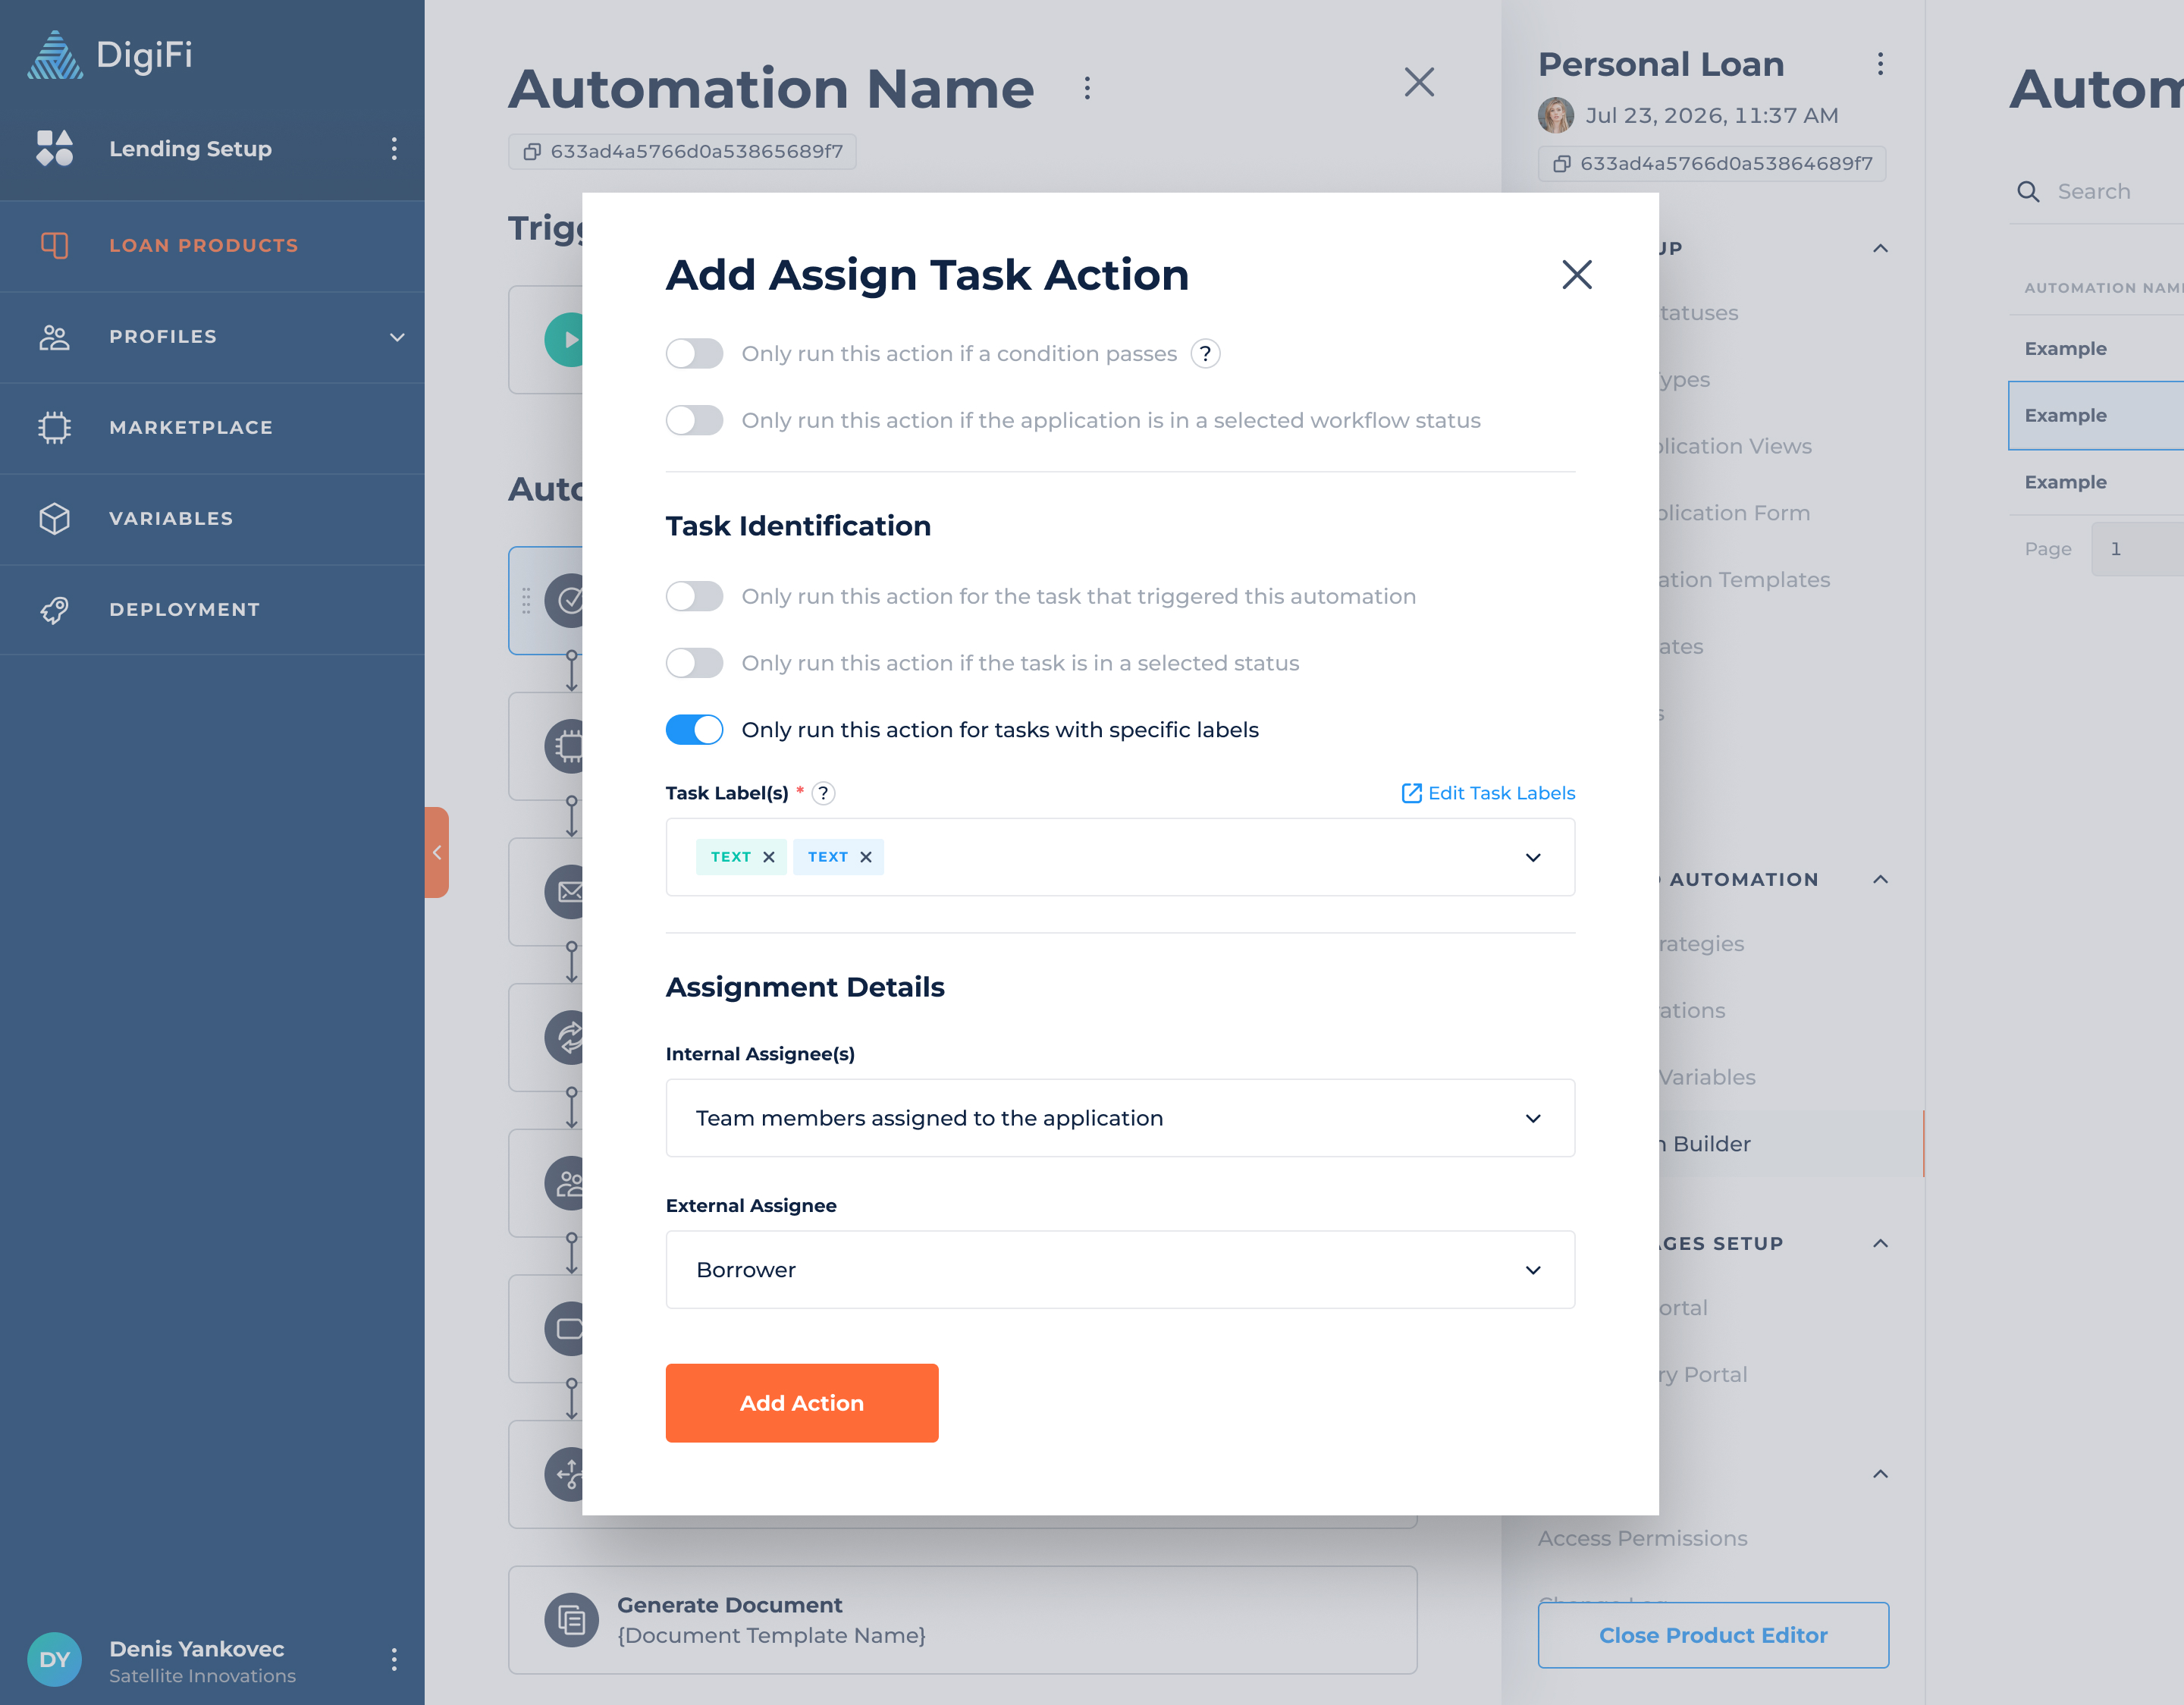
Actions (Assign Task)
The "Assign Task" action allows you to automatically update the internal and external assignees of existing tasks.
When configuring this action, you can define how the task is identified using the following options:
- Only run this action for the task that triggered this automation, this option is only applicable if the trigger is "When a task is created" or "When a task is moved to a status."
- Only run this action if the task is in a selected status, allows you to specify which task statuses must be met for the action to run.
- Only run this action for tasks with specific labels, allows you to filter tasks by label, so the action only applies to those with the selected labels.
After defining the task identification criteria, you’ll select the new assignment to apply, such as:
- Internal Assignee(s), which lets you to select one or more team members to assign to the task.
- External Assignee, which lets you to assign the task to a borrower or intermediary.
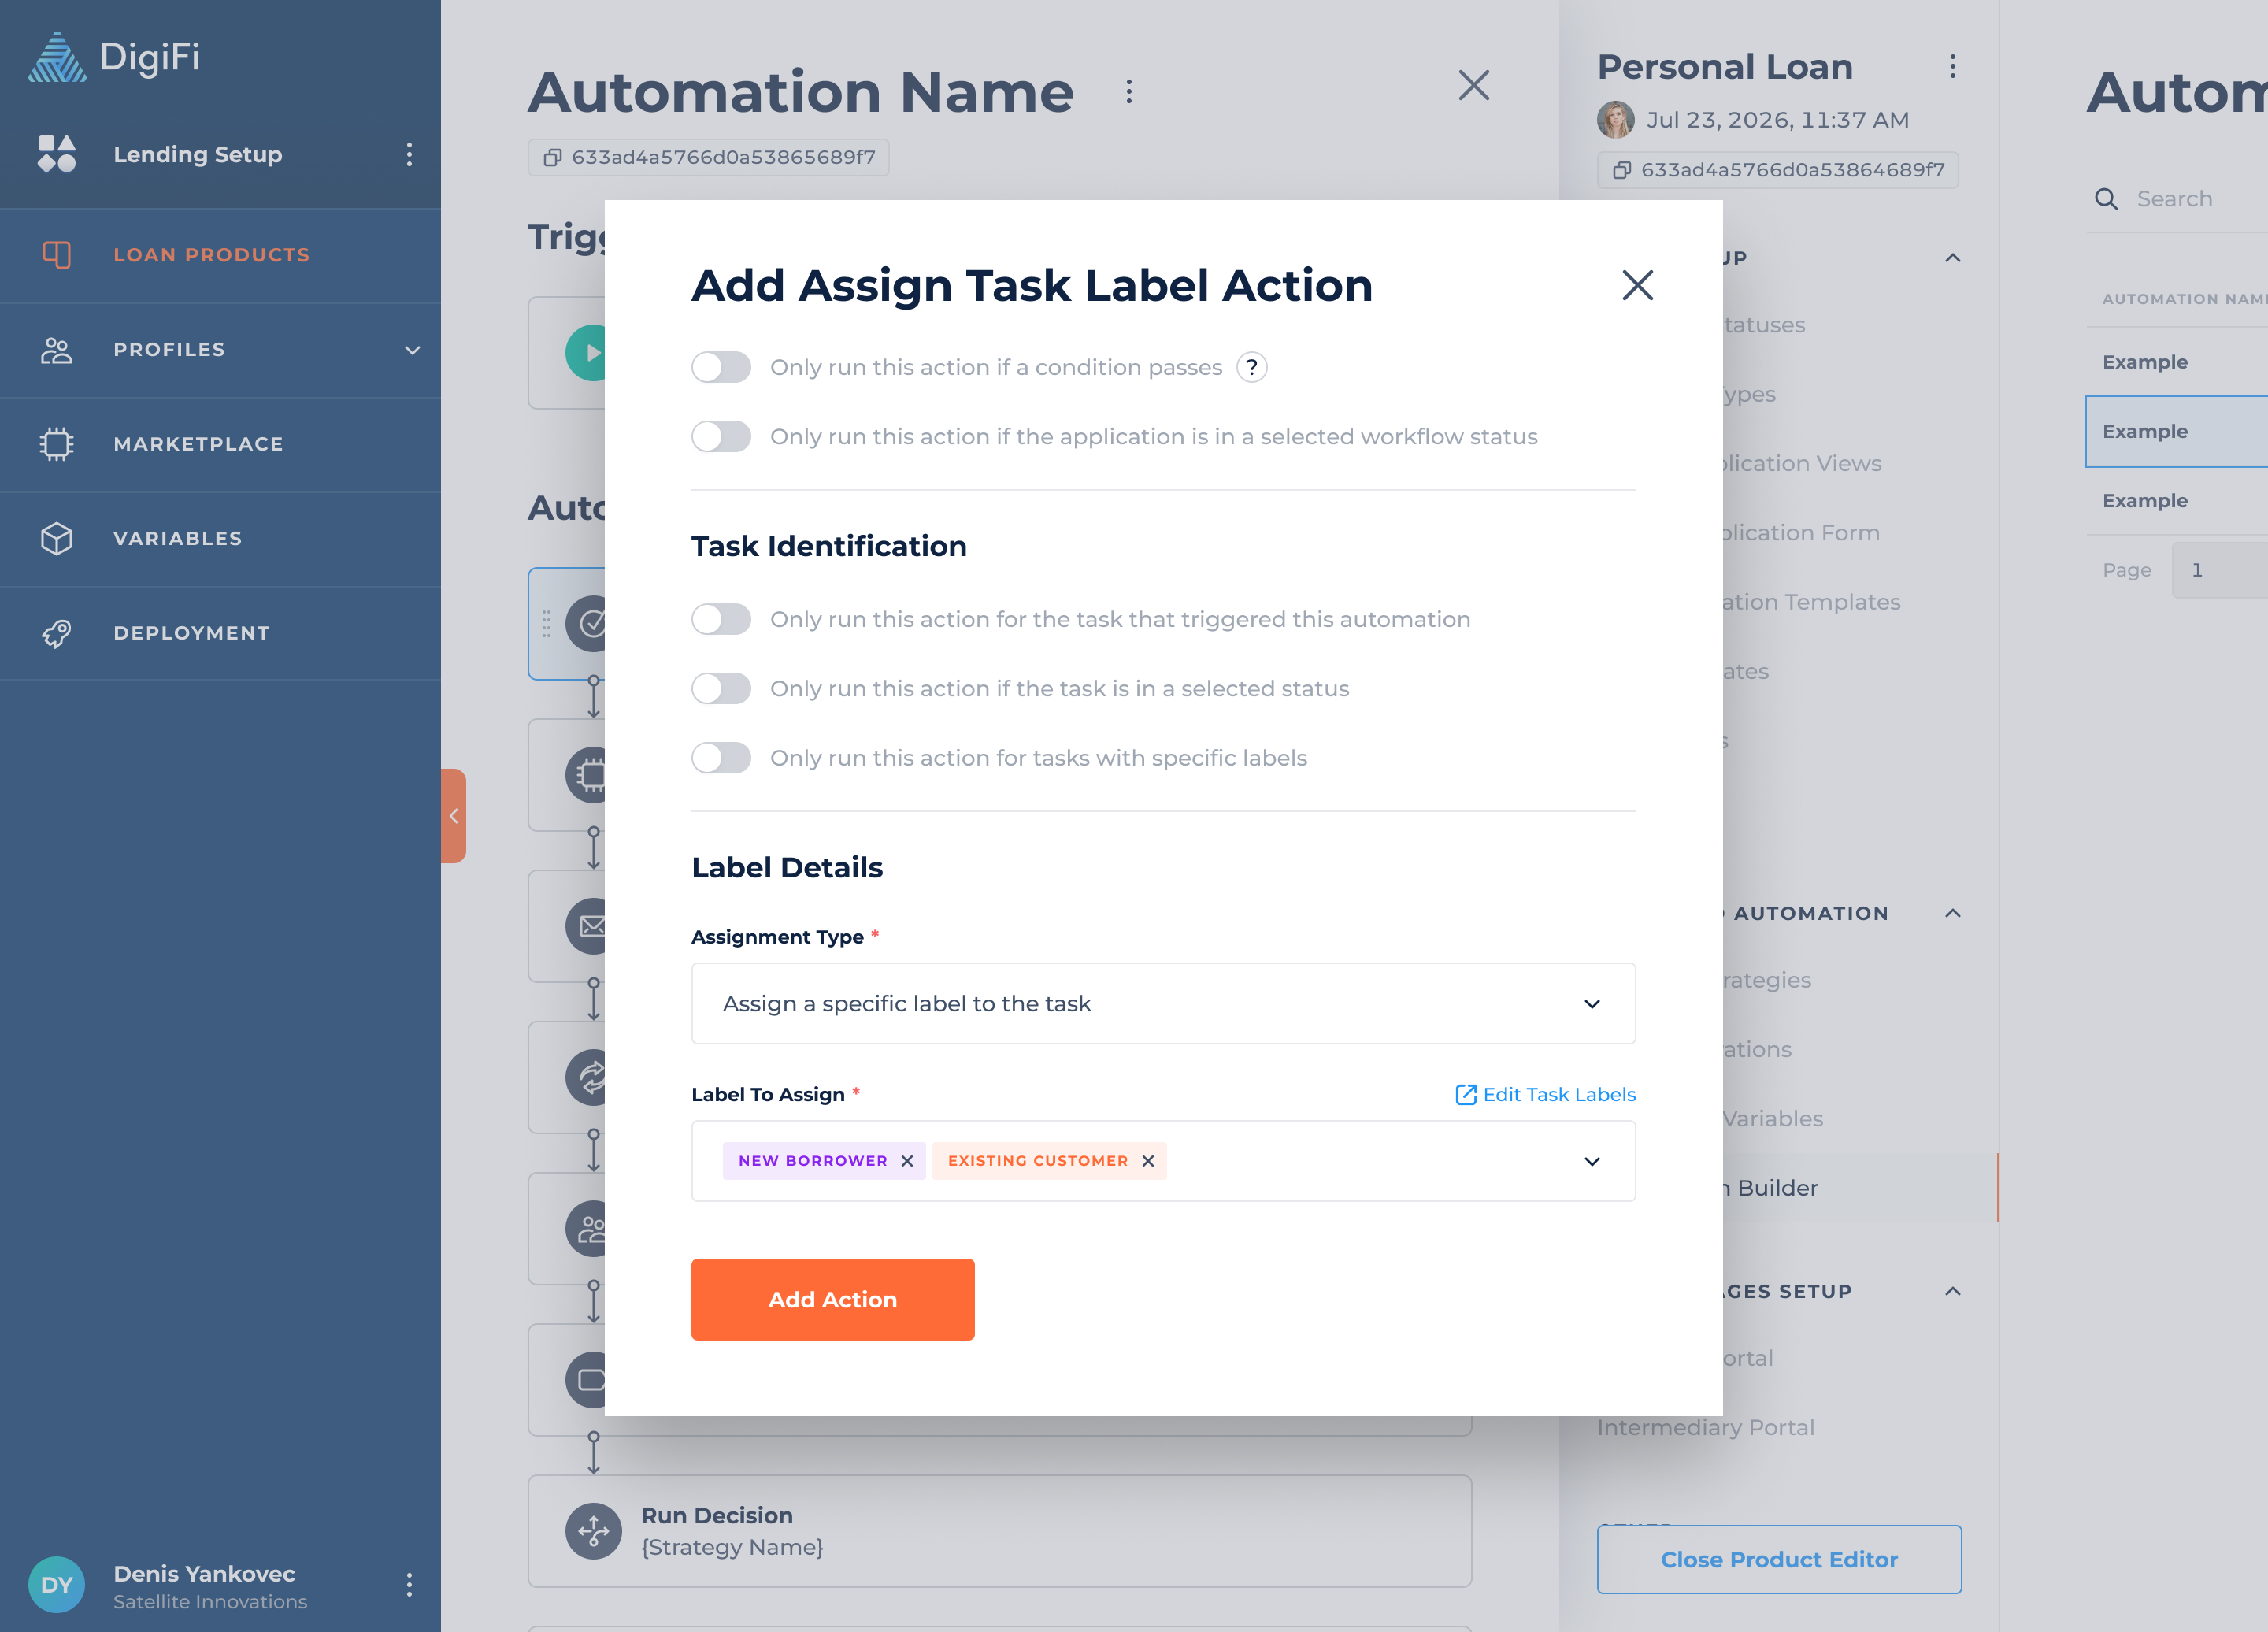
Actions (Assign Task Label)
The "Assign Task Label" action allows you to automatically assign or unassign task labels from existing tasks.
When configuring this action, you can define how the task is identified using the following options:
- Only run this action for the task that triggered this automation, this option is only applicable if the trigger is "When a task is created" or "When a task is moved to a status."
- Only run this action if the task is in a selected status, allows you to specify which task statuses must be met for the action to run.
- Only run this action for tasks with specific labels, allows you to filter tasks by label, so the action only applies to those with the selected labels.
After defining the task identification criteria, you will select the new task label assignment from the available options:
- Assign a specific label to the task, adds the selected label to the task without changing any existing labels.
- Unassign a specific label from the task, removes only the selected label, leaving others unchanged.
- Unassign all and assign new labels to the task, removes all existing labels and replaces them with the selected label(s).
- Unassign all labels from the task, removes all labels from the task.
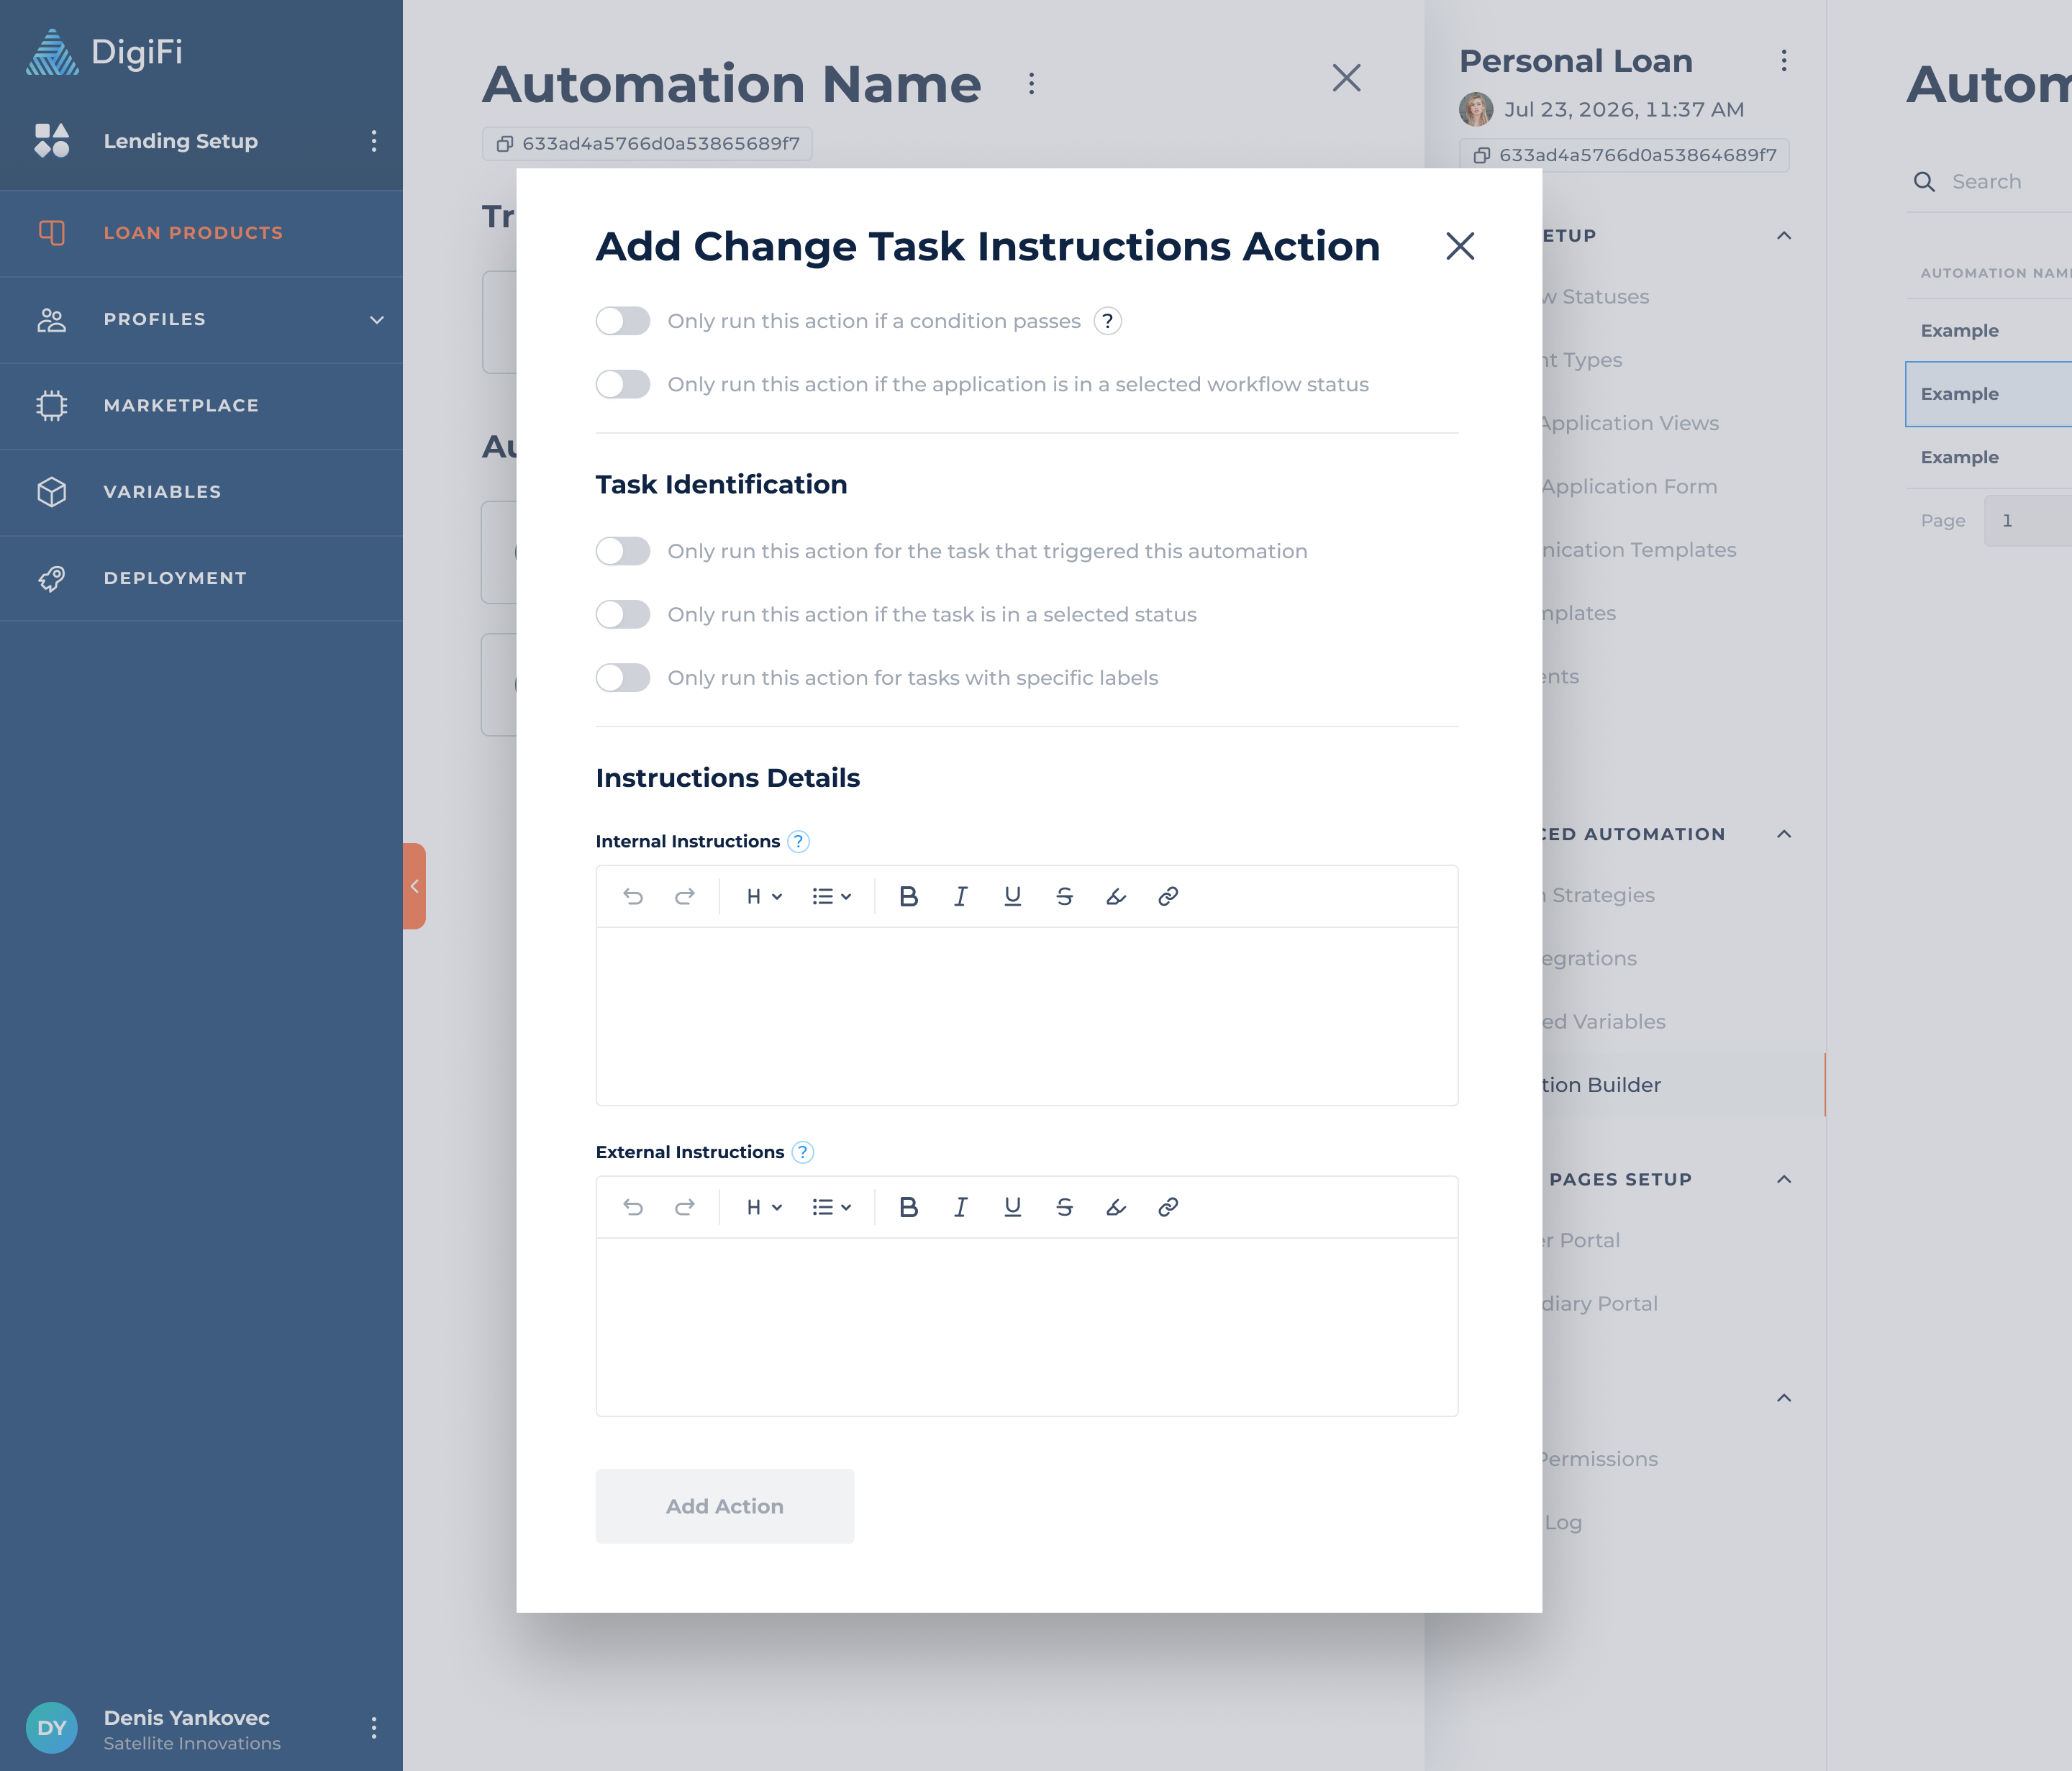
Actions (Change Task Instructions)
The "Change Task Instructions" action allows you to automatically update internal and external instructions for existing tasks.
When configuring this action, you can define how the task is identified using the following options:
- Only run this action for the task that triggered this automation, this option is only applicable if the trigger is "When a task is created" or "When a task is moved to a status."
- Only run this action if the task is in a selected status, allows you to specify which task statuses must be met for the action to run.
- Only run this action for tasks with specific labels, allows you to filter tasks by label, so the action only applies to those with the selected labels.
After defining the task identification criteria, you’ll need to provide the updated internal and/or external instructions. These instructions can be customized in the editor by adding headings, bold formatting, highlights, and more.
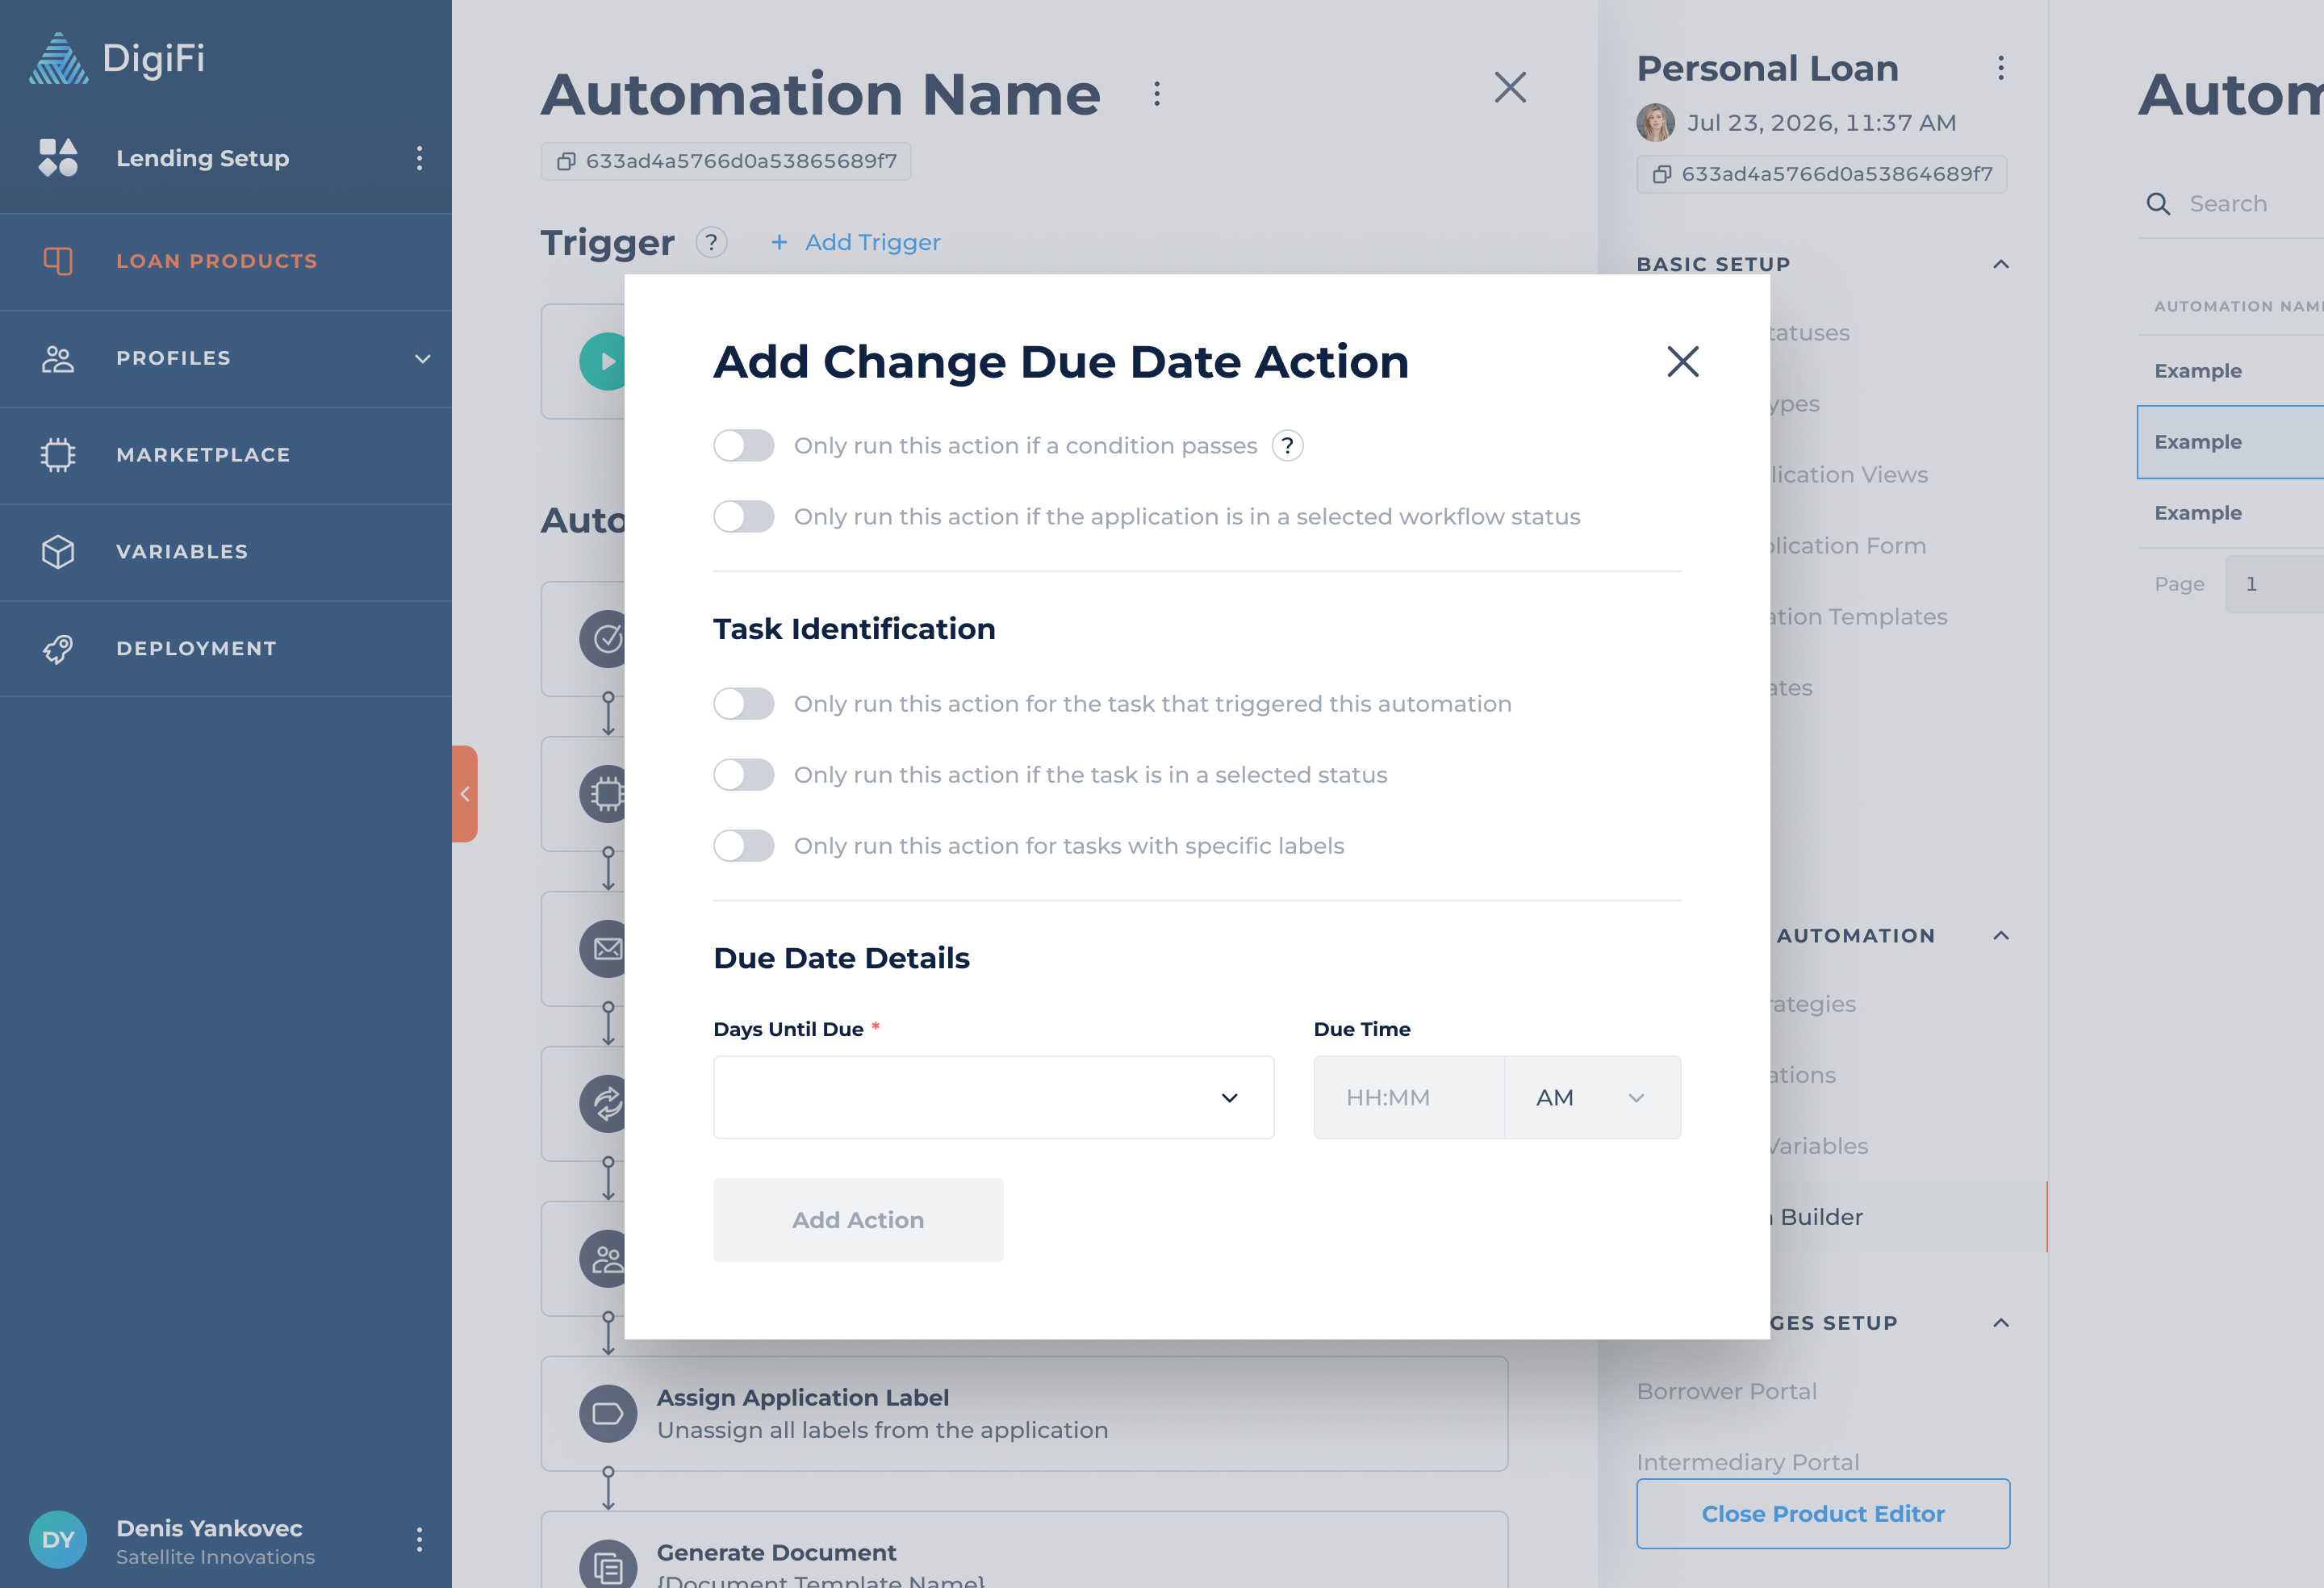
Actions (Change Due Date)
The "Change Due Date" action allows you to automatically update the due date of existing tasks.
When configuring this action, you can define how the task is identified using the following options:
- Only run this action for the task that triggered this automation, this option is only applicable if the trigger is "When a task is created" or "When a task is moved to a status."
- Only run this action if the task is in a selected status, allows you to specify which task statuses must be met for the action to run.
- Only run this action for tasks with specific labels, allows you to filter tasks by label, so the action only applies to those with the selected labels.
After defining the task identification criteria, you’ll need to specify the new due date to apply.
Actions (Run AI Agent)
The "Run AI Agent" action allows you to automatically execute the DigiFi AI Agent on a defined task within your workflow.
When triggered automatically, the AI Agent:
- Executes all defined internal instructions without any user interaction or confirmation.
- Logs events throughout the execution.
- Displays a complete execution history after processing is complete.
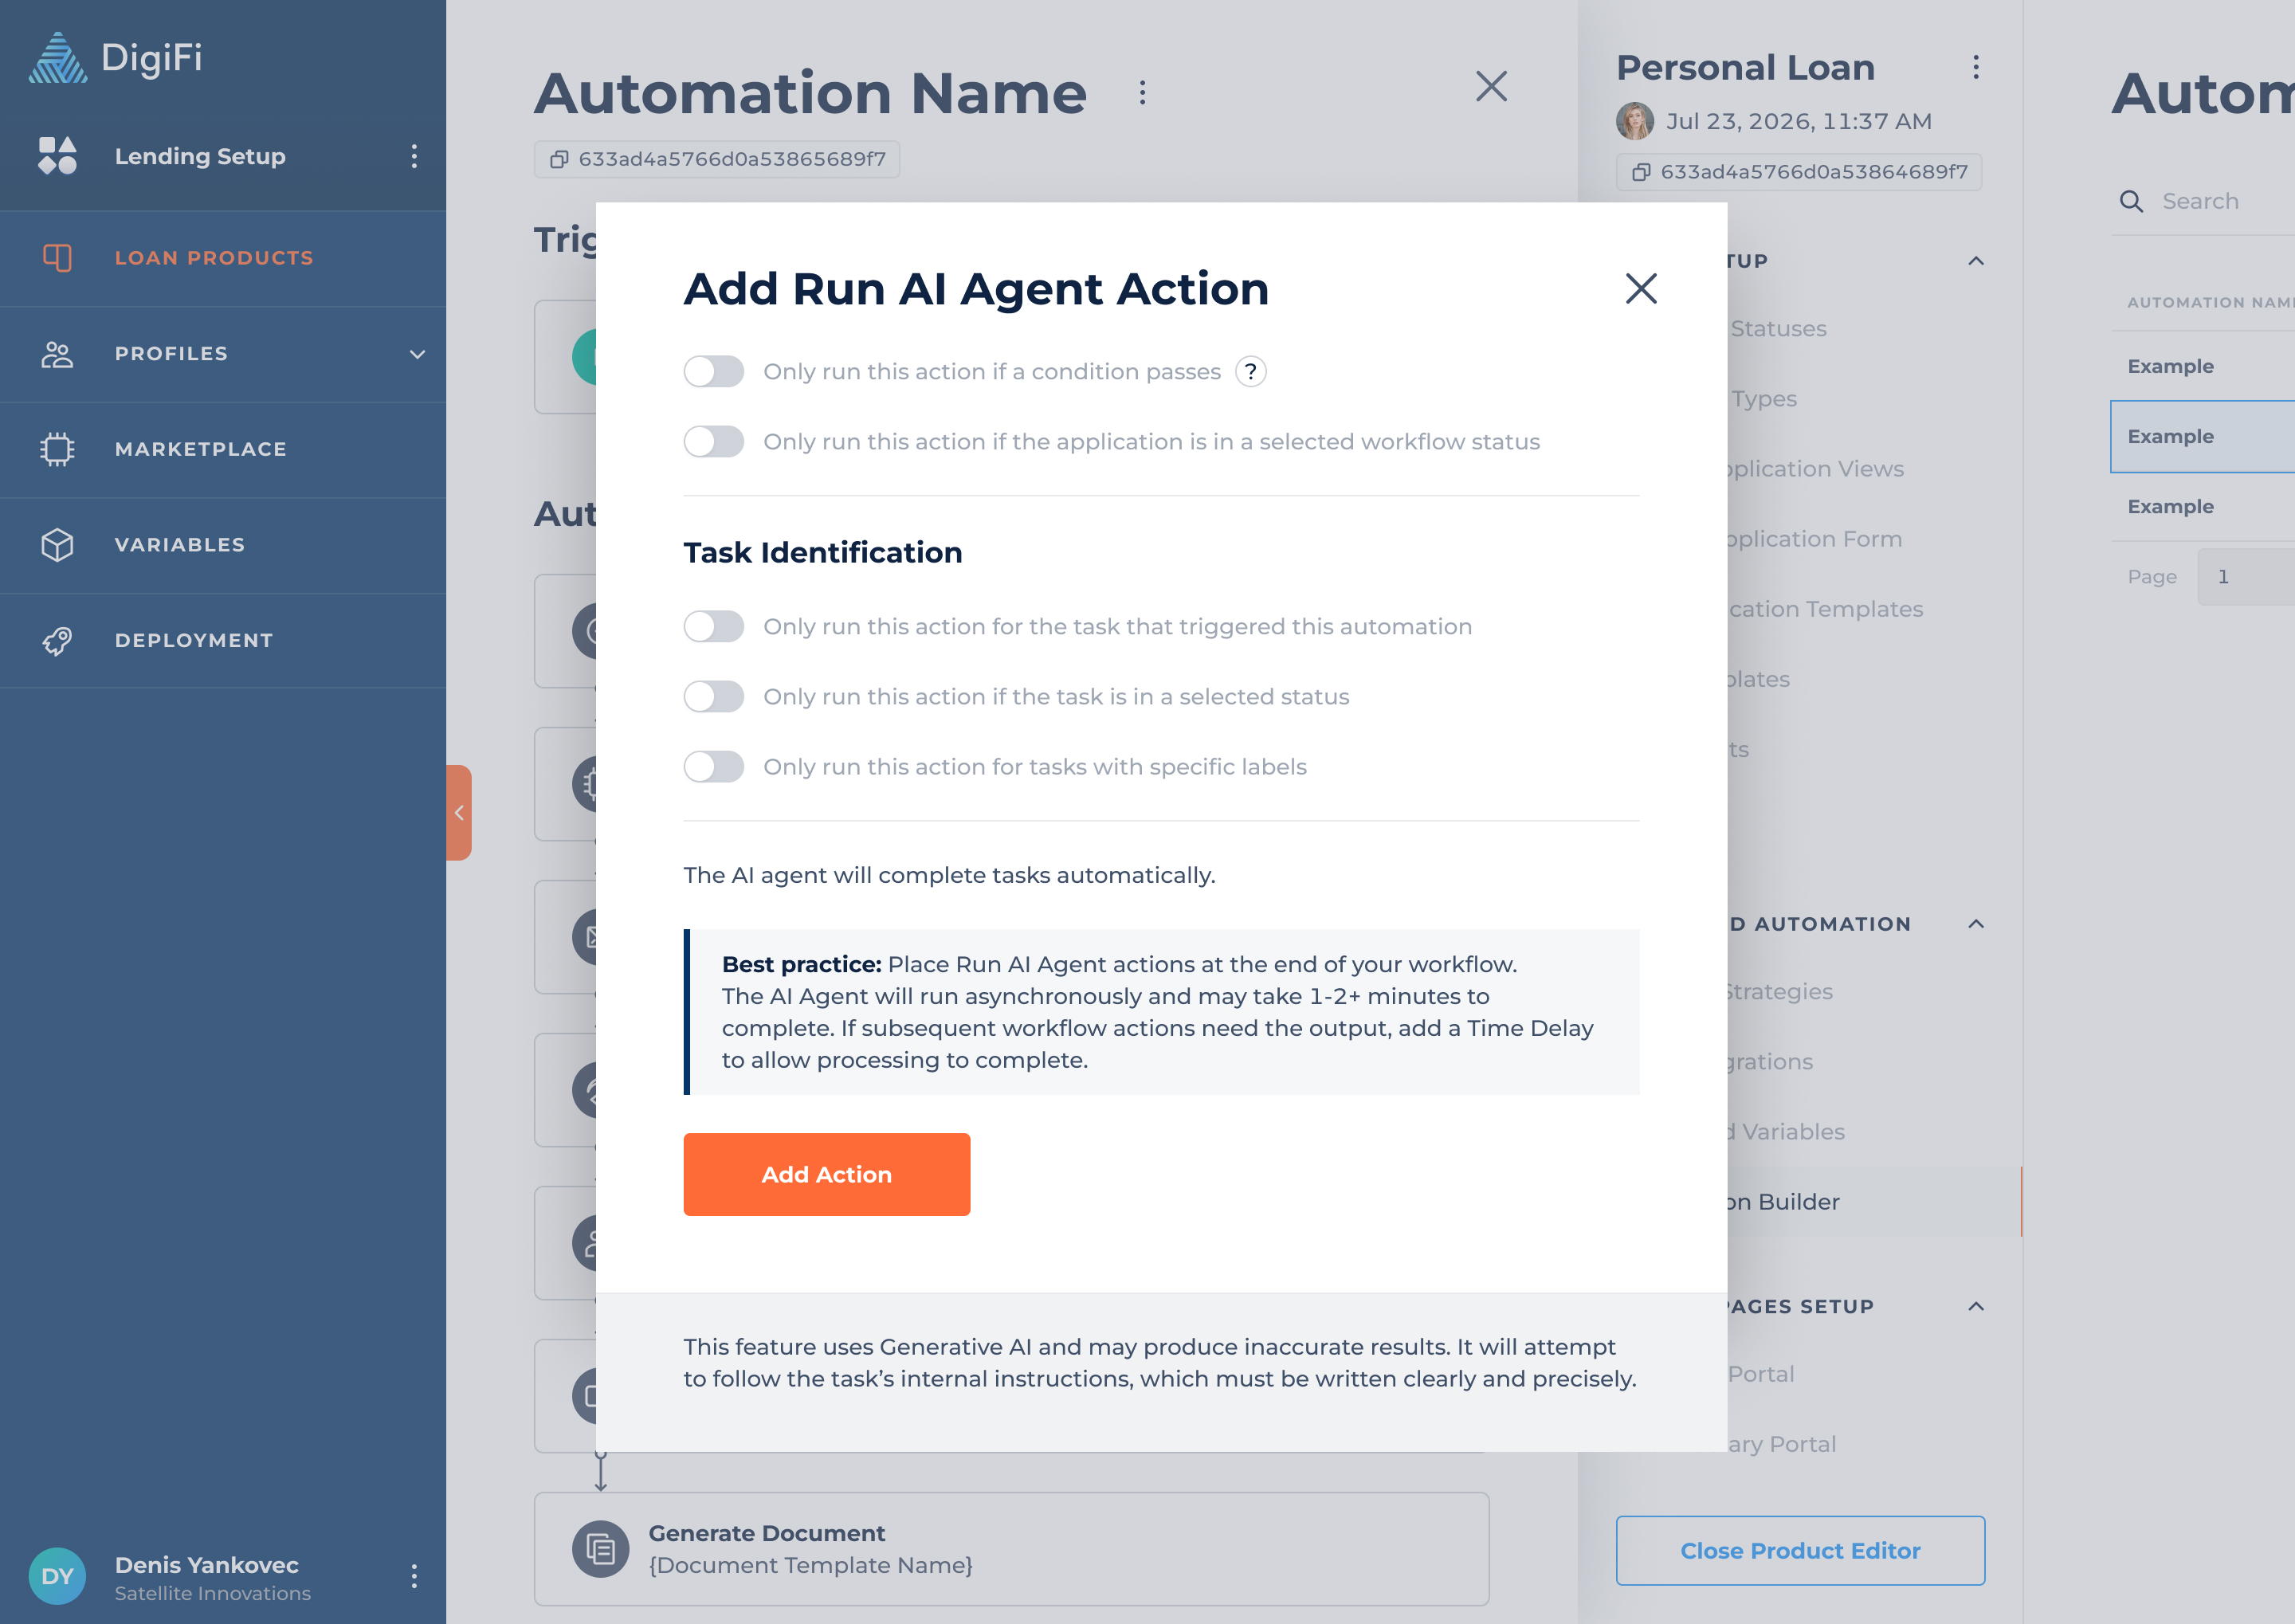
Task Identification
When configuring this action, you can define how the task is identified using the following options:
- Only run this action for the task that triggered this automation, this option is only applicable if the trigger is "When a task is created" or "When a task is moved to a status."
- Only run this action if the task is in a selected status, allows you to specify which task statuses must be met for the action to run.
- Only run this action for tasks with specific labels, allows you to filter tasks by label, so the action only applies to those with the selected labels.
Place Run AI Agent actions at the end of your workflow.
The AI Agent runs longer than other automated actions and may take 1-2+ minutes to complete.
If subsequent workflow actions depend on its output, add a Time Delay to ensure processing is complete before the workflow continues.
Actions (Generate Document)
The “Generate Document” action lets you automatically generate dynamically populated documents based on application data.
When you add a “Generate Document” action, you’ll be asked to provide the following information:
- Only generate a document if a condition passes, which lets you add conditionality to the generate document automation (in addition to the workflow status trigger). Conditions are created using DigiFi's formula language and must return TRUE (boolean) or "true" (string) to pass.
- Only run this action if the application is in a selected workflow status, which lets you execute actions based on the application's current workflow status.
- Document Template, which lets you select a template from the list of templates created in the Lending Setup > “Document Templates” section.
- Folder To Save Document, which lets you select a folder to which a generated document will be saved. By default, it’s “Root Folder”.
- Document Label(s), which lets you select the document labels.
You can click on “Edit Folders” to edit “Document Folder Structure” in the loan product configuration.
- Send this document in an email after it is generated, which offers you an option to send a generated document in an email.
- To, Cc and Bcc, which are who the email will be sent to. We will automatically bcc the DigiFi email tracking inbox so that automated emails are visible to day-to-day users in the "Emails" sections of the platform.
- Subject, which is the subject of the email.
- Body, which is the email content. You can use standard text or make emails more dynamic with variables.
- Add a button at the bottom of the email, which lets you include a button with a name and a hyperlink, for example, to direct the recipient to a digital lending portal (for borrowers or intermediaries) or the DigiFi platform (for your team members).

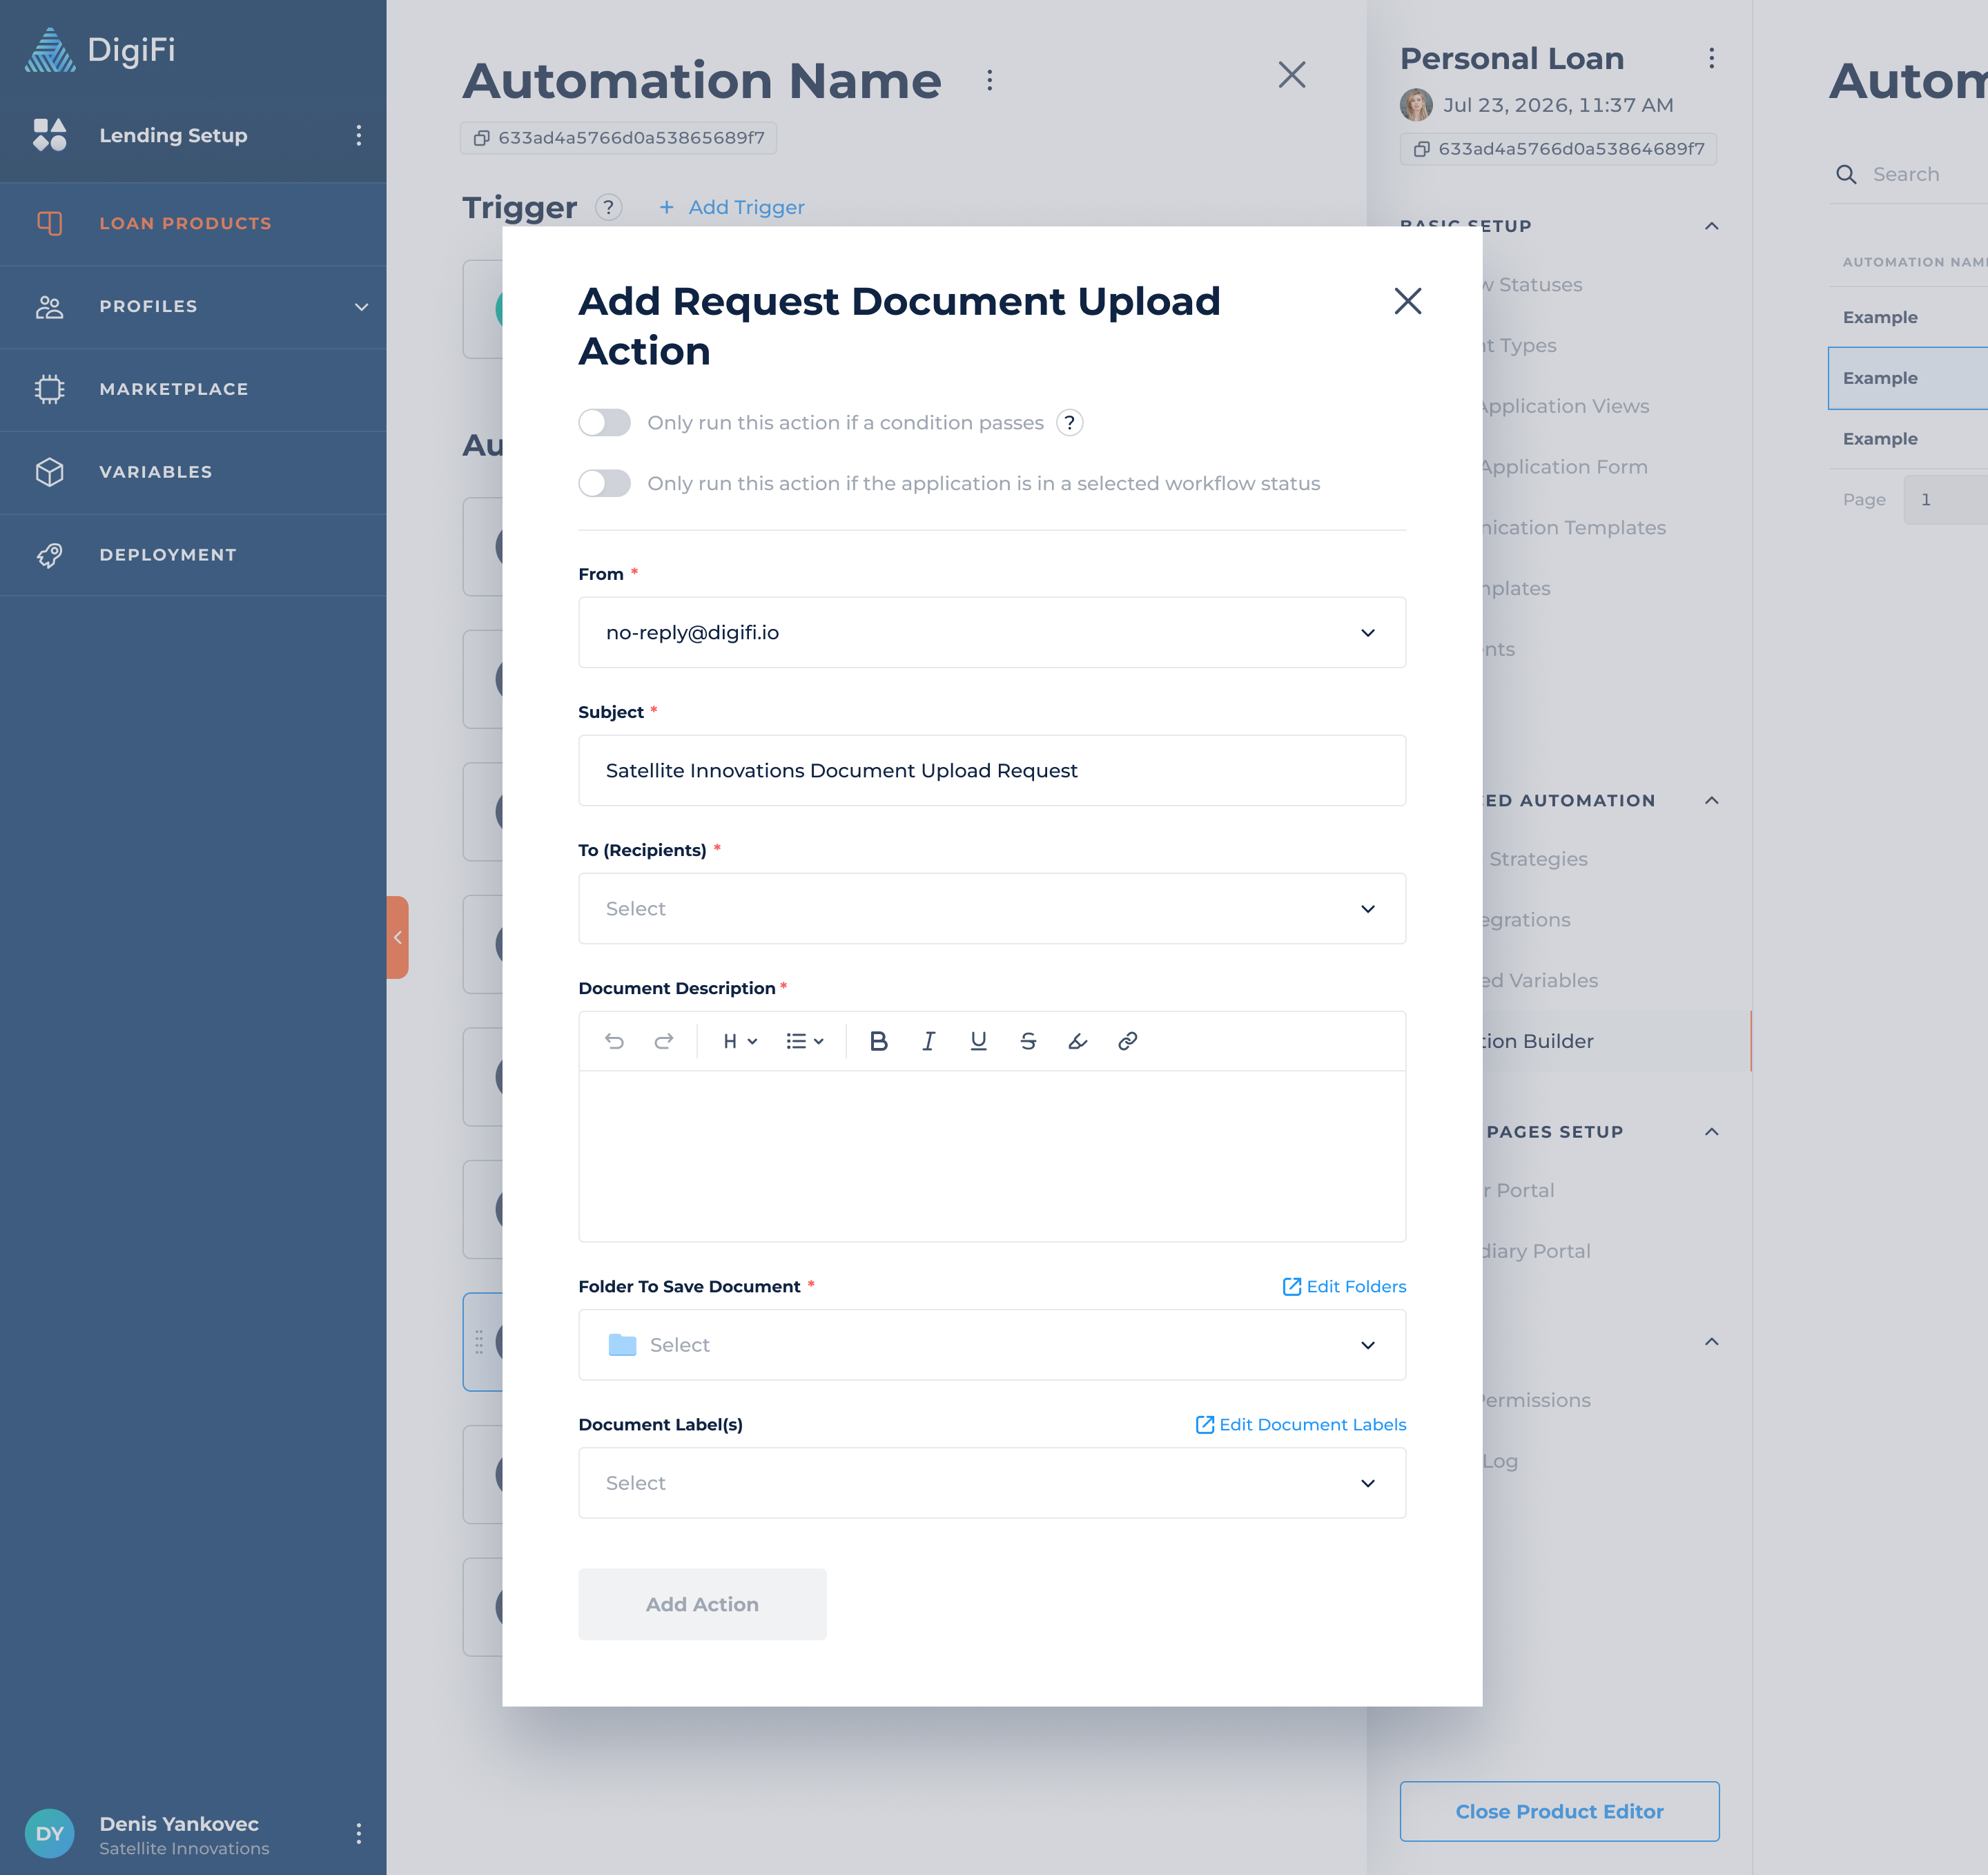
Actions (Request Document Upload)
The "Request Document Upload" action lets you automatically send a document upload request to the borrower, co-borrower, or intermediary. Please note that to send automatic emails to borrowers, co-borrowers, and intermediaries, you need to have a SendGrid integration.
When you add a “Request Document Upload” action, you’ll be asked to provide the following information:
- Only request document upload if a condition passes, which lets you add conditionality to the request document upload automation (in addition to the workflow status trigger). Conditions are created using DigiFi's formula language and must return TRUE (boolean) or "true" (string) to pass.
- Only run this action if the application is in a selected workflow status, which lets you execute actions based on the application's current workflow status.
- From (Sender), lets you choose the sender email (if multiple options are available).
- Subject, which is the subject of the email.
- To (Recipient), lets you choose who will receive the email with the request. In addition to default recipients (Borrower, Intermediary, etc.), you can add custom email addresses.
- Document Description, which is the description of the document(s) you are requesting. You can customize the text using the editor by adding headings, bold formatting, highlights, and more.
- Folder To Save Document, which lets you select a folder to which a requested document will be saved. By default, it’s “Root Folder.”
- Document Label(s), which lets you select the document labels.
You can click on “Edit Folders” to edit “Document Folder Structure” in the loan product configuration.
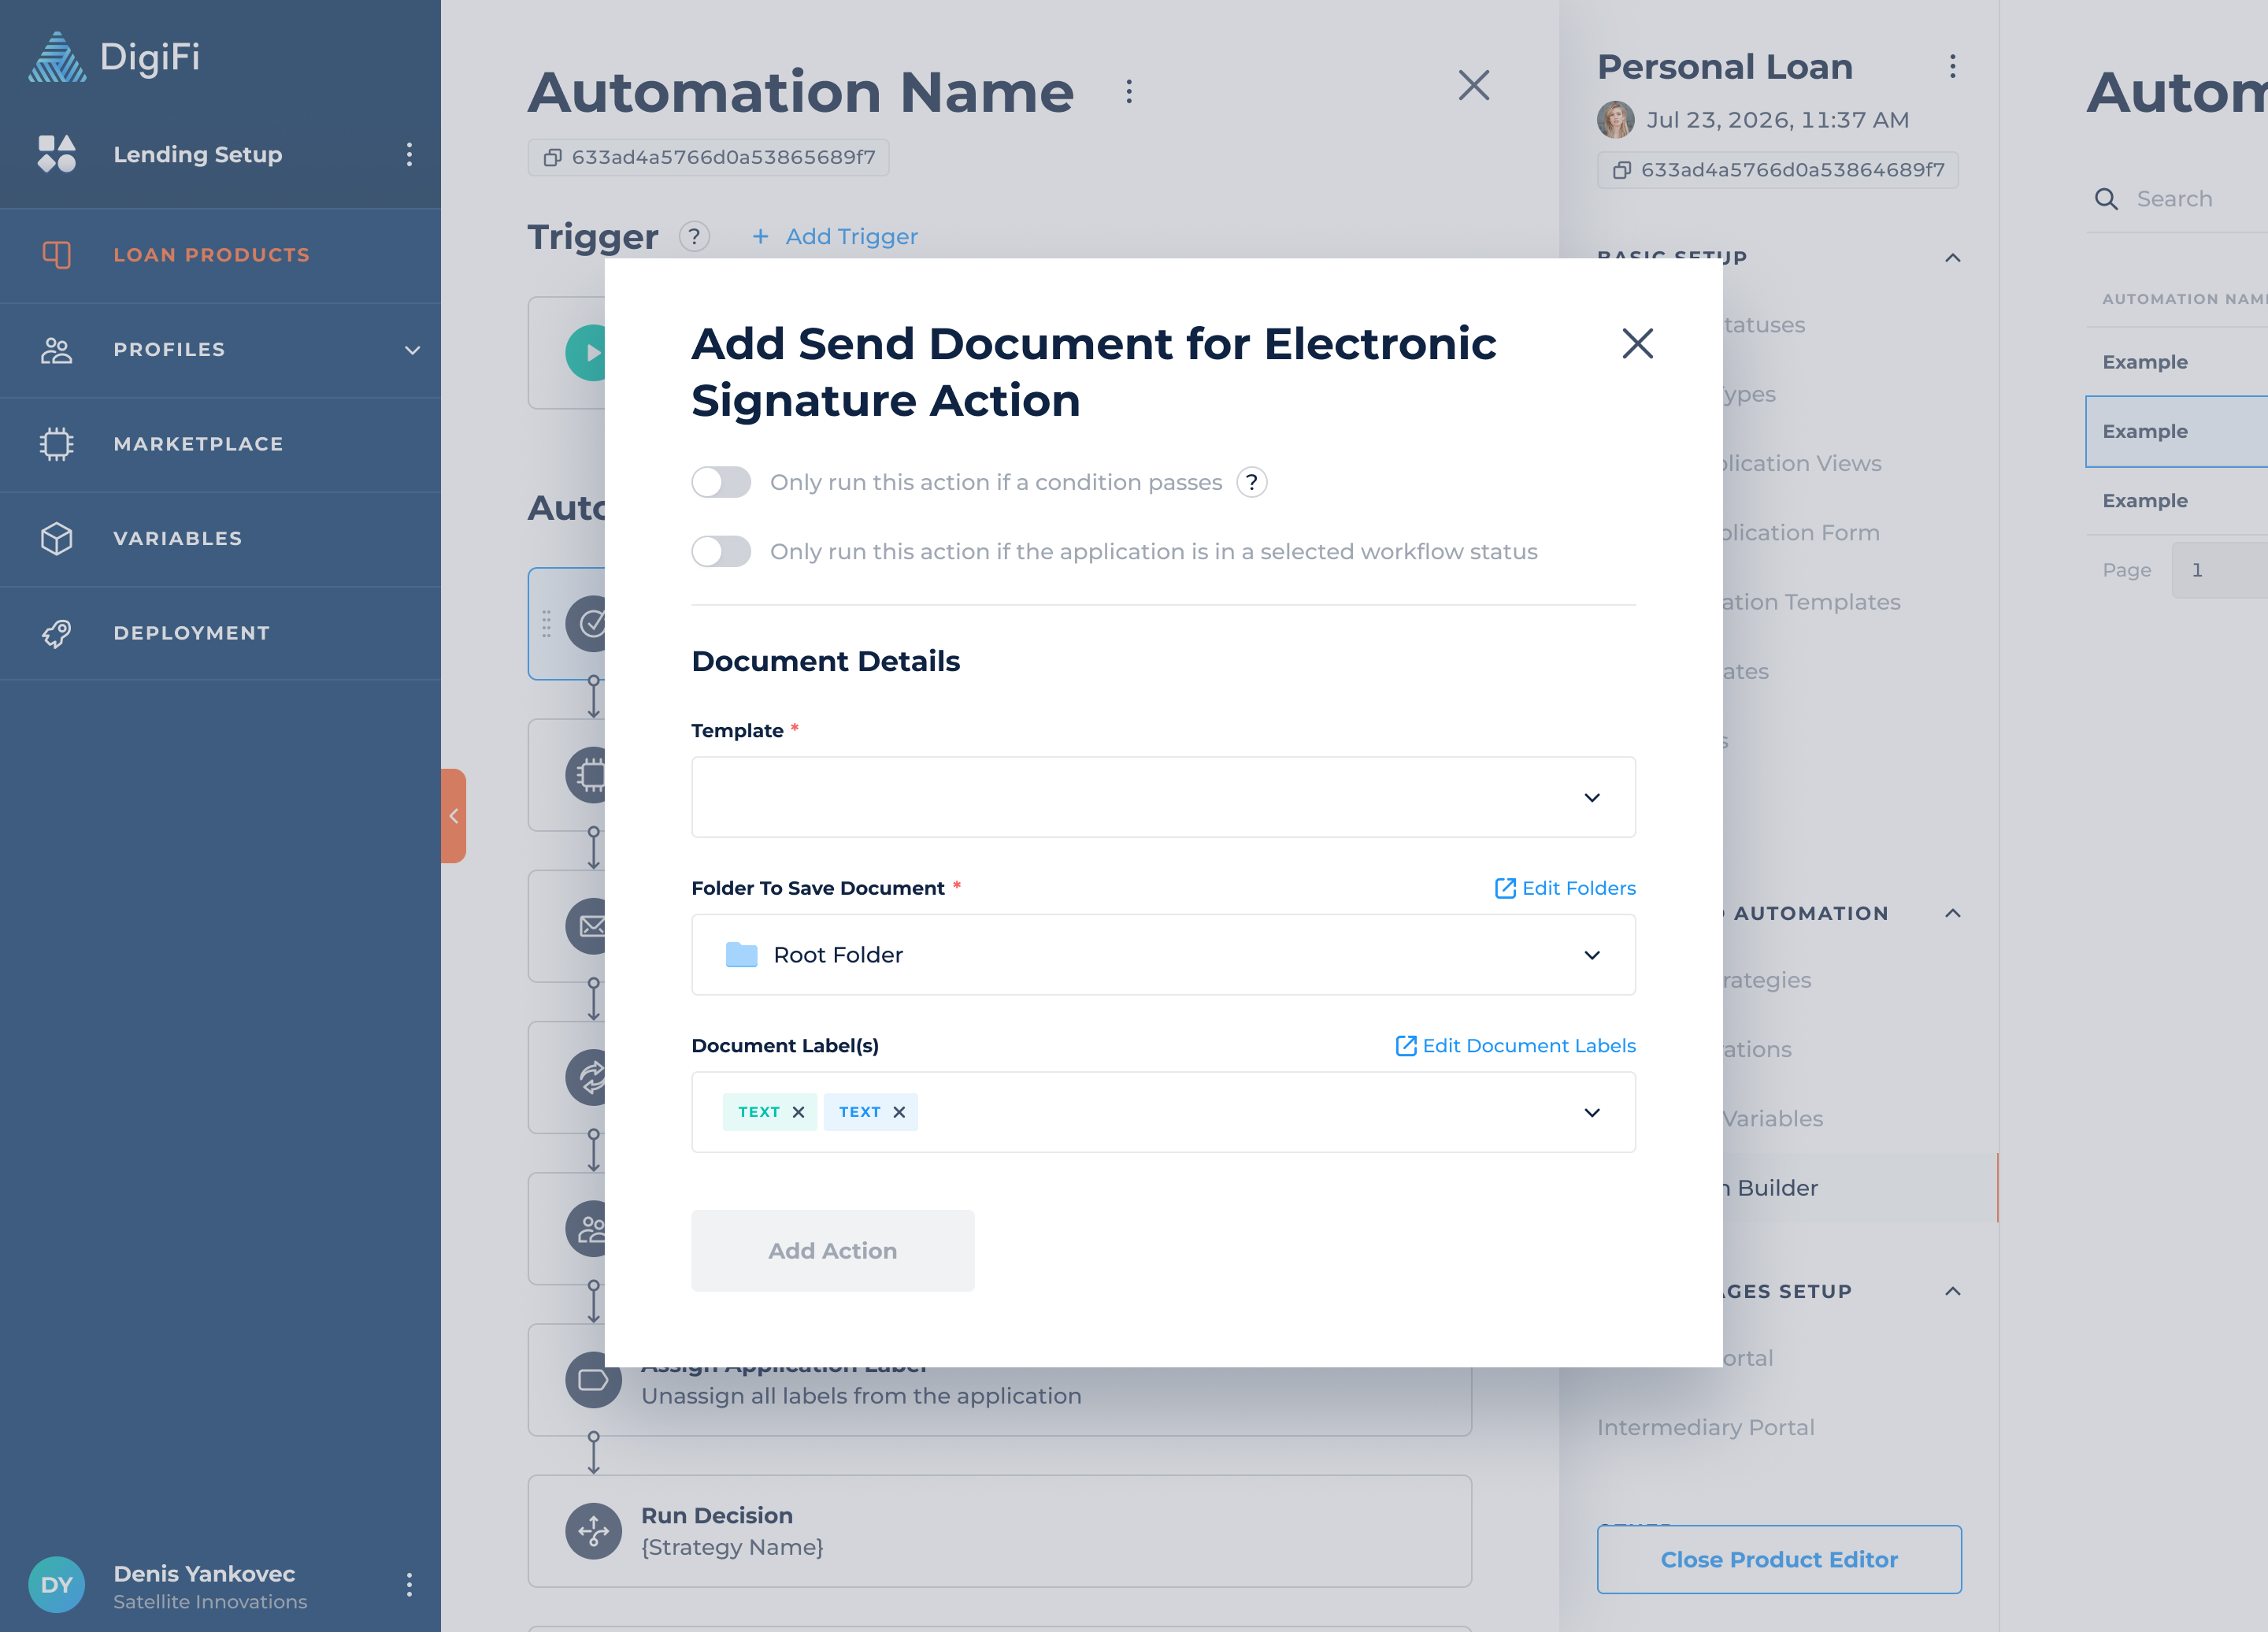
Actions (Send Document for E-Signature)
The "Send Document for E-Signature" action lets you automatically send a document for e-signature through a DocuSign or PandaDoc integrations.
When you add a “Send Document for E-Signature” action, you’ll be asked to provide the following information:
- Only send a document for e-signature if a condition passes, which lets you add conditionality to the send document for e-signature automation (in addition to the workflow status trigger). Conditions are created using DigiFi's formula language and must return TRUE (boolean) or "true" (string) to pass.
- Only run this action if the application is in a selected workflow status, which lets you execute actions based on the application's current workflow status.
- Template, which lets you select a template from the list of templates imported from the DocuSign or PandaDoc integrations.
- Folder To Save Document, which lets you select a folder to which a signed document will be saved. By default, it’s “Root Folder”.
- Document Label(s), which lets you select the document labels.
You can click on “Edit Folders” to edit “Document Folder Structure” in the loan product configuration.
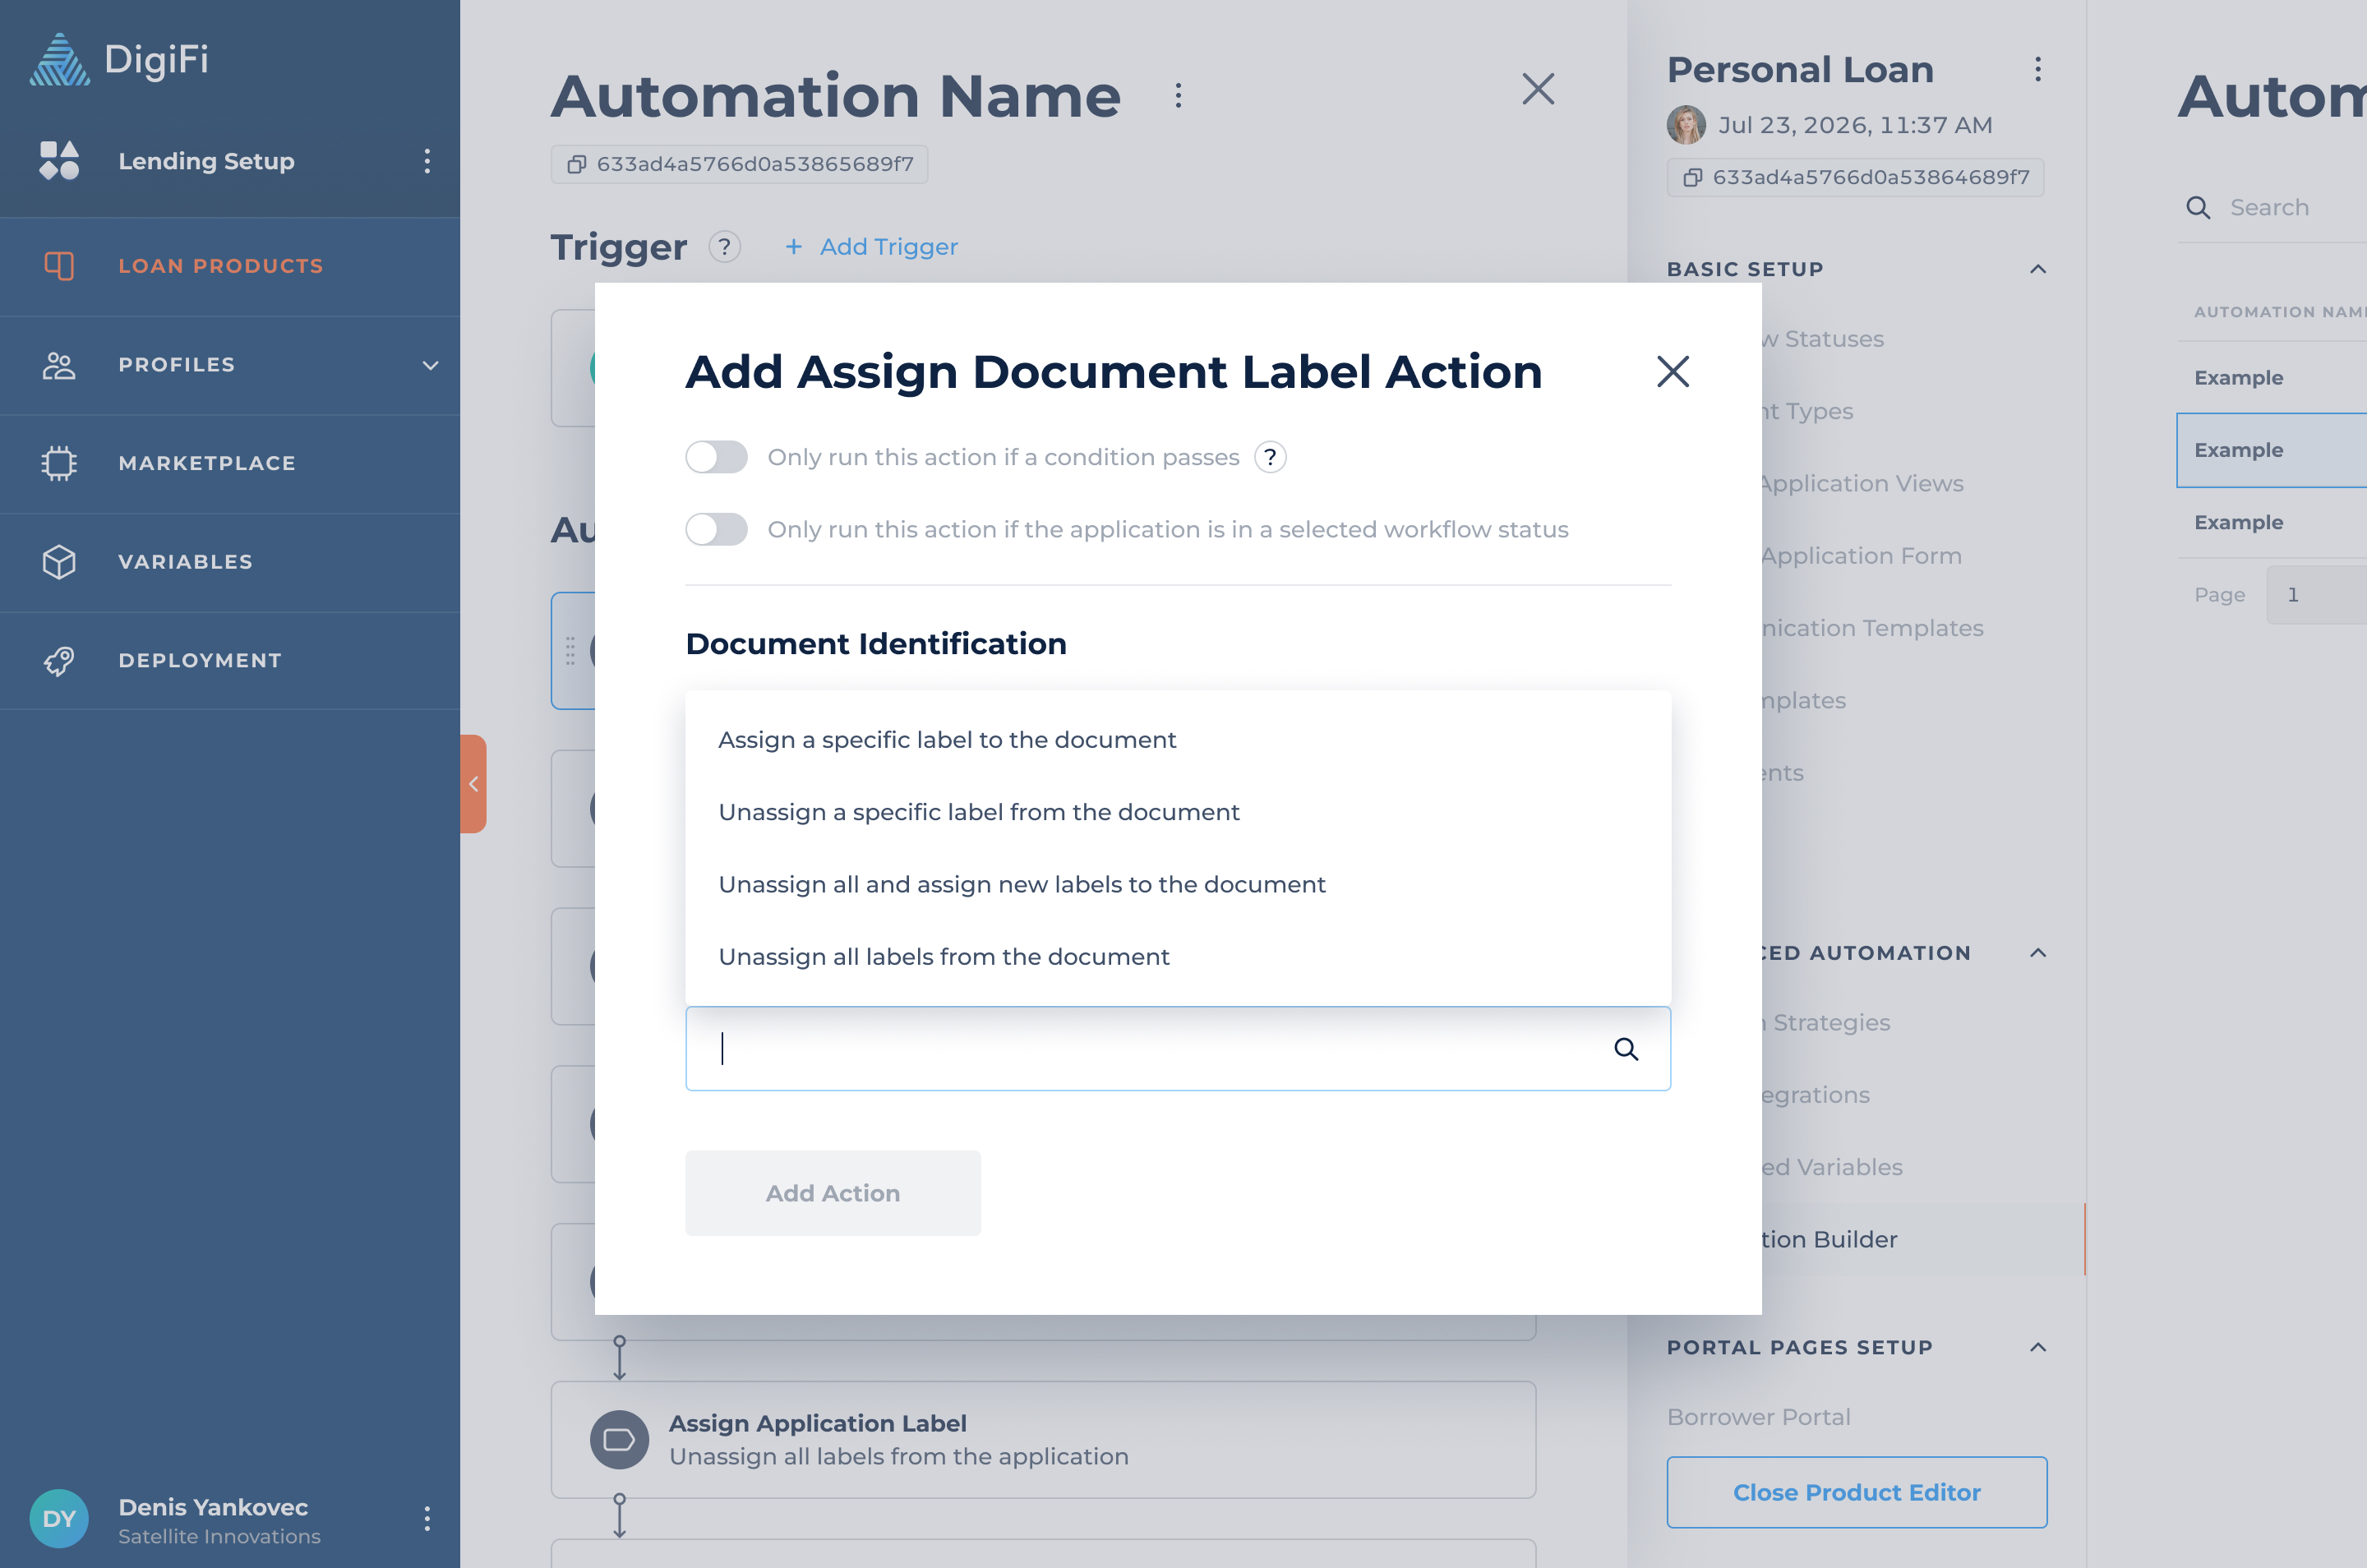
Actions (Assign Document Label)
The "Assign Document Label" action allows you to automatically assign or unassign labels from existing documents.
When configuring this action, you can define how the document is identified using the following options:
- Only run this action for the document that triggered this automation, this option is only applicable if the trigger is "When a document is uploaded" or "When a document is updated."
- Only run this action if the document has specific labels, which allows you to filter documents by existing labels so the action only applies to those with the selected labels.
After defining the document identification criteria, you will select the new document label assignment from the available options:
- Assign a specific label to the document, adds the selected label(s) to the document without changing any existing labels.
- Unassign a specific label from the document, removes only the selected label(s), leaving others unchanged.
- Unassign all and assign new labels to the document, removes all existing labels and replaces them with the selected label(s).
- Unassign all labels from the document, removes all labels from the document.
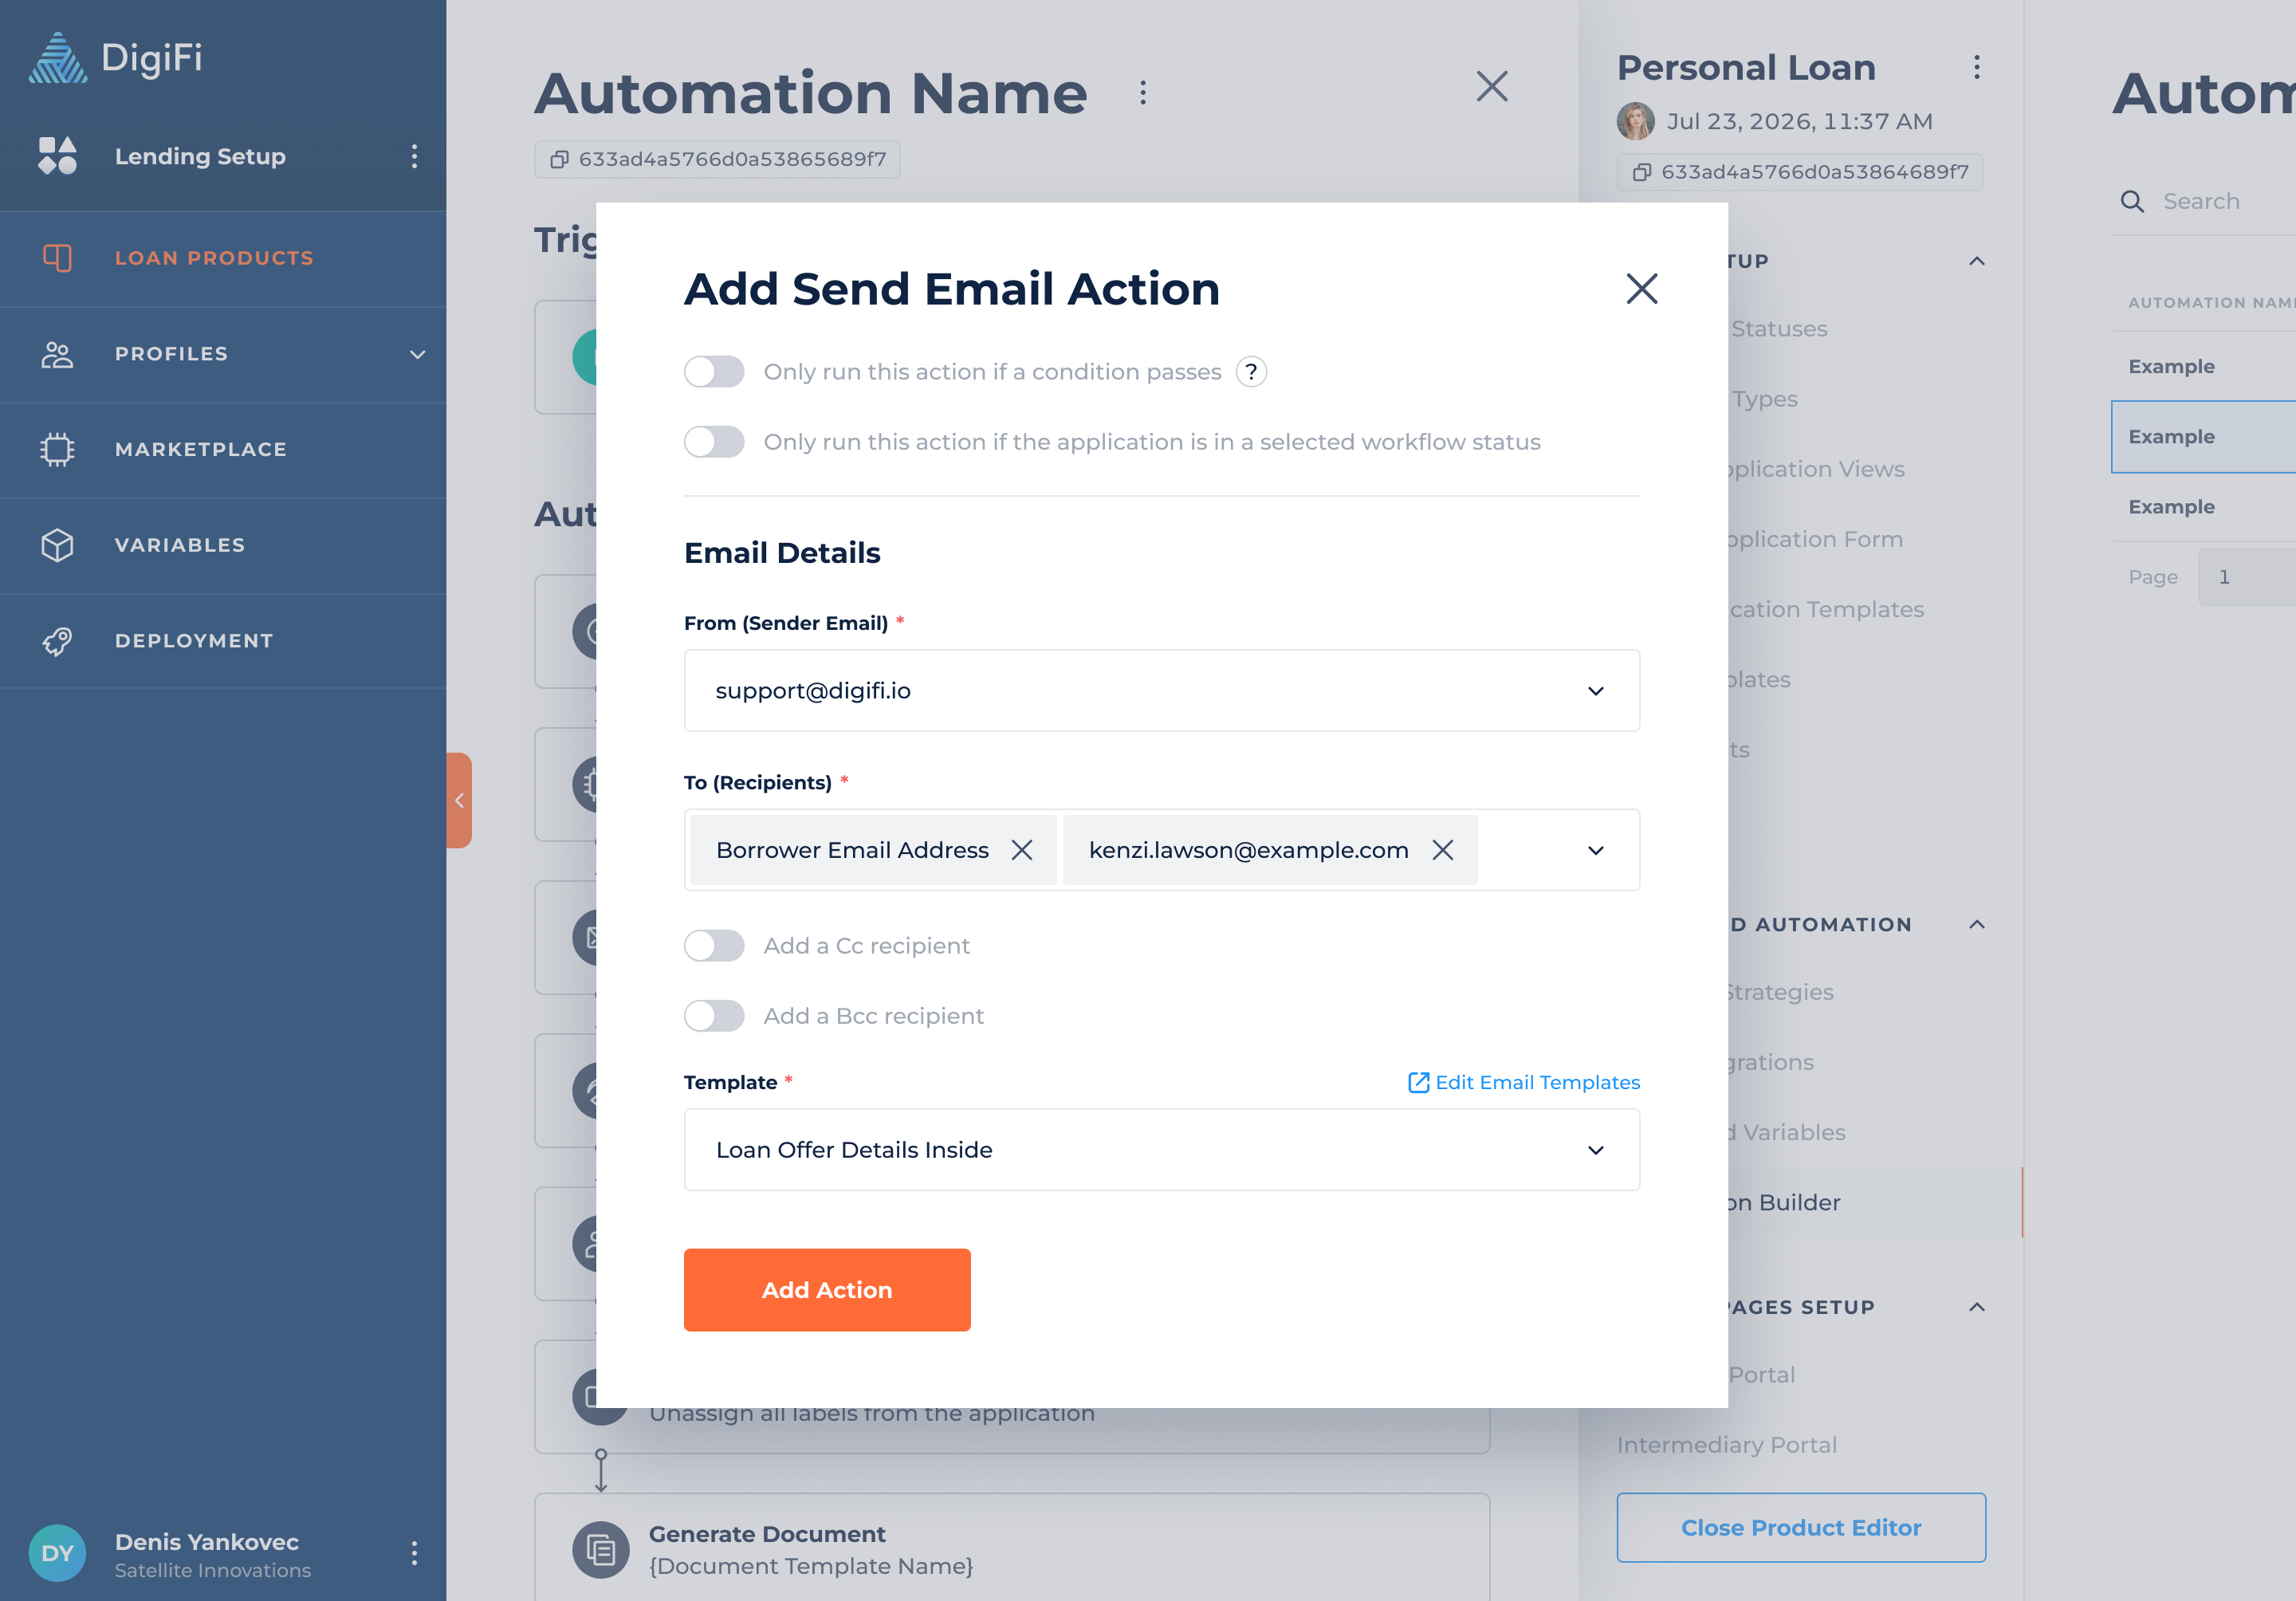
Actions (Send Email)
The "Send Email" action type lets you automatically trigger emails to the application's assigned team members, a borrower or the intermediary. Emails will be sent using your SendGrid Email Delivery integration and Company Branding, both of which must be set up to use this feature.
For ExampleWhen an Application is created and enters the first workflow status, you may want to automatically email:
- The assigned team member to let them know about the application.
- The borrower to confirm to them that their application was received.
When you add a “Send Email” action, you'll be asked to provide the following information:
- Only send this email if a condition passes, which lets you add conditionality to the email automation (in addition to the workflow status trigger). Conditions are created using DigiFi's formula language and must return TRUE (boolean) or "true" (string) to pass.
- Only run this action if the application is in a selected workflow status, which lets you execute actions based on the application's current workflow status.
- From, the sender email address, which you can select from the list of email addresses added and configured via SendGrid.
- To, Cc and Bcc, which are who the email will be sent to. Select one or multiple recipients (borrower, co-borrower(s), intermediary, a variable with an email address type or a custom address).
- Template, which lets you select the reusable email template that will be used to generate the email.
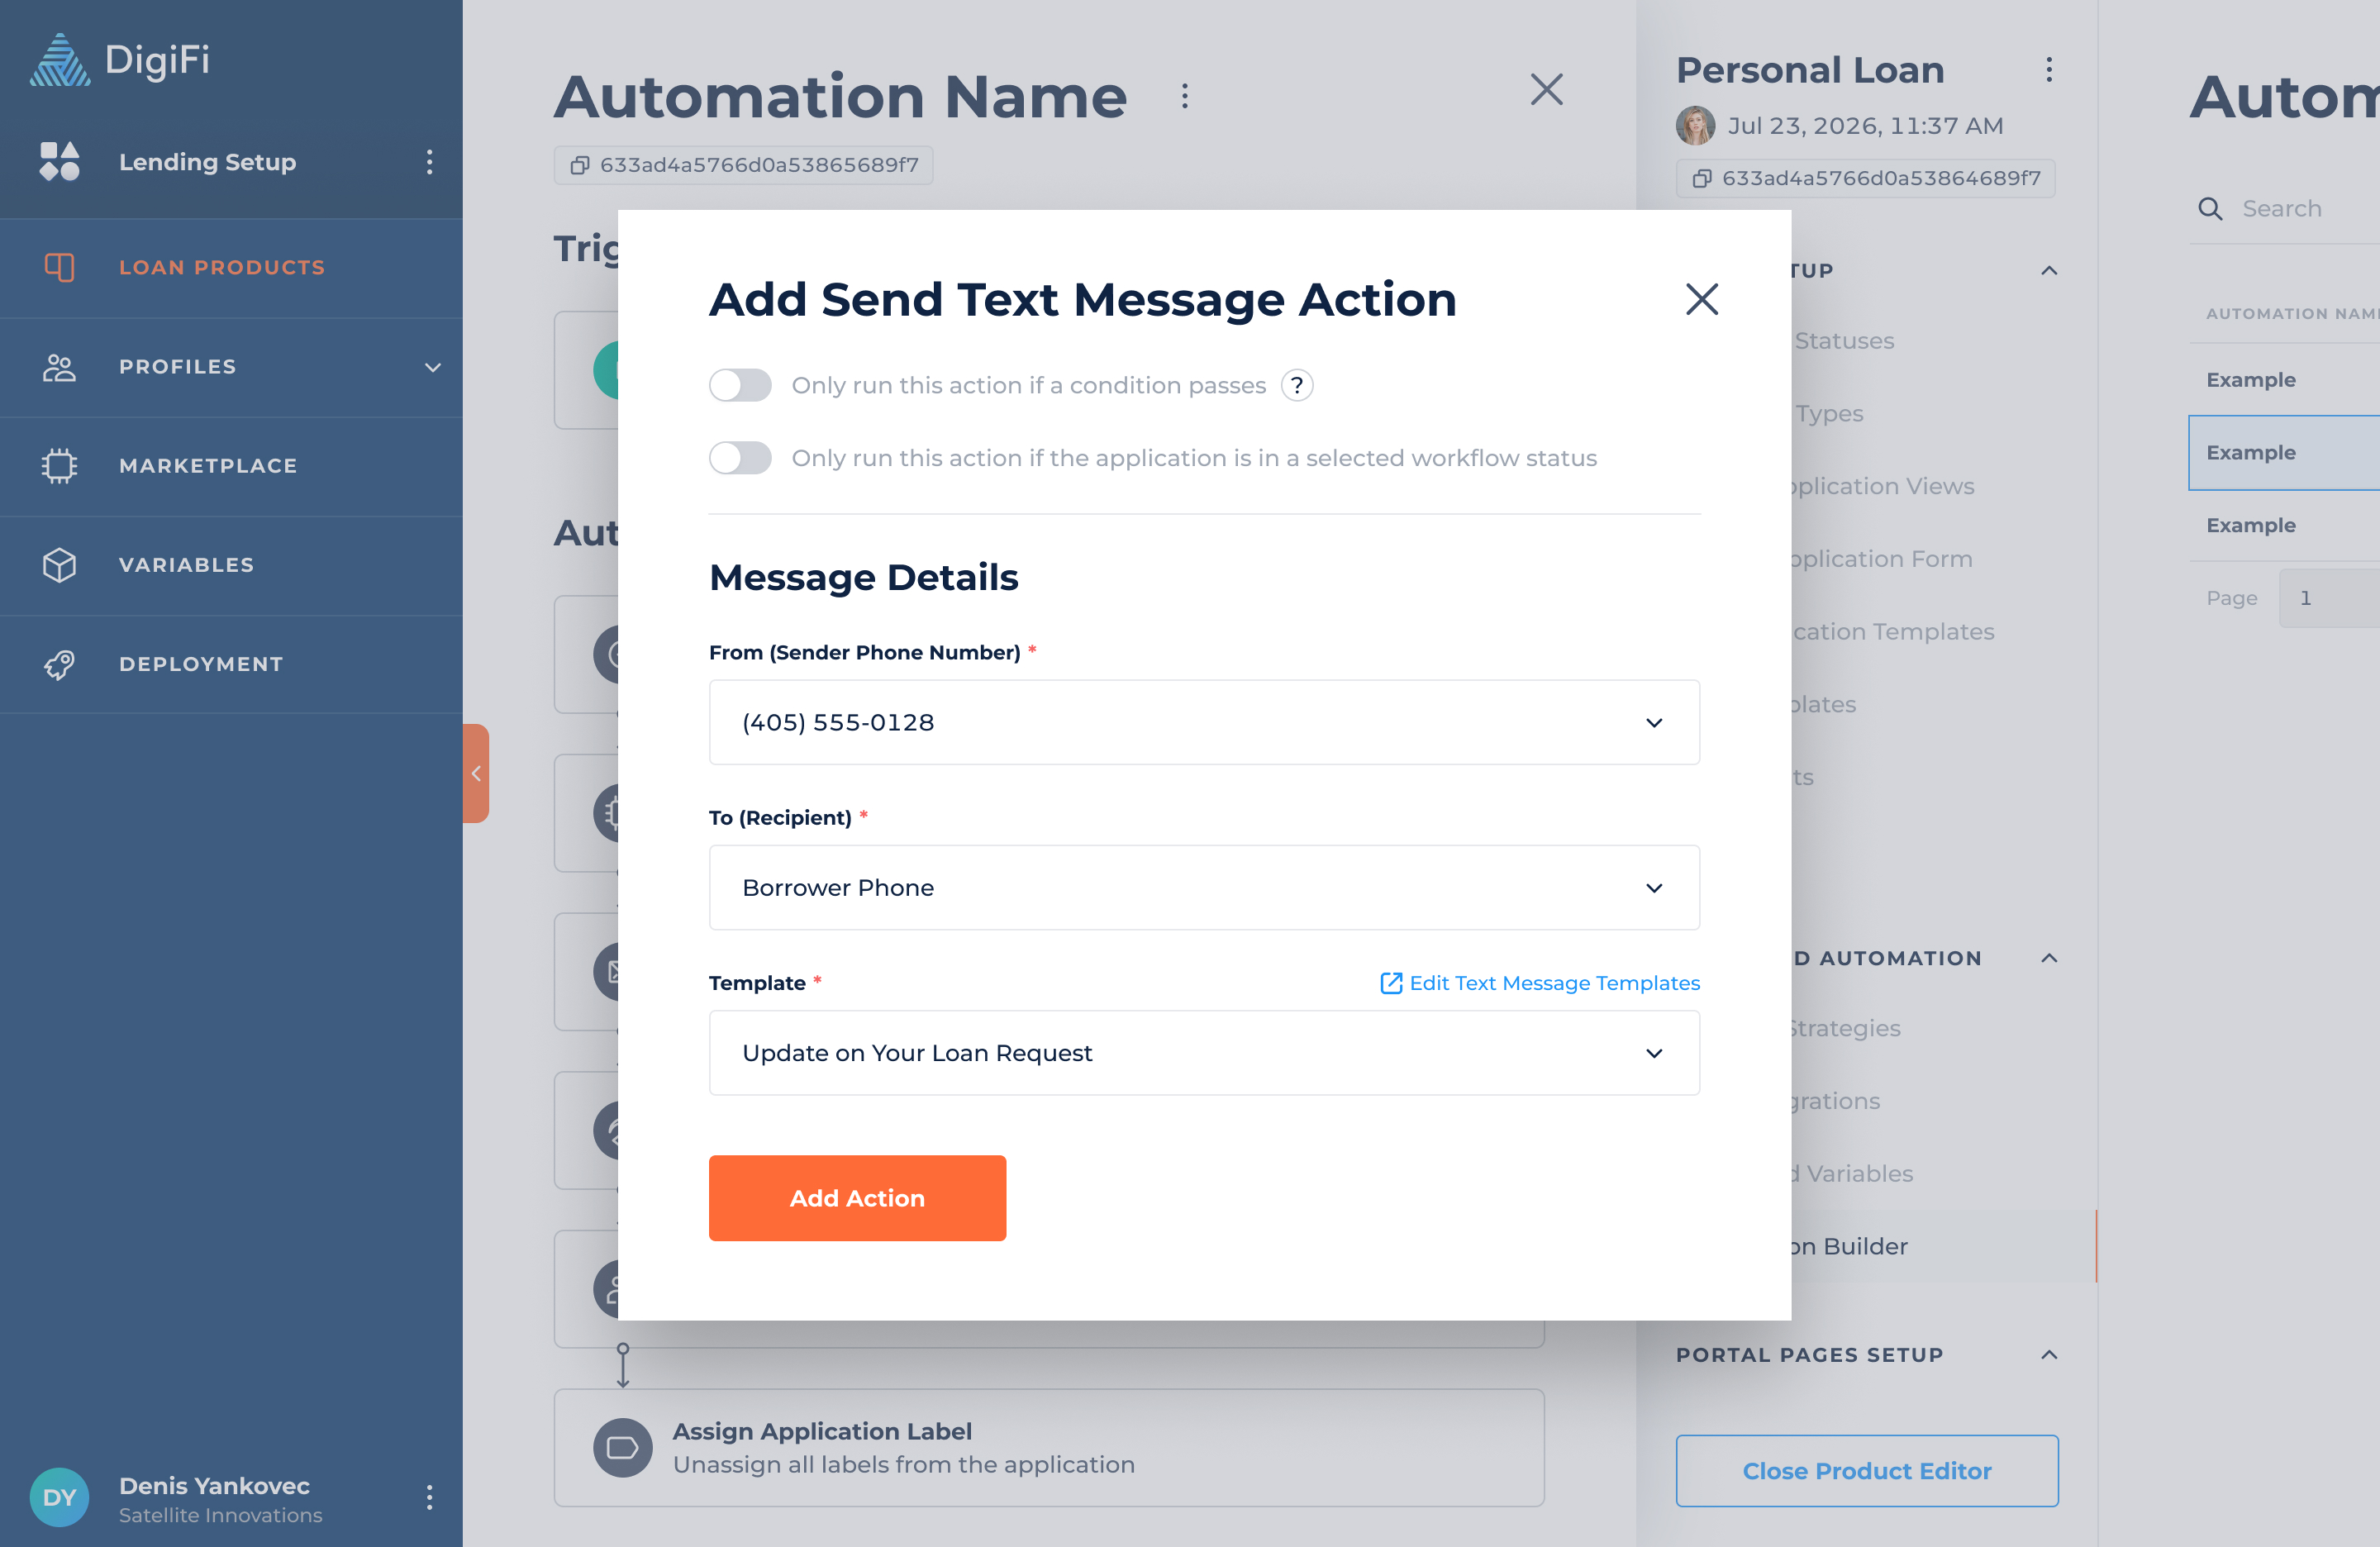
Actions (Send Text Message)
The "Send Text Message" action type lets you automatically trigger text messages to the application's borrower, co-borrower, or intermediary. Messages will be sent using Twilio integration which must be set up from the Integration Marketplace to use this feature.
When you add a “Send Text Message” action, you'll be asked to provide the following information:
- Only send this message if a condition passes, which lets you add conditionality to the message automation (in addition to the workflow status trigger). Conditions are created using DigiFi's formula language and must return TRUE (boolean) or "true" (string) to pass.
- Only run this action if the application is in a selected workflow status, which lets you execute actions based on the application's current workflow status.
- From, the sender phone number, which you can select from the list of phone numbers purchased in Twilio and added via the Twilio integration.
- To, which is a multiselect field that supports selecting the phone numbers of the borrower, co-borrower, intermediary or a variable with a phone number type and a manually entered phone number.
- Template, which lets you select the reusable text message template that will be used to generate the SMS.
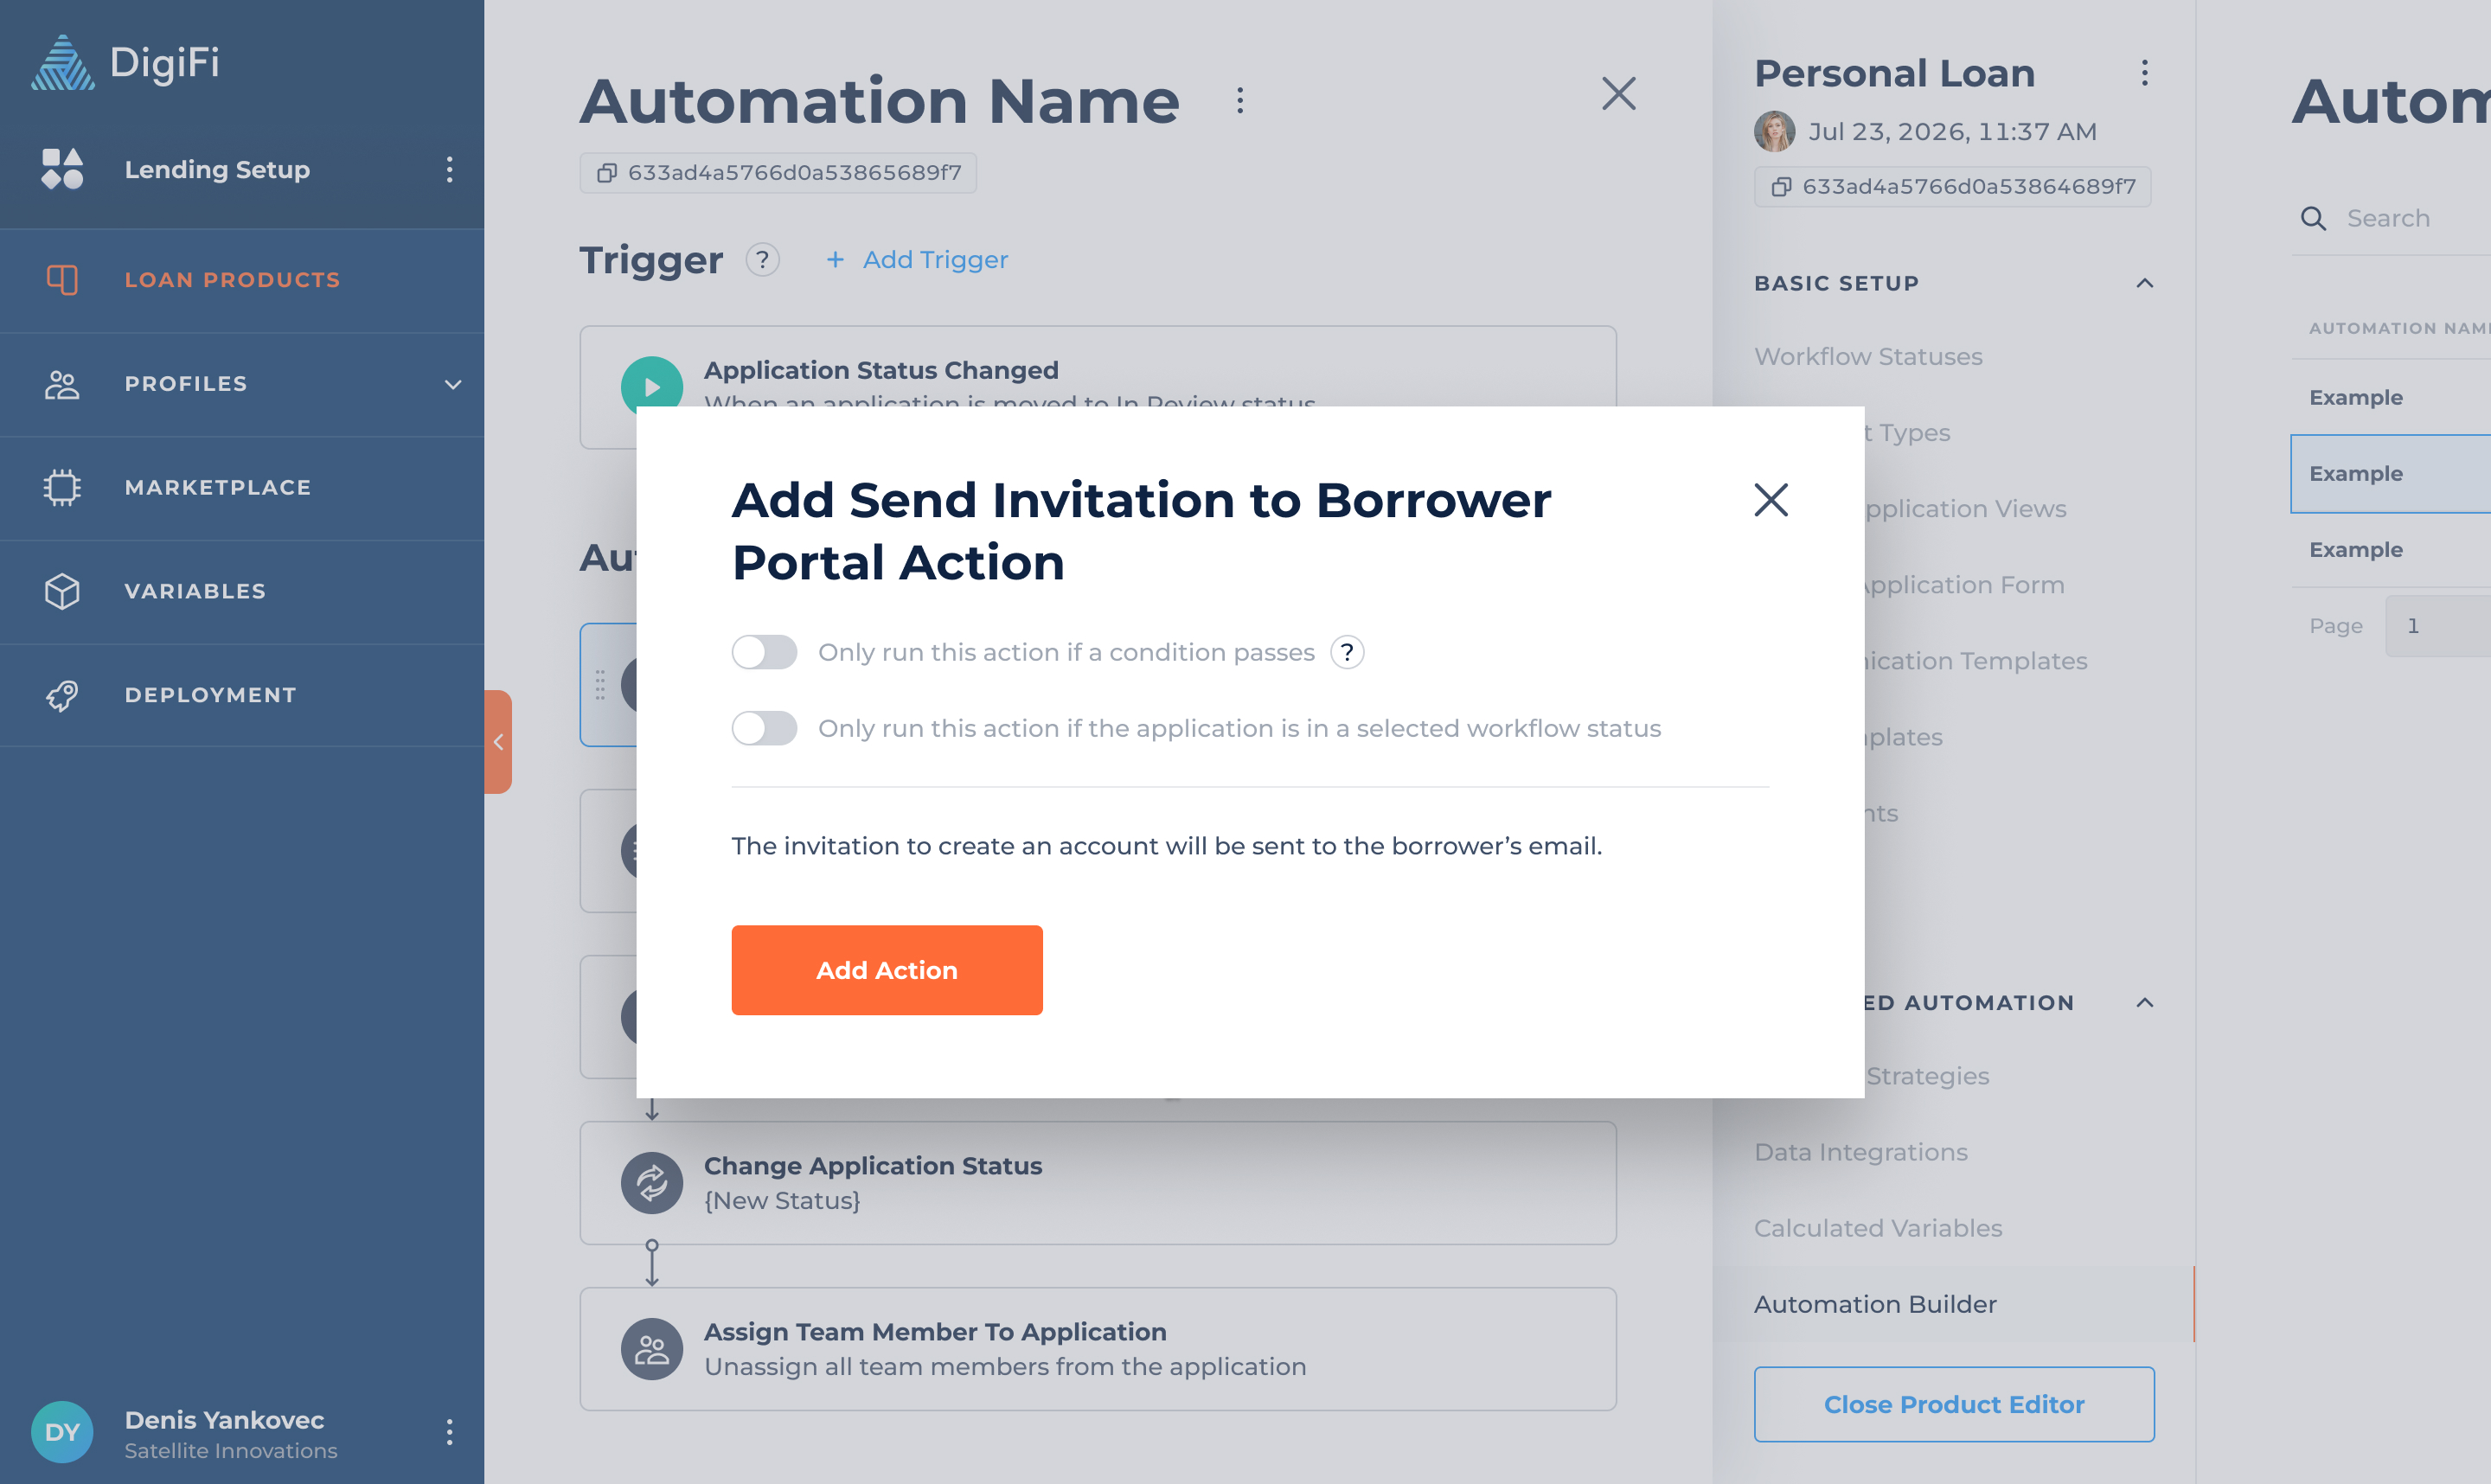
Actions (Send Invitation to Borrower Portal)
The “Send Invitation to Borrower Portal” action lets you automatically send email invitations to the digital borrower portal. After creating an account, borrowers can track their existing applications and create new ones.
When you add a “Send Invitation to Borrower Portal” action, you’ll be asked to provide the following information:
-
Only send invitation to borrower portal if a condition passes, which lets you add conditionality to the send invitation to borrower portal automation (in addition to the workflow status trigger). Conditions are created using DigiFi's formula language and must return TRUE (boolean) or "true" (string) to pass.
-
Only run this action if the application is in a selected workflow status, which lets you execute actions based on the application's current workflow status.
How To Delete An Automation
To delete an automation:
- Hover on the relevant row in the table of automations.
- Click on the 3-dots icon on the right side.
- Select the "Delete Automation" option.Action Typ
Updated 15 days ago