Single Sign-On
A guide to set up SAML SSO
DigiFi’s Single Sign-On uses the Security Assertion Markup Language (SAML 2.0) to integrate your user authentication with identity management services.
Within a SAML SSO configuration, the identity provider (IdP) takes on the responsibility of managing your organization’s user credentials. DigiFi functions as the service provider (SP), enabling users to access the platform using a unified set of credentials from their identity provider.
When using SAML SSO, members log in to their DigiFi organization using the organization's identity provider (IdP).
DigiFi supports SAML 2.0-based Identity Provider (IdP) solutions including widely used platforms like Okta, Microsoft Azure AD, Google Workspace, and other identity provider solutions supporting SAML 2.0 protocol.
The process for configuring SAML will depend on your specific identity provider. We've outlined the general process for implementing SAML SSO below.
Turn on SAML SSO in DigiFi
You'll need to set up SAML SSO in DigiFi. This will:
Turn on SAML SSO for your organization
Before proceeding with further steps, create a new custom application for DigiFi on the Identity Provider side (1 application per 1 DigiFi organization).
To turn on SAML SSO:
- Navigate to the General Settings > SAML SSO section.
- Copy the SAML configuration field values required for IdP from the “SAML configuration information required for Identity Provider” section in DigiFi and paste them to the corresponding fields on the IdP side.
- Copy the SAML configuration field values required for Service Provide (DigiFi) from Identity Provider and paste them to the corresponding fields in the “SAML configuration for DigiFi” section in DigiFi.
- Click on “Save Changes” in DigiFi.
If all the values were provided - the “Enable SSO” button will become active. Click on it to activate SSO.
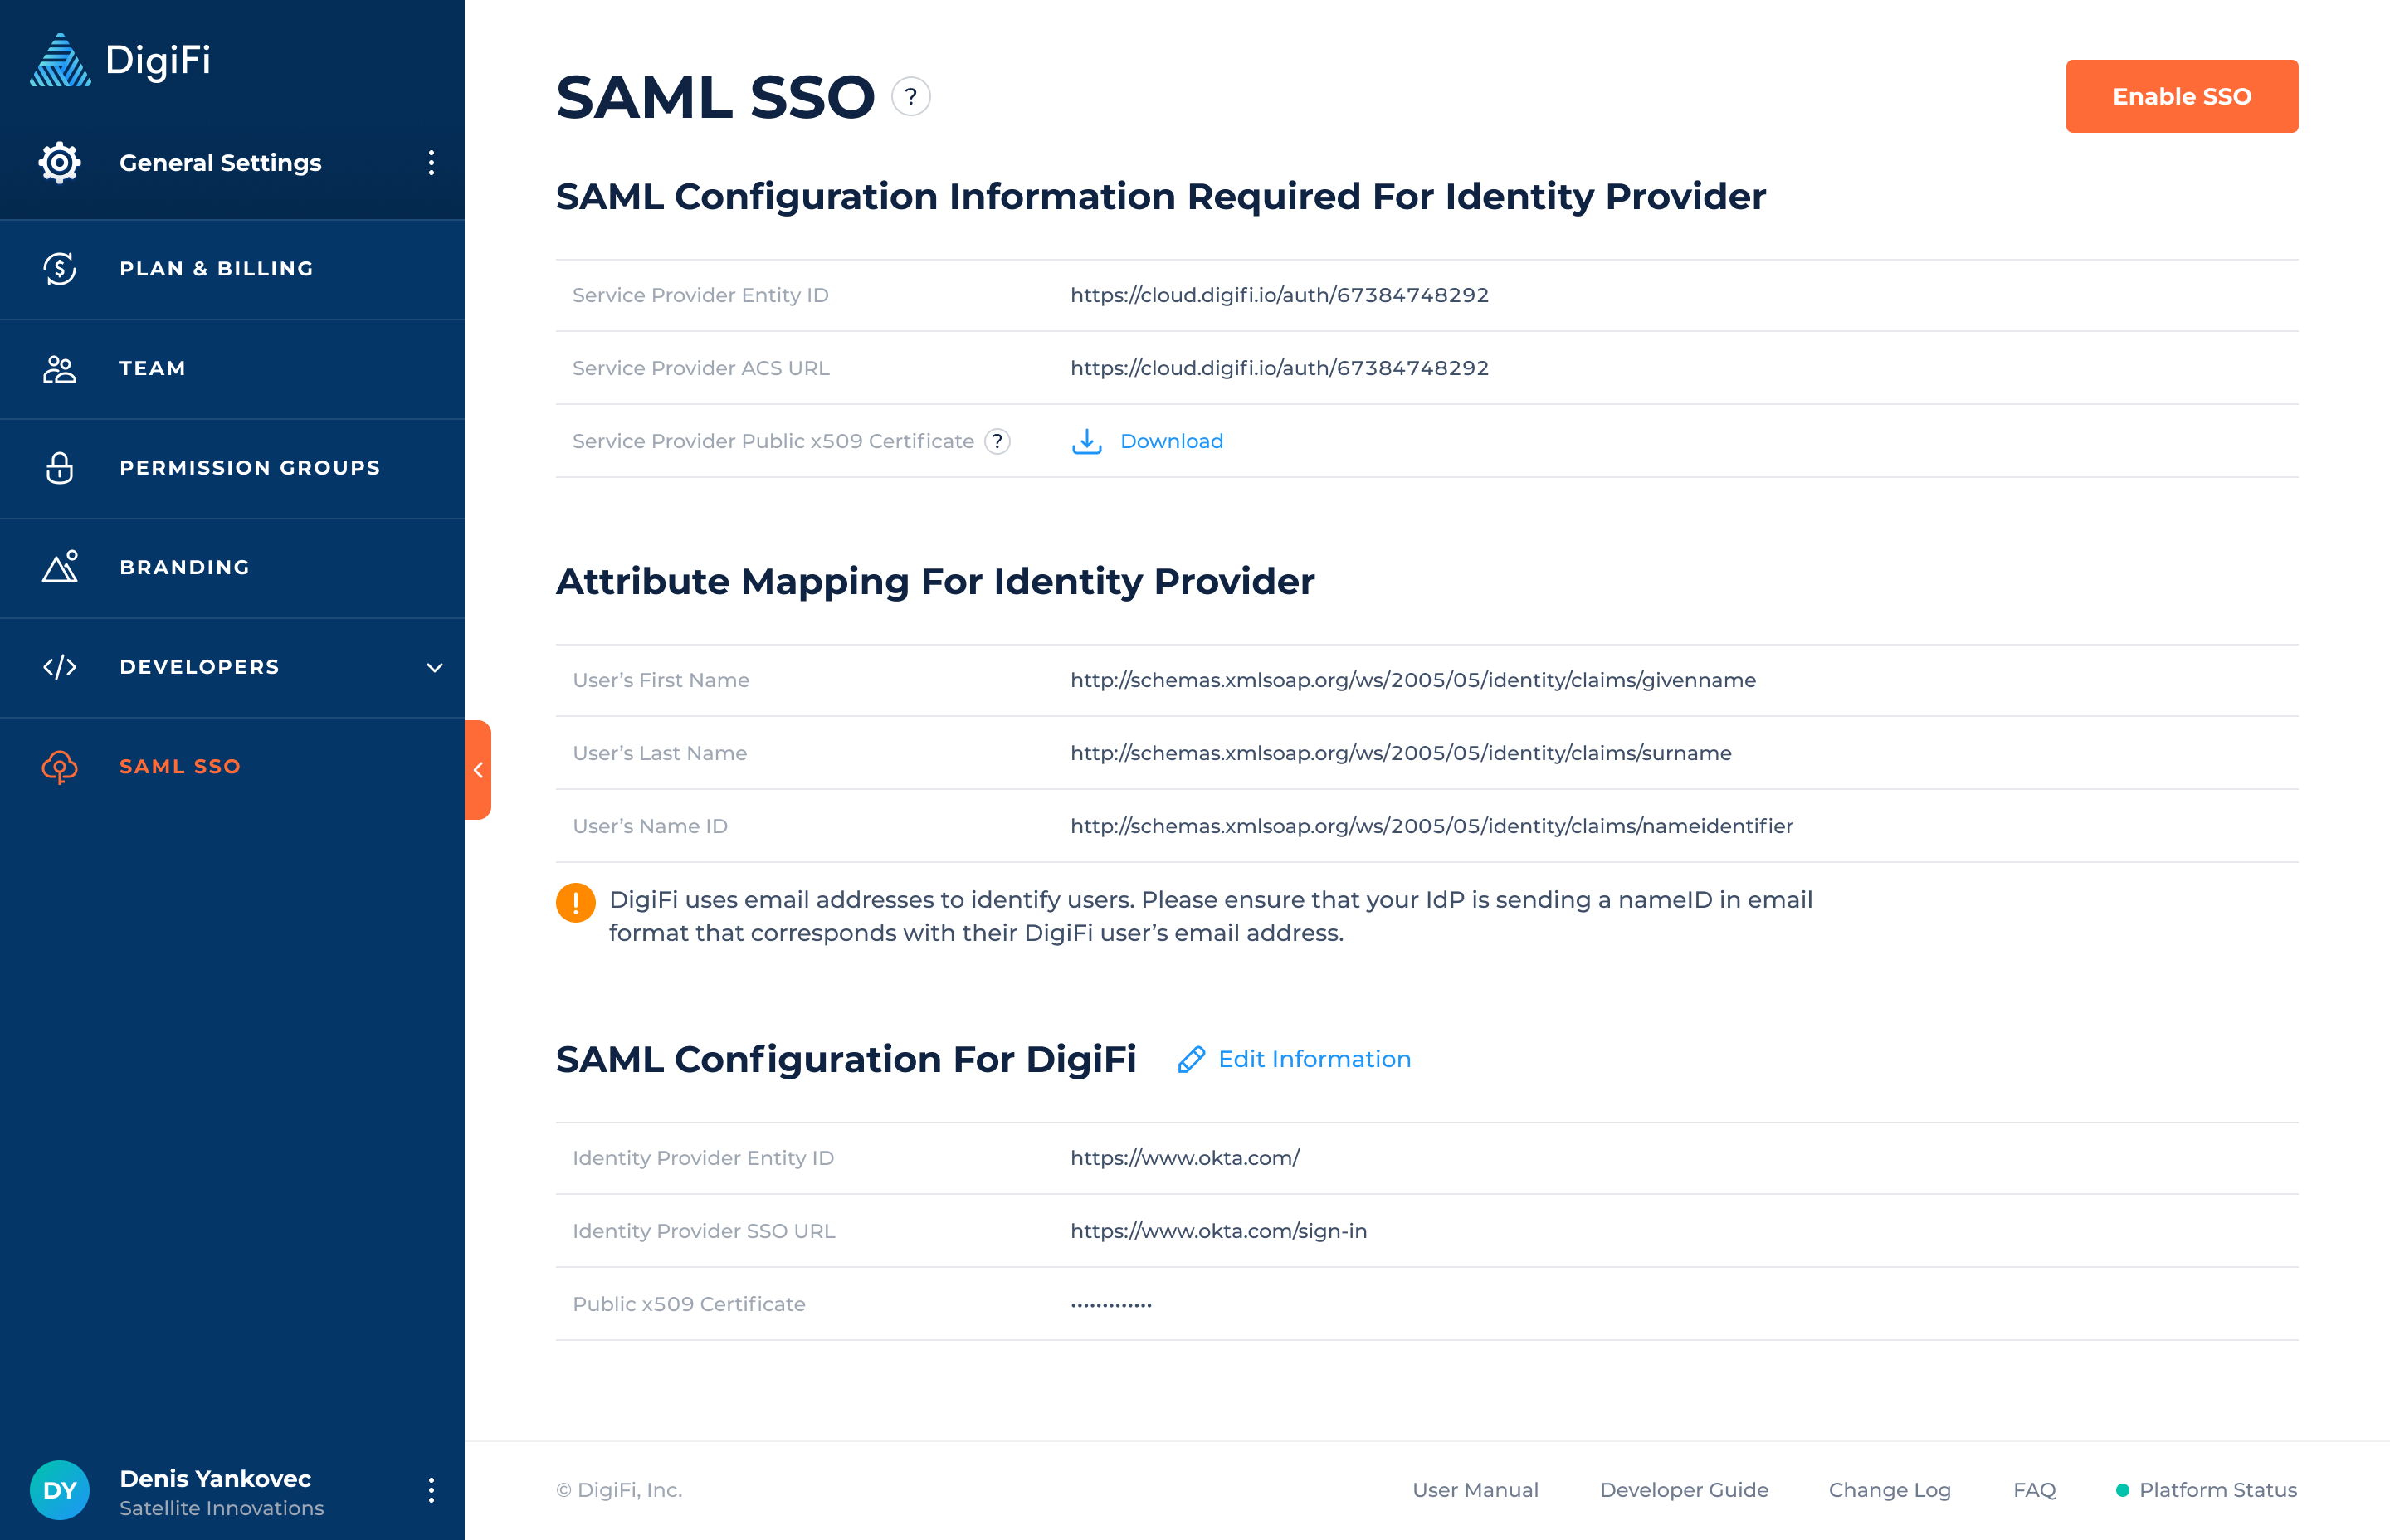
Click on the “Disable SSO“ button in the active SSO configuration if you want to edit or update it.
How To Connect Your Identity Provider To The DigiFi Organization
Complete the rest of the setup process with your identity provider. Here are the steps for the most popular Identity Providers:
Configure SSO in Google
In your Google Admin console (at admin.google.com):
- Go to Menu > Apps > Web and mobile apps.
- Click on Add app > Add custom SAML app.
- On the App Details page:
- Enter the name of the custom app.
- (Optional) Upload an app icon.
- Click on the "Continue" button.
You are now on the Google Identity Provider details page. To configure the application you have to perform the mapping between the DigiFi application and the Google Identity Provider application. Hence, perform the following steps.
- Open the DigiFi application. Go to General Settings > SAML SSO and copy the following values from the Google Identity Provider details page to perform the mapping.
| Google Field | DigiFi Field | DigiFi Field Example |
|---|---|---|
| SSO URL | Identity Provider SSO URL | https://accounts.google.com/o/saml2/idp?idpid=123abc |
| Entity ID | Identity Provider Entity ID | https://abc.com |
| Certificate | Public x509 Certificate | Must begin with -----BEGIN CERTIFICATE----- and end with -----END CERTIFICATE----- |
-
Open the DigiFi application. Go to General Settings > SAML SSO and copy values to the Google Identity Provider details page to perform the mapping.
Google Field DigiFi Field Example ACS URL Service Provider ACS URL https://cloud.digifi.io/auth/67384748292 Entity ID Service Provider Entity ID https://cloud.digifi.io/auth/67384748292
For Name ID format select “EMAIL”. For Name ID select “Basic Information > “Primary Email”.
- Click on the "Finish" button.
Turn on the SAML app.
To turn on the SAML app:
- In your Google Admin console (at admin.google.com) go to Menu > Apps > Web and mobile apps.
Select your SAML app (DigiFi). - Click on User Access and select “ON for everyone”.
- Enable SSO in DigiFi. After that, you can start creating users with the Google Identity Provider authorization option in DigiFi. Check out this article for more details.
Configure SSO in Azure AD
In your Azure Active Directory go to Enterprise applications:
- Click on “+ New Application”.
- Click on Create your own application > Add application name > Click on the "Create" button.
The overview page for the created application will be opened. Open the DigiFi application. Go to General Settings > SAML SSO and copy values to the Azure AD details page to perform the mapping. Hence, click on Setup single sign-on > SAML.
- Click on Edit and:
| Azure AD Field | DigiFi Field | Example |
|---|---|---|
| Add reply URL | Service Provider ACS URL | https://cloud.digifi.io/auth/67384748292 |
| Add Identifier | Service Provider Entity ID | https://cloud.digifi.io/auth/67384748292 |
- Click on the "Save" button.
Go to edit Attributes & Claims page:
- Click on Unique User Identifier (Name ID) in the Claim Name section.
- Select "user.email" in the Source attribute field.
- Click on the "Save" button.
Go back to the Single sign-on page. In the SAML Certificates section click on the Download button to download the certificate:
- Rename the downloaded file from .cer to .txt.
- Open the file > copy its value > Paste it into the Public x509 Certificate field in DigiFi.
Go back to the Single sign-on page in Azure > Set up section. Open the DigiFi application. Go to General Settings > SAML SSO and copy values from the Azure AD setup section to perform the mapping.
| Azure AD Field | DigiFi Field | Example |
|---|---|---|
| Login URL | Identity Provider SSO URL | https://login.microsoftonline.com/abc |
| Azure AD Identifier | Identity Provider Entity ID | https://sts.windows.net/abc |
Enable SSO in DigiFi. Don’t forget to add users in Azure AD by following the instructions here. After that, you can start creating users with the Azure AD authorization option in DigiFi. Check out this article for more details.
Configure SSO in Okta
In your Okta account go to Applications tab > Applications sub-tab:
- Click on the "Create App Integration" button.
- Choose the SAML 2.0 option.
- Type the app name (DigiFi) and click on the "Next" button.
Open the DigiFi application. Go to General Settings > SAML SSO and copy values to the Okta application configuration page to perform the mapping.
| Azure AD Field | DigiFi Field | Example |
|---|---|---|
| Single sign-on URL | Service Provider ACS URL | https://cloud.digifi.io/auth/67384748292 |
| Audience URI (SP Entity ID) | Service Provider Entity ID | https://cloud.digifi.io/auth/67384748292 |
For Name ID Format select “Email Address”. For Application Username select “Email”.
Perform the mapping for attribute Statements:
| Name (copy from DigiFi) | Name Format | Okta Value |
|---|---|---|
| …/givenname | Basic | user.firstName |
| …/surname | Basic | user.lastName |
Enable SSO in DigiFi. Don’t forget to add users in Okta by following the instructions here . After that, you can start creating users with the Okta authorization option in DigiFi. Check out this article for more details.
Updated about 1 year ago