Decision Strategies
How to build and manage decision and integration strategies.
Overview of Decision Strategies
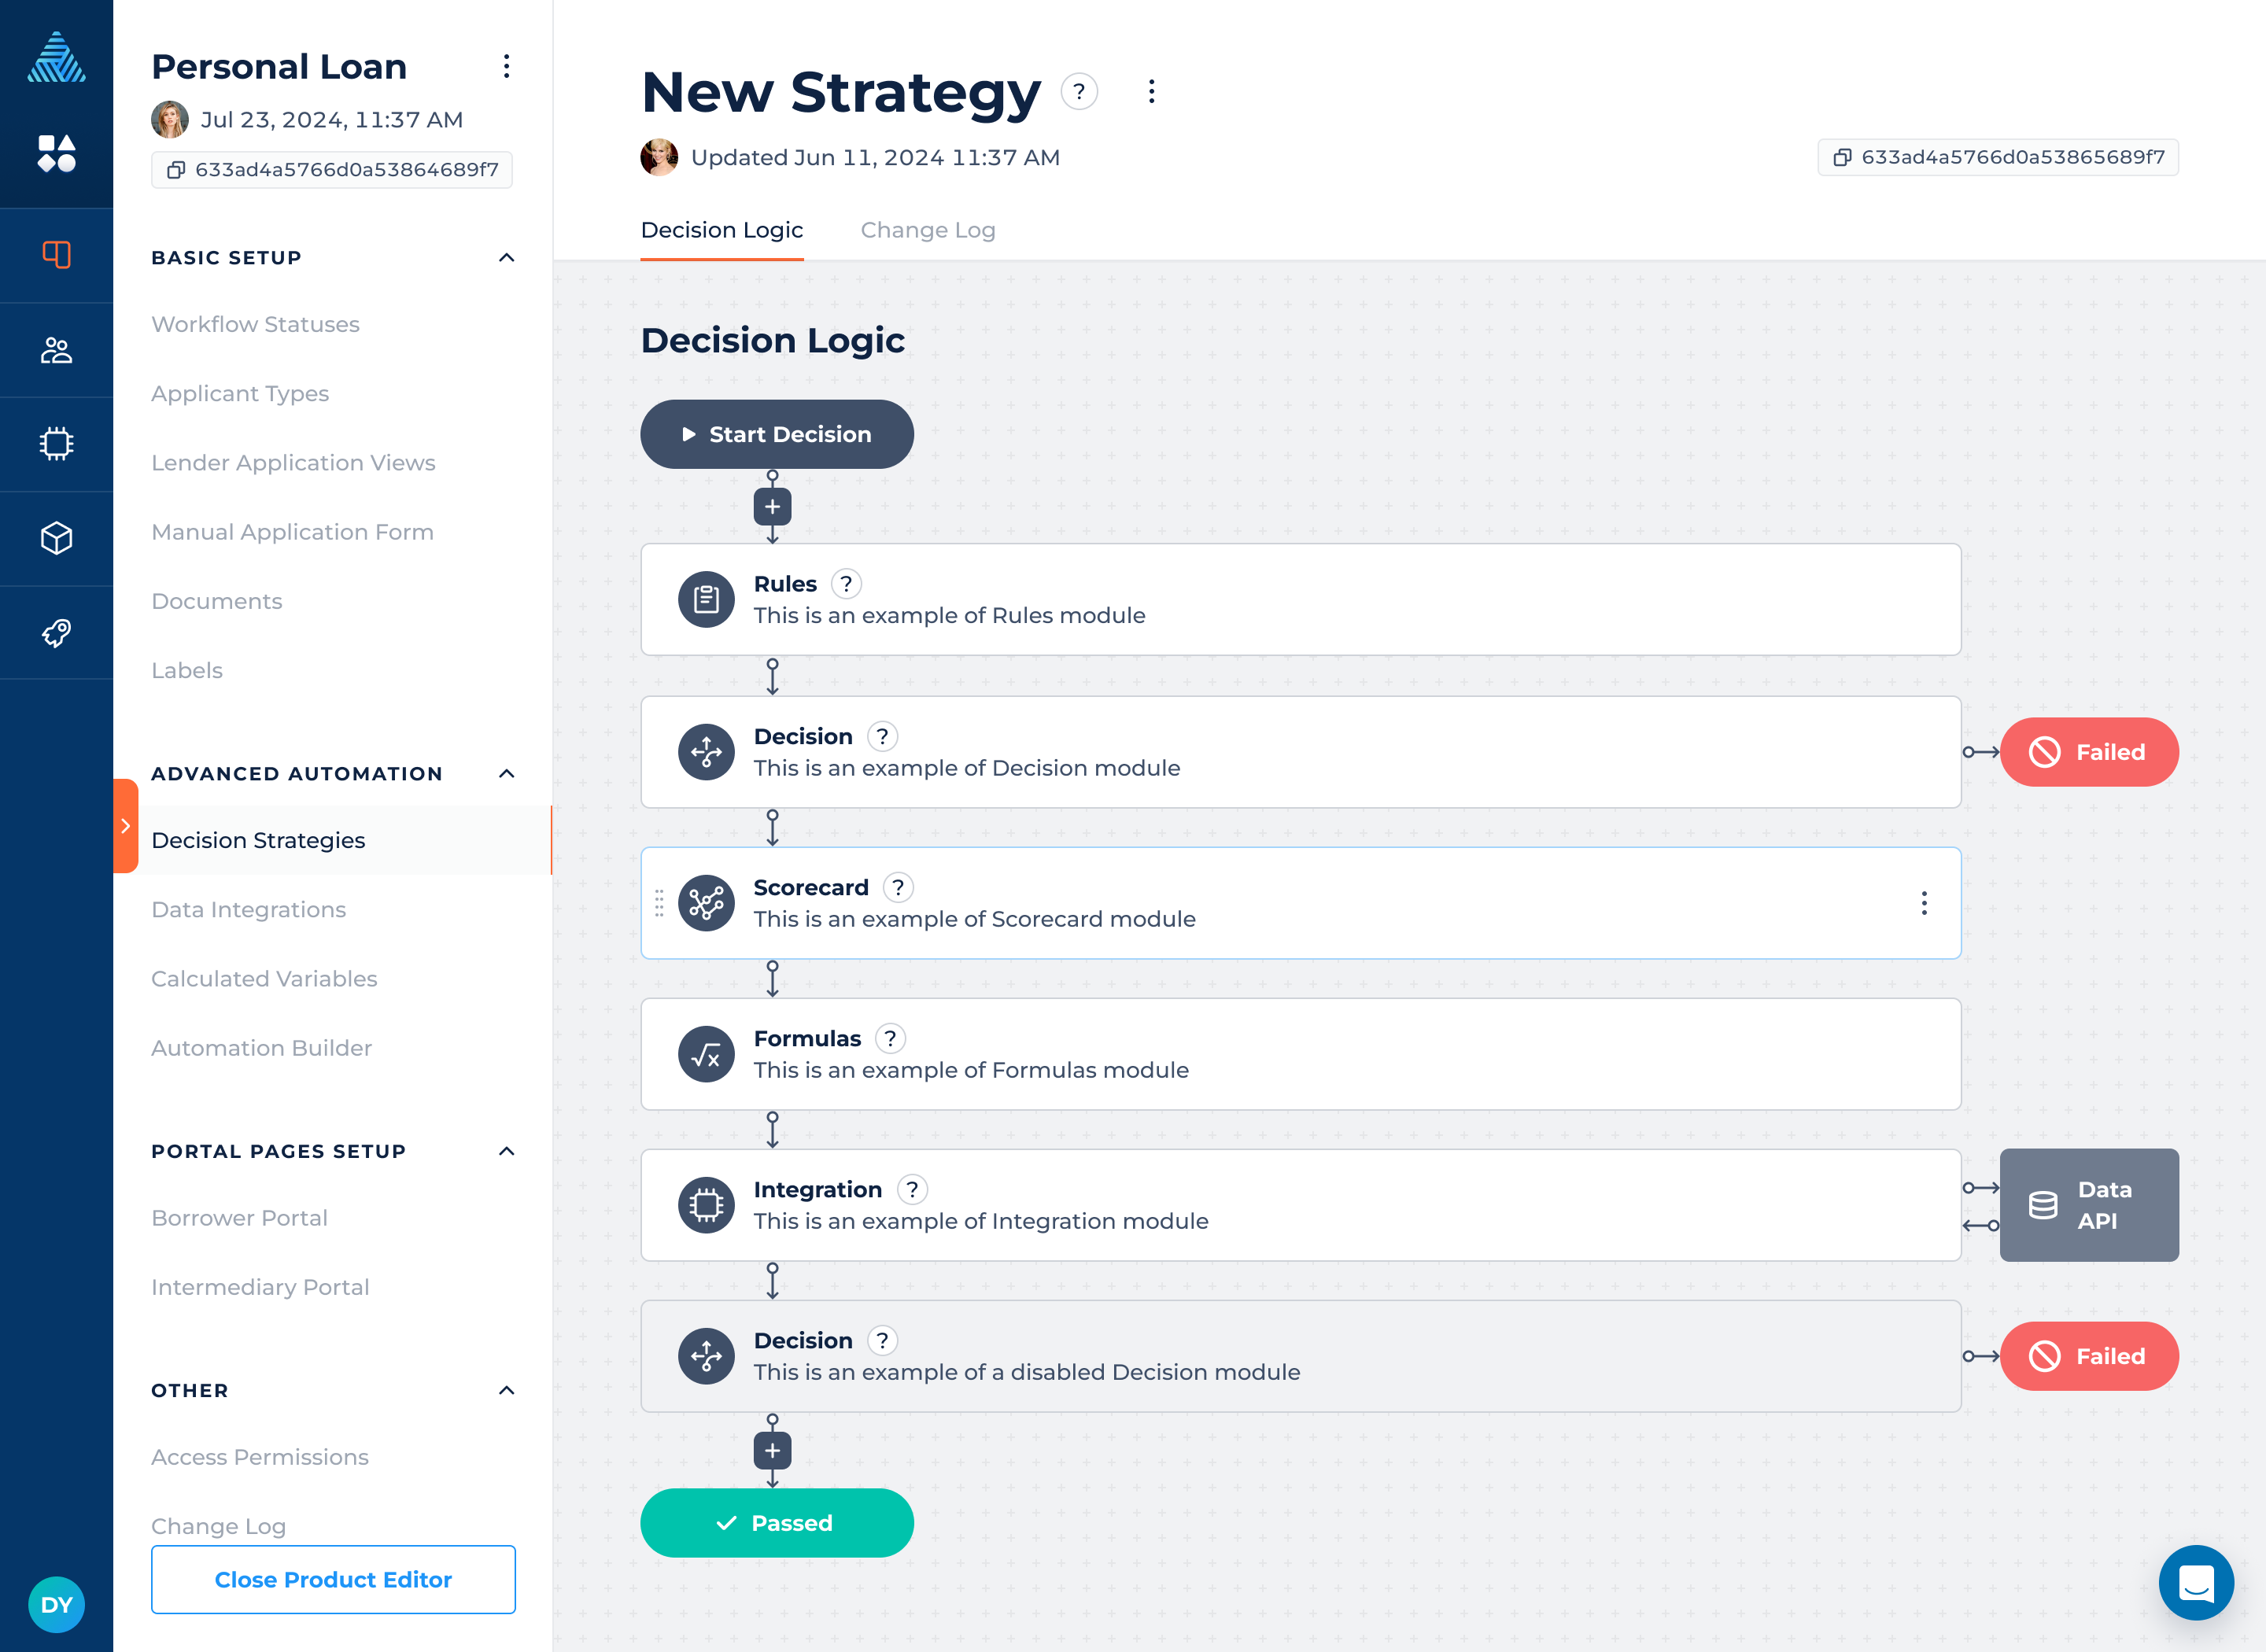
DigiFi's platform empowers lenders to fully automate data integrations, underwriting, verification and other lending decisions - without needing to write any code. This is done by building and running decision strategies.
Decision strategies are the central element of decisioning within DigiFi and are fully-automated single-step or multi-step execution paths that can include integrations, rules, formulas, calculations and more. Decision strategies let you build and control complex decisioning through a no-code, drag-and-drop interface. Your lending process can include as many decision strategies as you need.
Within each decision strategy, you can find the "Decision Logic" and "Change Log" tabs:
- Decision Logic allows you to configure the decisioning process with the help of modules and rules.
- Change Log tab shows all the changes made within the decision strategy.
Within a decision strategy, there are two major sub-elements:
- Modules are placed within decision strategies and contain a group logic (e.g. an integration, eligibility rules, a scorecard, etc.)
- Rules contain specific business logic and conditions, which can be as complex as your business logic requires. Rules are built using variables and DigiFi Formula Language.
For Example:Here's simple example of each level in a decision strategy:
- Strategy: Personal Loan Underwriting
- Module: Minimum Credit Requirements
- Rule: GTE(borrower_credit_score, 600)
Creating A Decision Strategy
To create a new decision strategy:
- Click on the button.
- Provide a name and a description for your strategy, then click “Add Strategy”.
- You can update the decision strategy's name and description by clicking on three dots beside the title and then clicking on “Edit Basic Information”.
You can then begin adding modules to the decision strategy.
Setting Up A Decision Process
Once you have created a decision strategy, you will see a blank workflow for the decision logic. From here you can begin implementing a multi-step integration and decisioning process by adding modules.
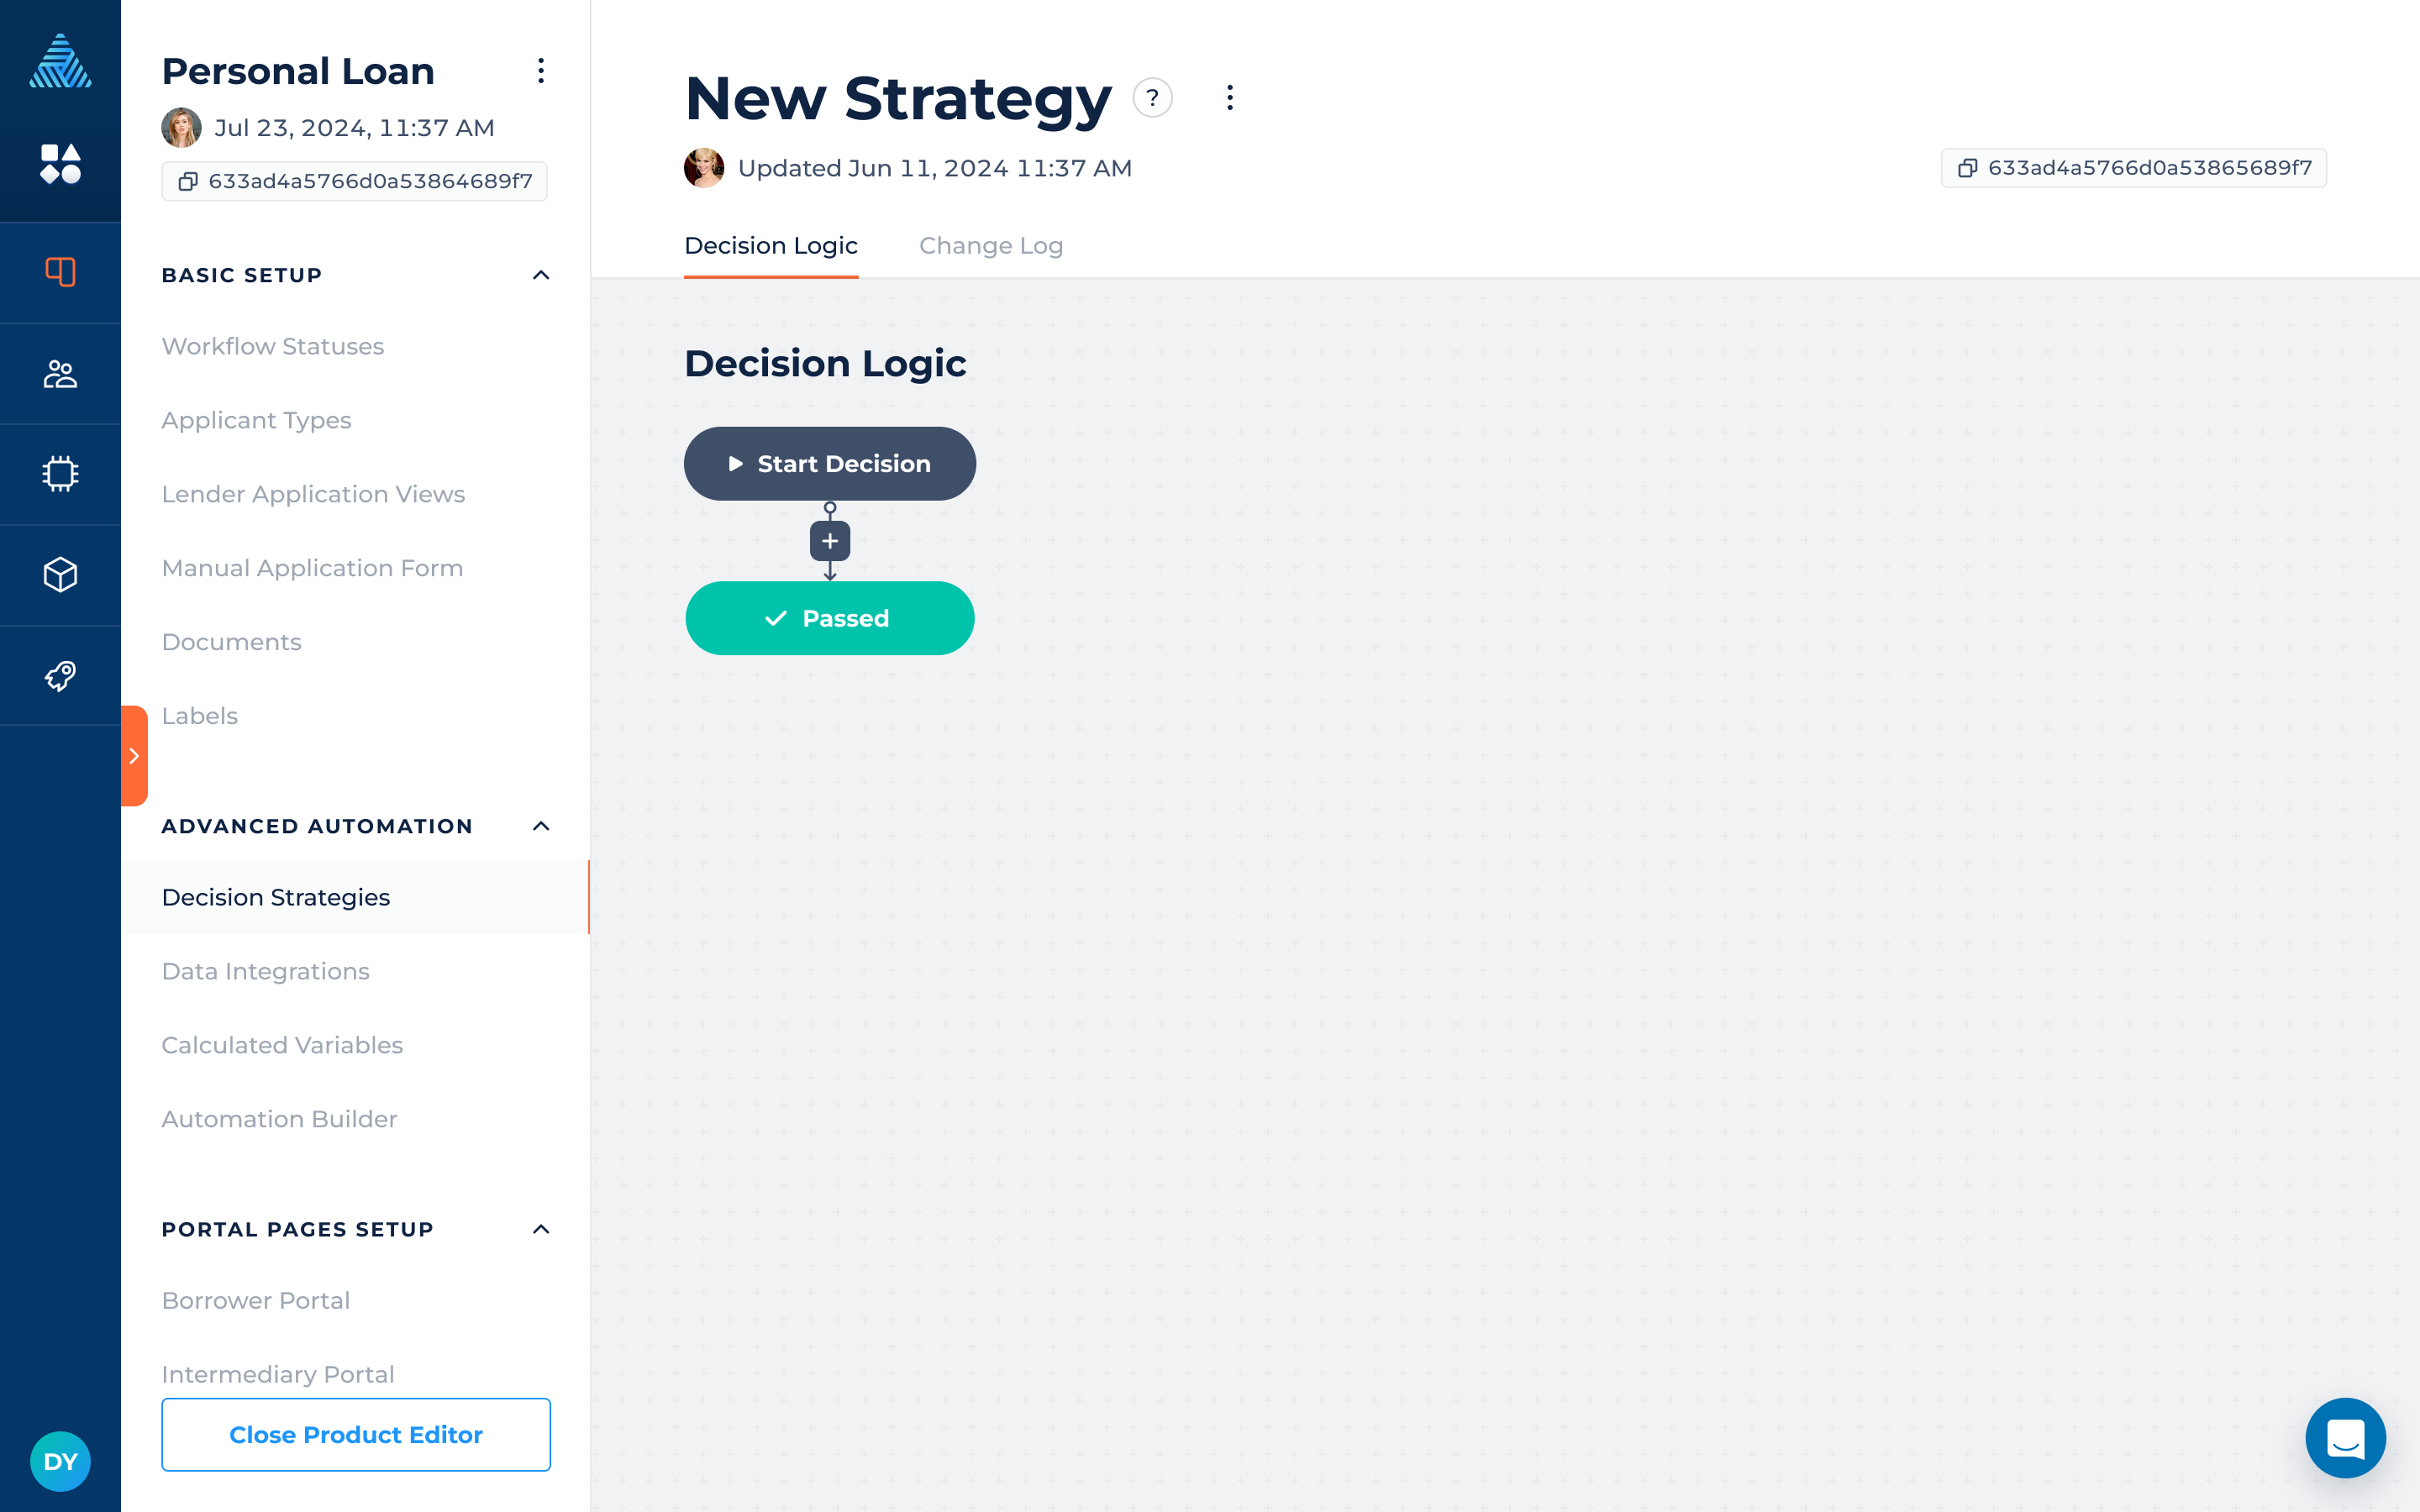
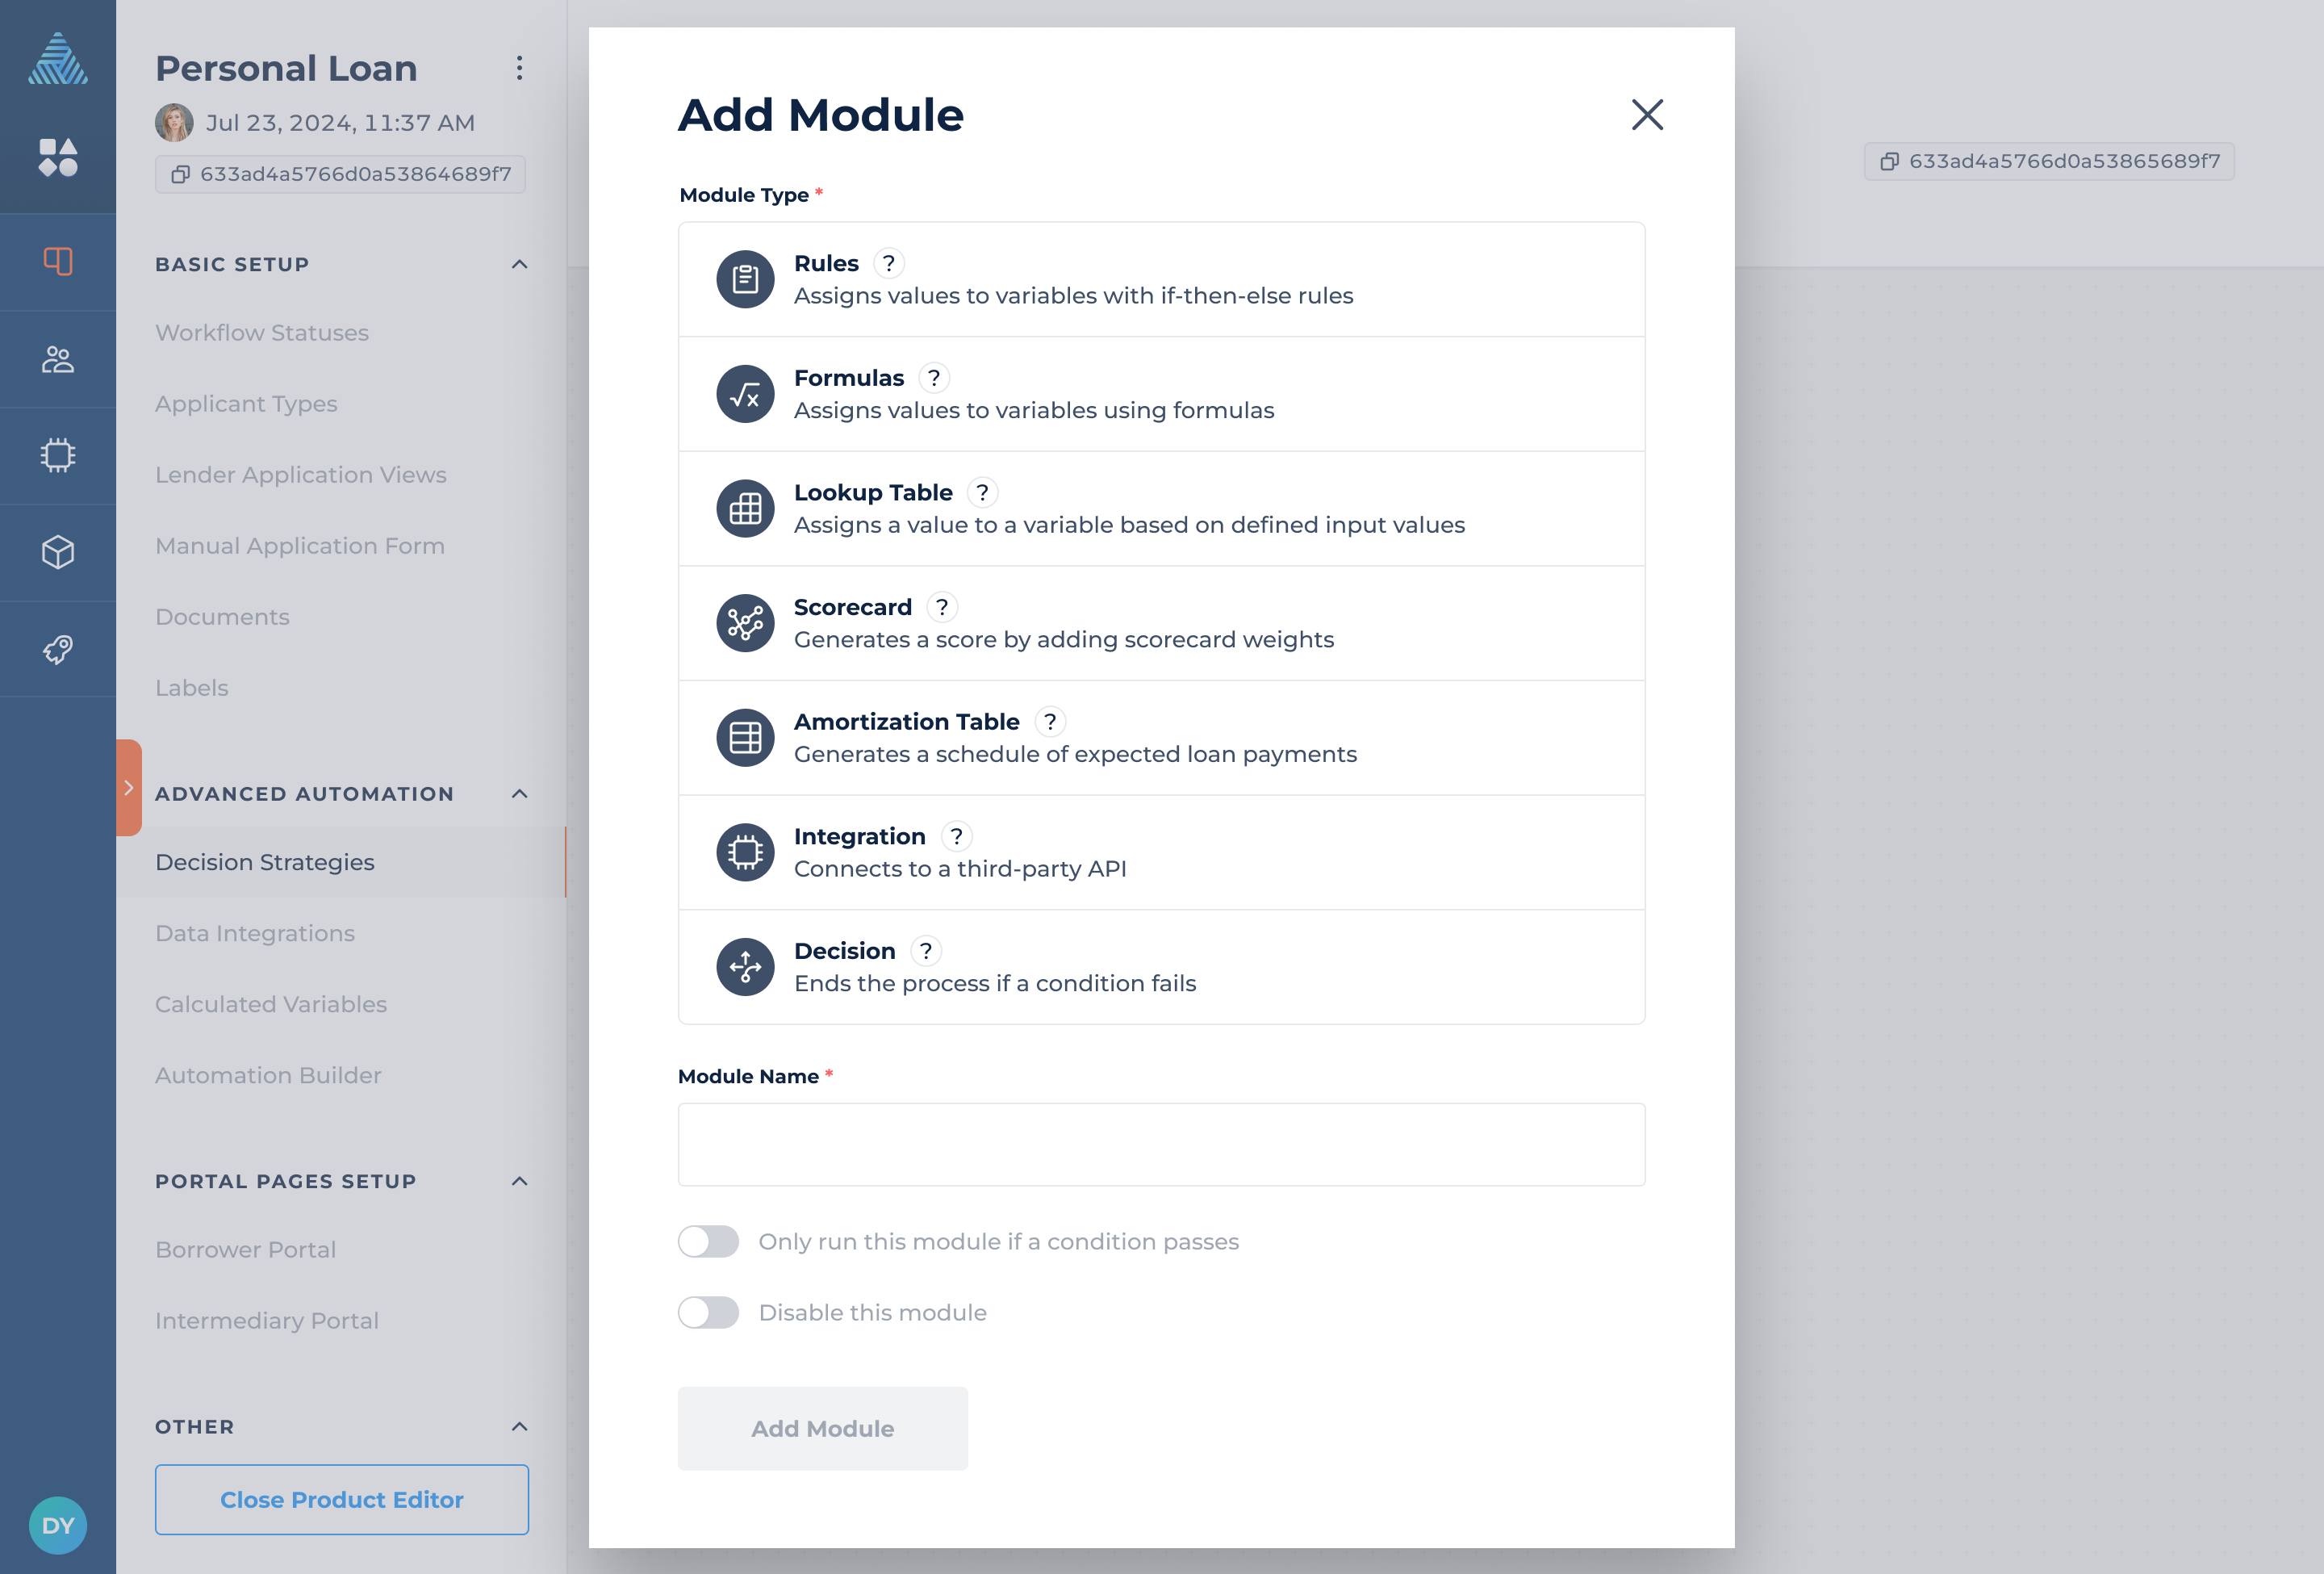
Add a module to the decision strategy by clicking on the "+" button between "Start Decision" and "Passed". This will bring up a module selection screen with five options:
| Type | Description |
|---|---|
| Rules | Lets you add rules and outputs to be set if the rule passes or fails. |
| Formulas | Lets you write formulas that generate outputs during decision processes. |
| Lookup Table | Lets you assign a value to a variable based on defined input values. |
| Scorecard | Lets you implement a typical credit scorecard that runs conditions, adds weights and produces a resulting score. |
| Amortization Table | Lets you generate an amortization schedule of expected loan payments and assign the results to a selected table variable. |
| Integration | Lets you integrate data sources and predictive models. |
| Decision | Lets you add a condition that must pass for a decision to pass. The output is a user-defined decline reason for each condition that fails. |
You can also choose to run any module only if a condition passes, which is helpful if you want to skip modules in certain cases (or only run modules in certain cases). Conditions are created using the DigiFi formula language and must return TRUE (boolean) or "true" (string) to pass.
After you add a module, it will immediately appear within your decision flow. You can repeat this process to build your full decision process. To reorder the modules you can click, hold, drag-and-drop them into another position. To edit the module click on three dots on the right side of the module.
Create Complex ProcessesThe outputs of each module can be used by subsequent modules in your decision flow, allowing you to build complex decisioning processes. For instance, you could run a "Scorecard" module to create a custom credit risk score and then run a "Decision" module to test if the score is high enough to pass underwriting.
You can move rules by dragging and dropping them within the module. Also, it’s possible to download or upload rules at your convenience by clicking on the three dots on the right side of the module.
Implementing Conditions and Rules
After you have added module(s) to your decision strategy, you can implement business logic by adding rules.
To add a condition:
- Click on the module to expand it.
- Click on the “Add …” button at the bottom of the expanded window.
- Add the condition using the DigiFi Formula Language. The condition must return “true” (string) or TRUE (boolean) to pass.
The specifics of conditions will vary based on the type of module you're implementing. Please refer to the module descriptions below for more information.
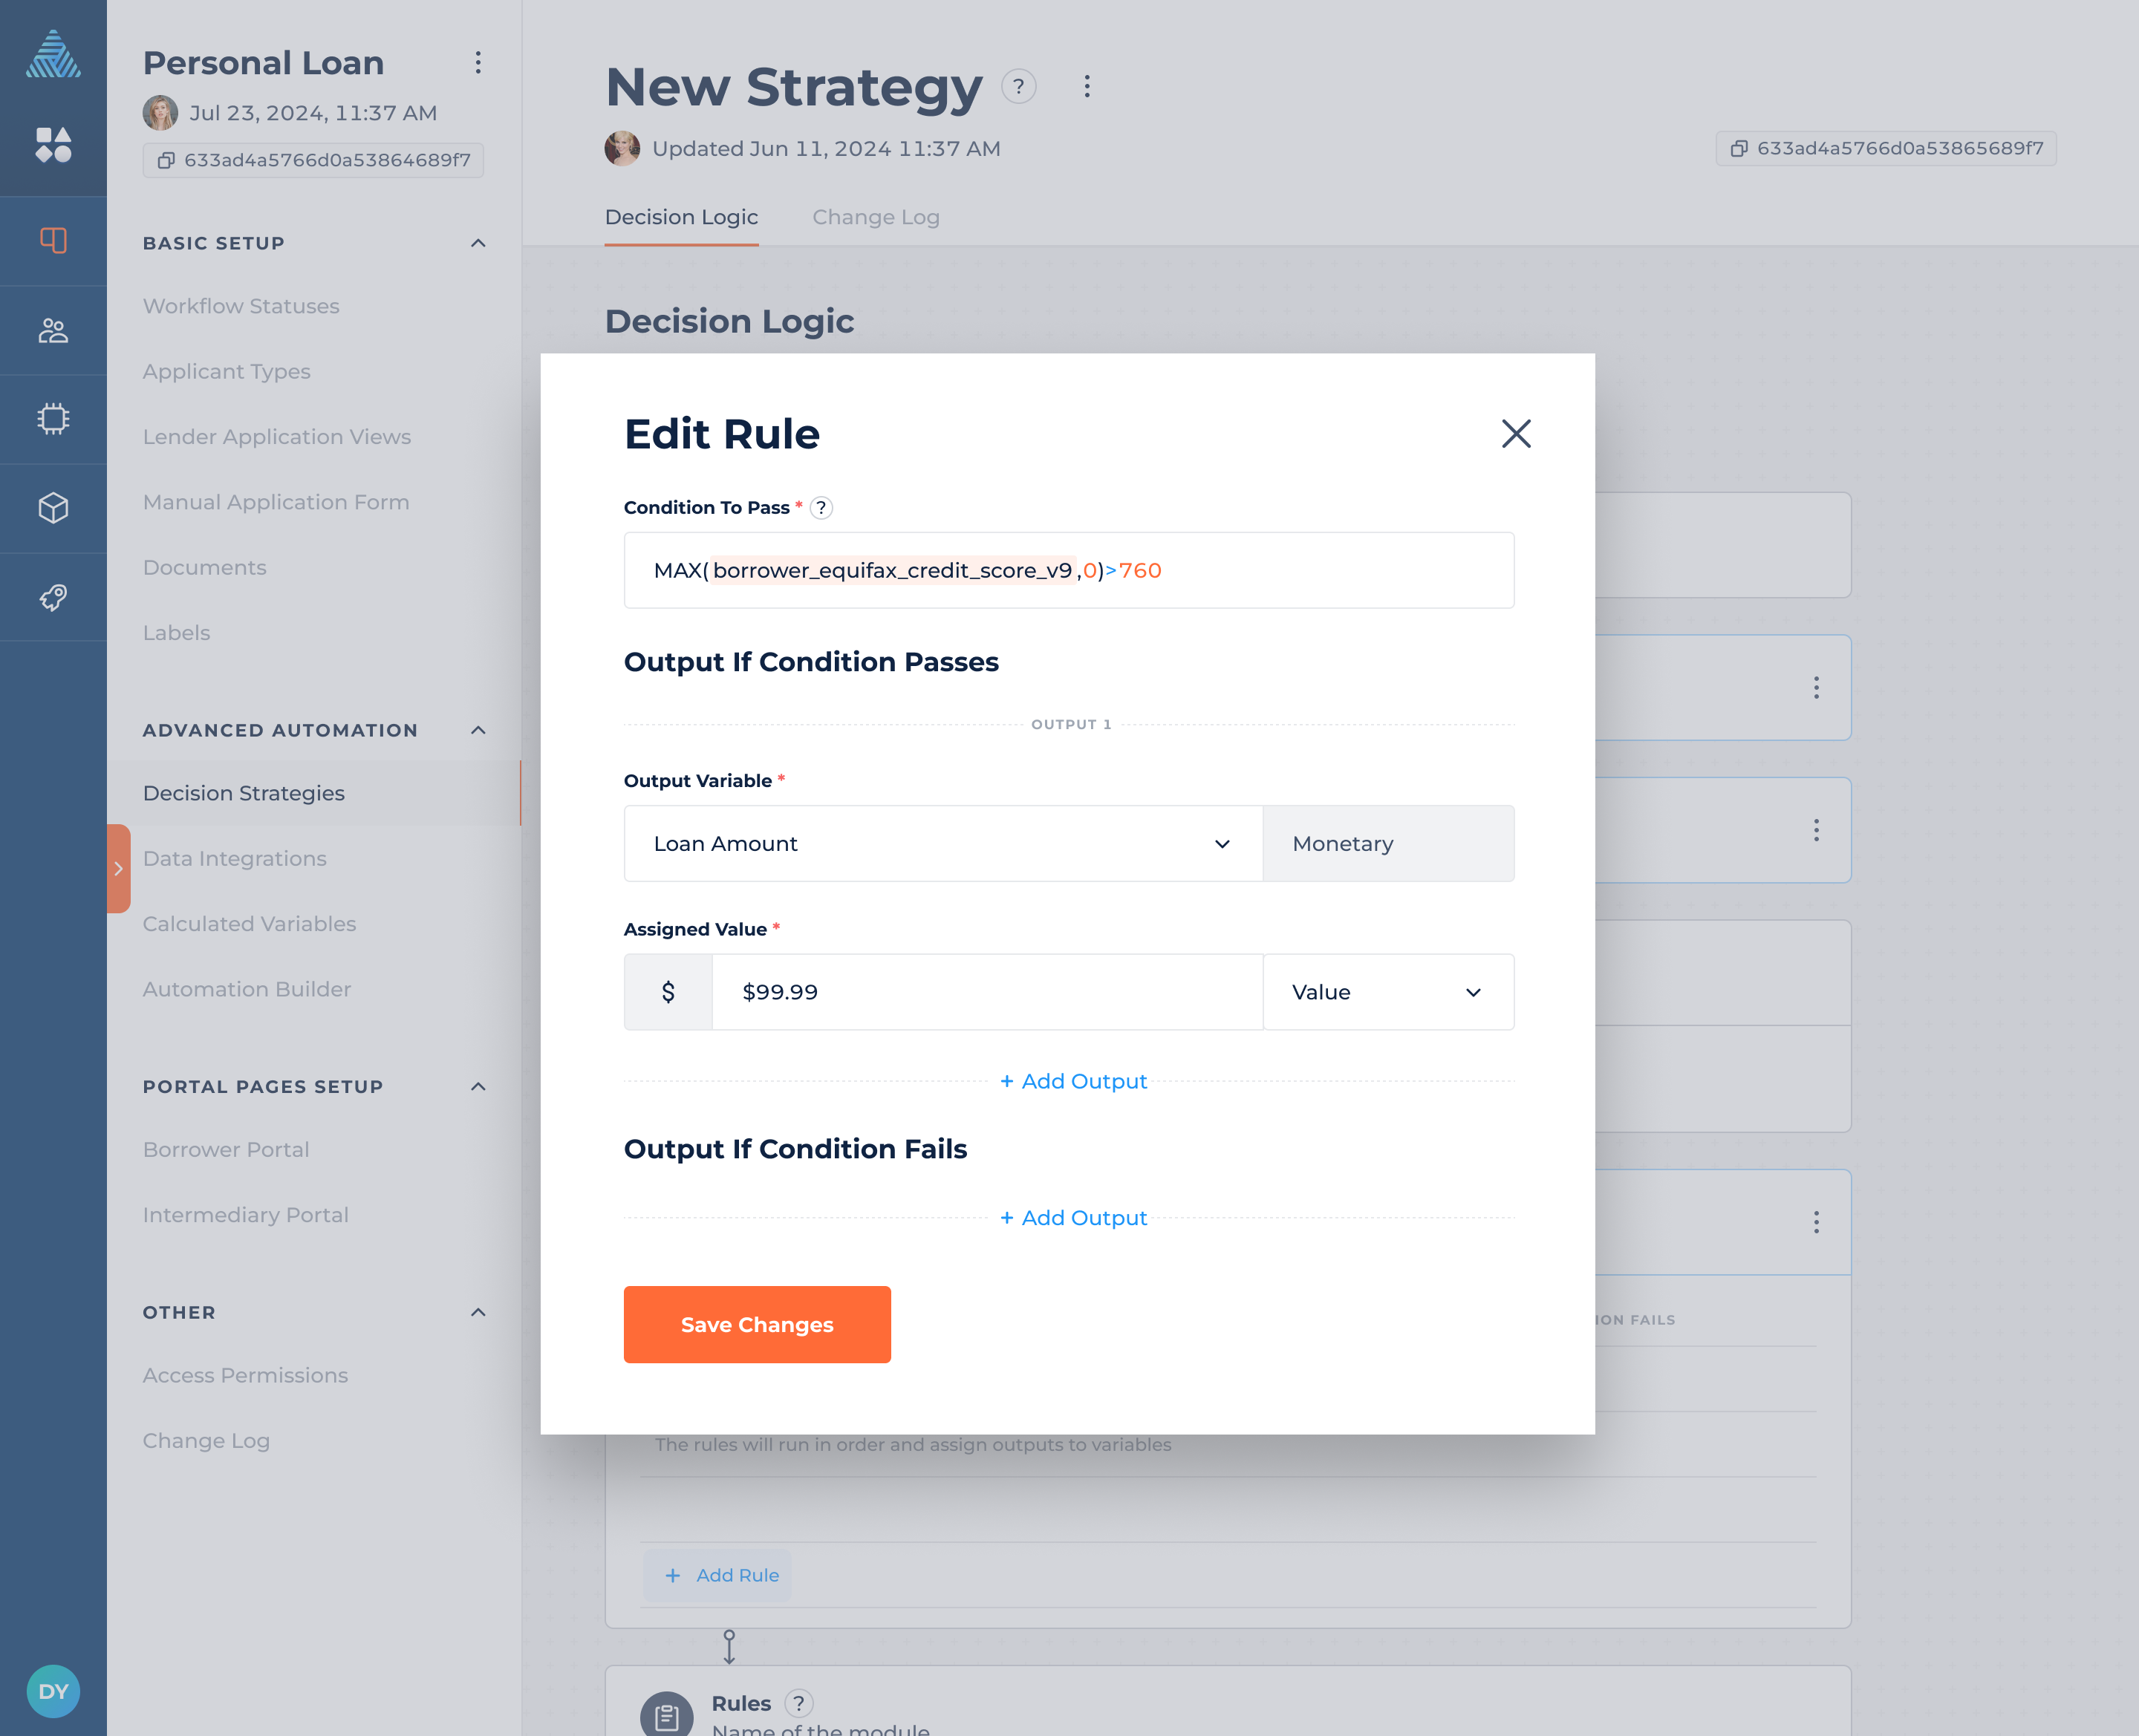
Repeat this process to add rules to each module in your decision strategy.
Simple conditions can be easily built by the “Rule Builder” tool, which can be accessed by clicking on the "gear" icon above the formula input box. A simple condition is built by choosing a variable, comparison, and value. It is automatically converted to a condition written in the DigiFi Formula Language.
Rule Comparison Types
DigiFi's decision engine offers the following comparison types within "Rule Builder" tool:
| Comparison | Description |
|---|---|
= | Equals |
<> | Does not equal |
> | Greater than |
>= | Greater than or equal to |
< | Less than |
<= | Less than or equal to |
Between | Between a range of numbers (inclusive of both ends) |
In | In a list |
Not In | Not in a list |
Is Empty | Is empty |
Is Not Empty | Is not empty |
Comparisons Depend On Variable TypeCertain comparison options are only available for variables with a specific data type. For example, a
Betweencomparison cannot be performed on a variable with the data type ofTextorListand therefore this is not an available option (however it can be performed on Variables with aNumber,MonetaryorPercentagedata type).
Test your condition by clicking on the play button next to the “Rule Builder” button.
Rules Module
The "Rules" module lets you run conditions and generate outputs. The rules will run in order and assign outputs to variables if the rules pass or fail.
To add a rule:
- Click on a module to expand it.
- Click on the "Add Rule" button at the bottom of the module.
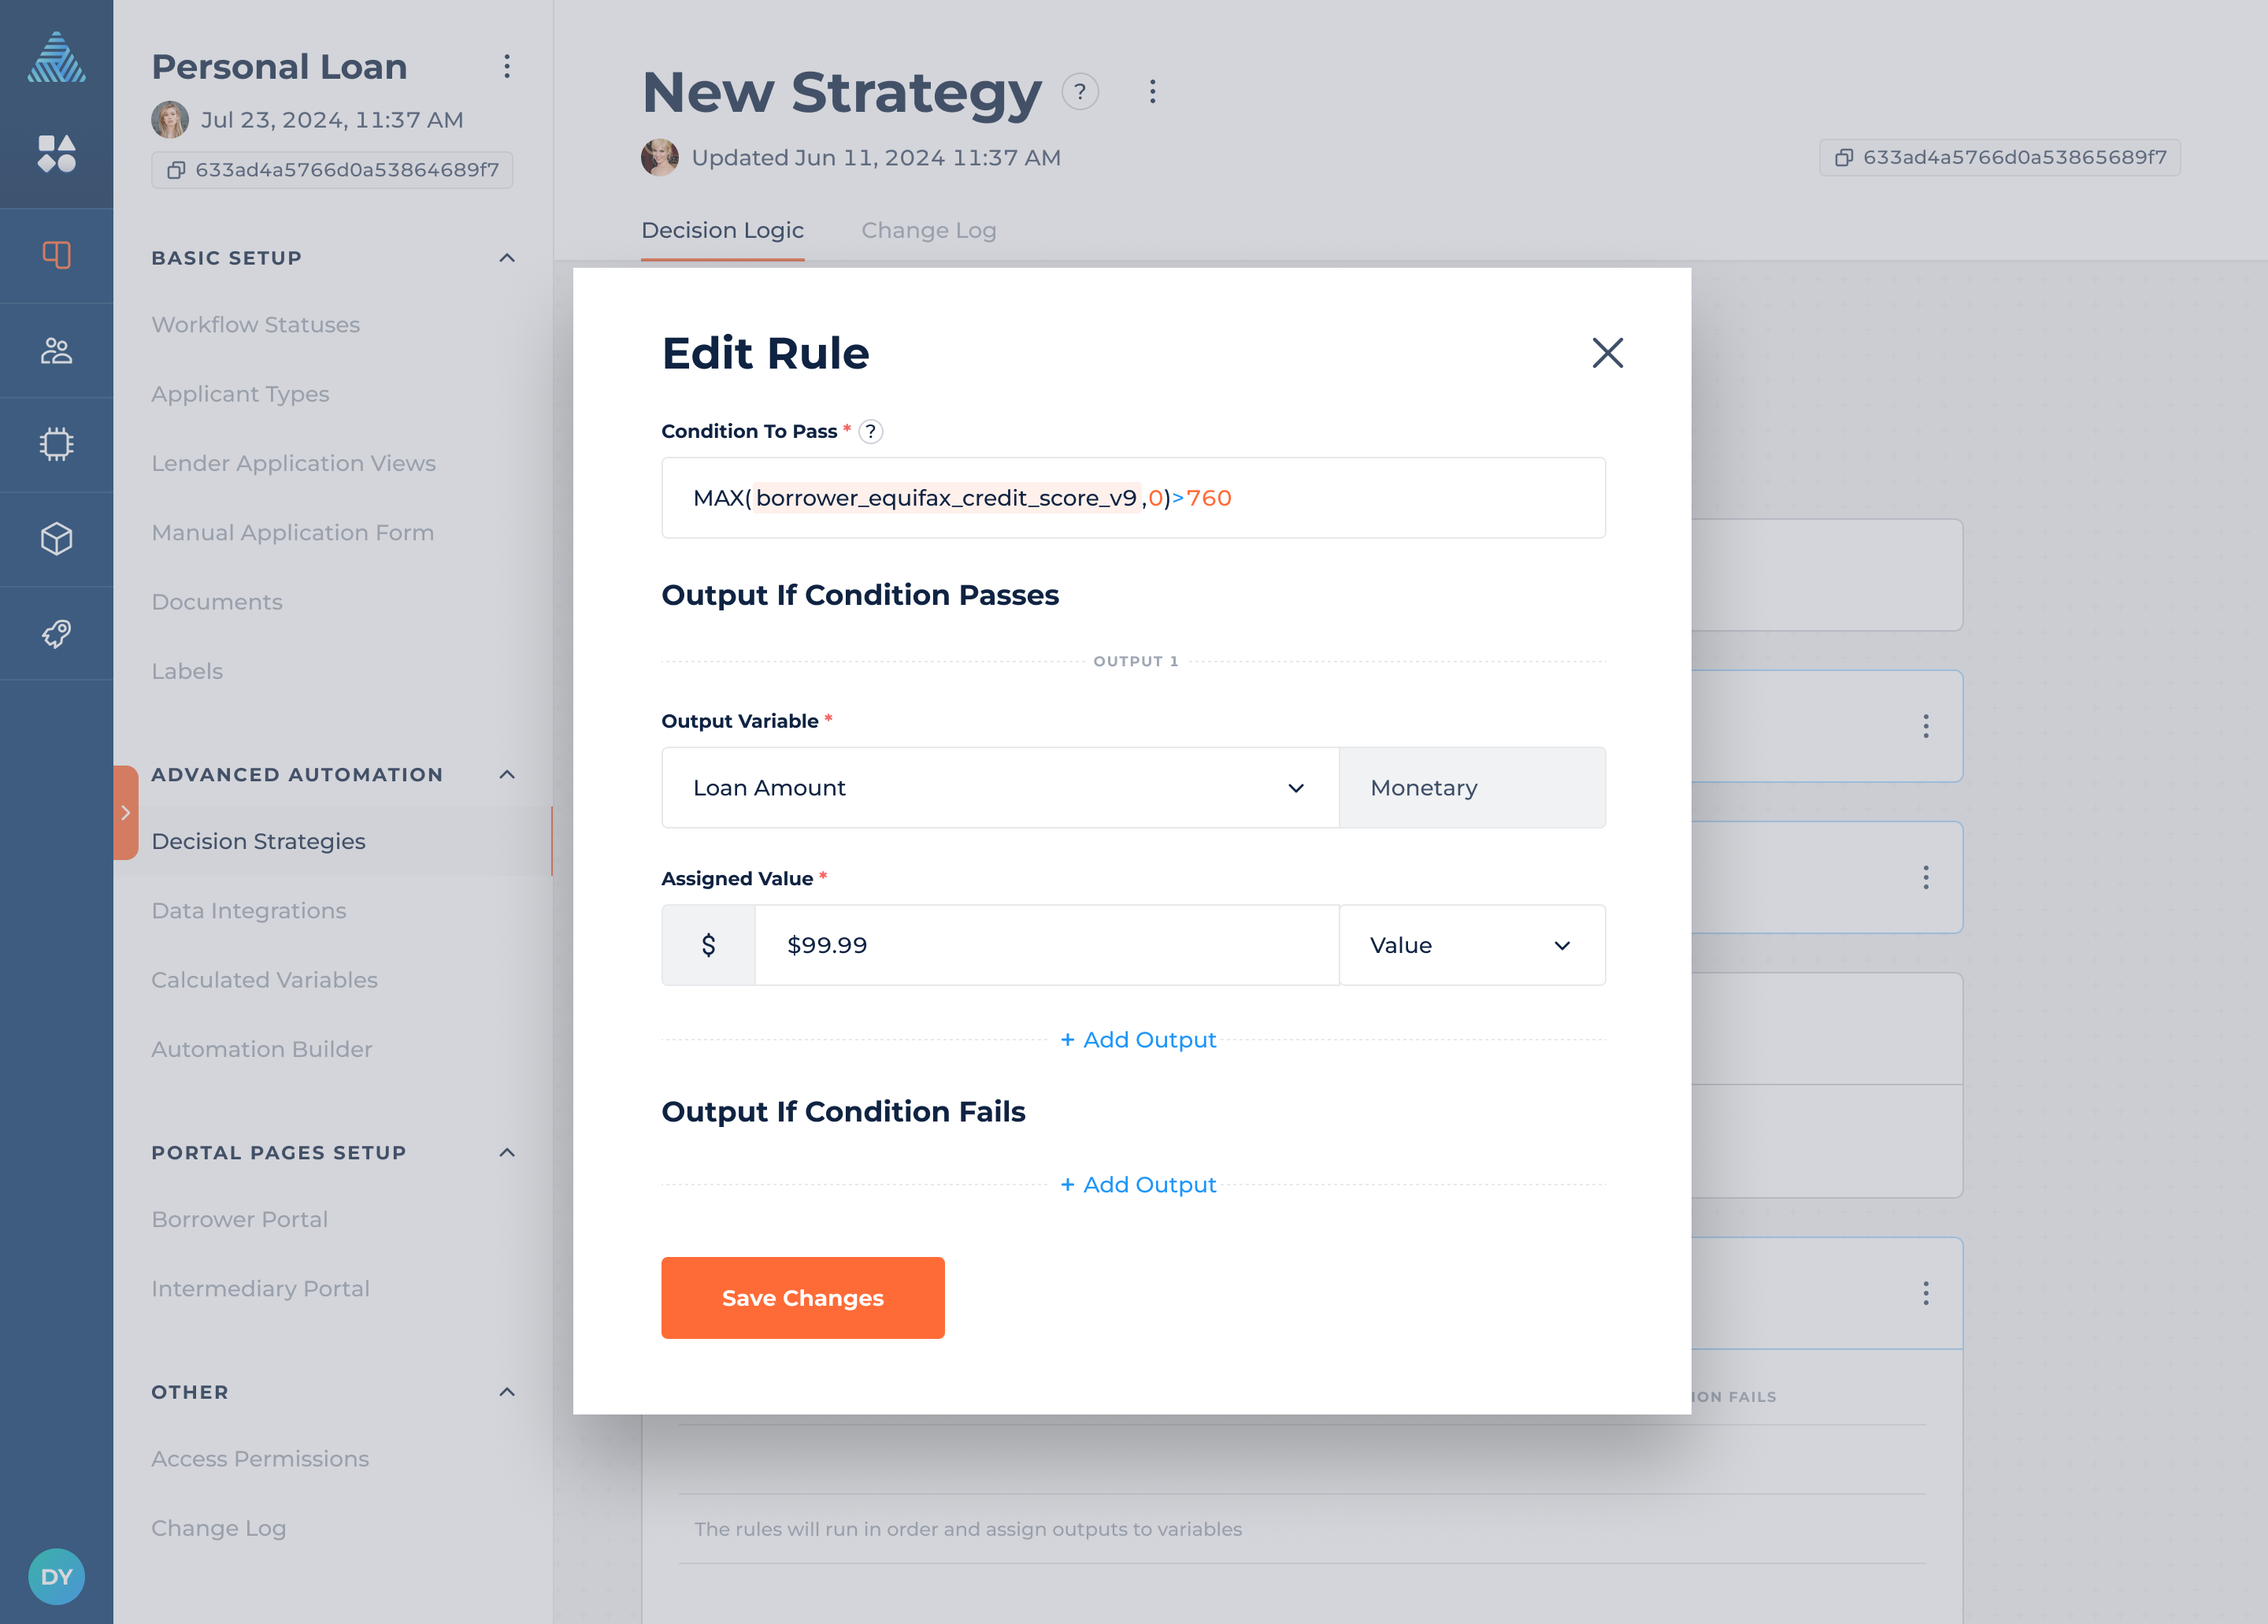
You’ll be asked to provide the following information:
- Condition To Pass, which must return “true” (string) or TRUE (boolean) to pass.
- Output If Condition Passes, which lets you select a variable and assign a value.
- Output If Condition Fails, which lets you select a variable and assign a value.
Formulas Module
The "Formulas" module runs formulas and use outputs from other modules to make a calculation. It runs formulas in order and assigns results to the selected variables.
To add a rule:
- Click on a module to expand it.
- Click on the "Add Formula" button at the bottom of the module.
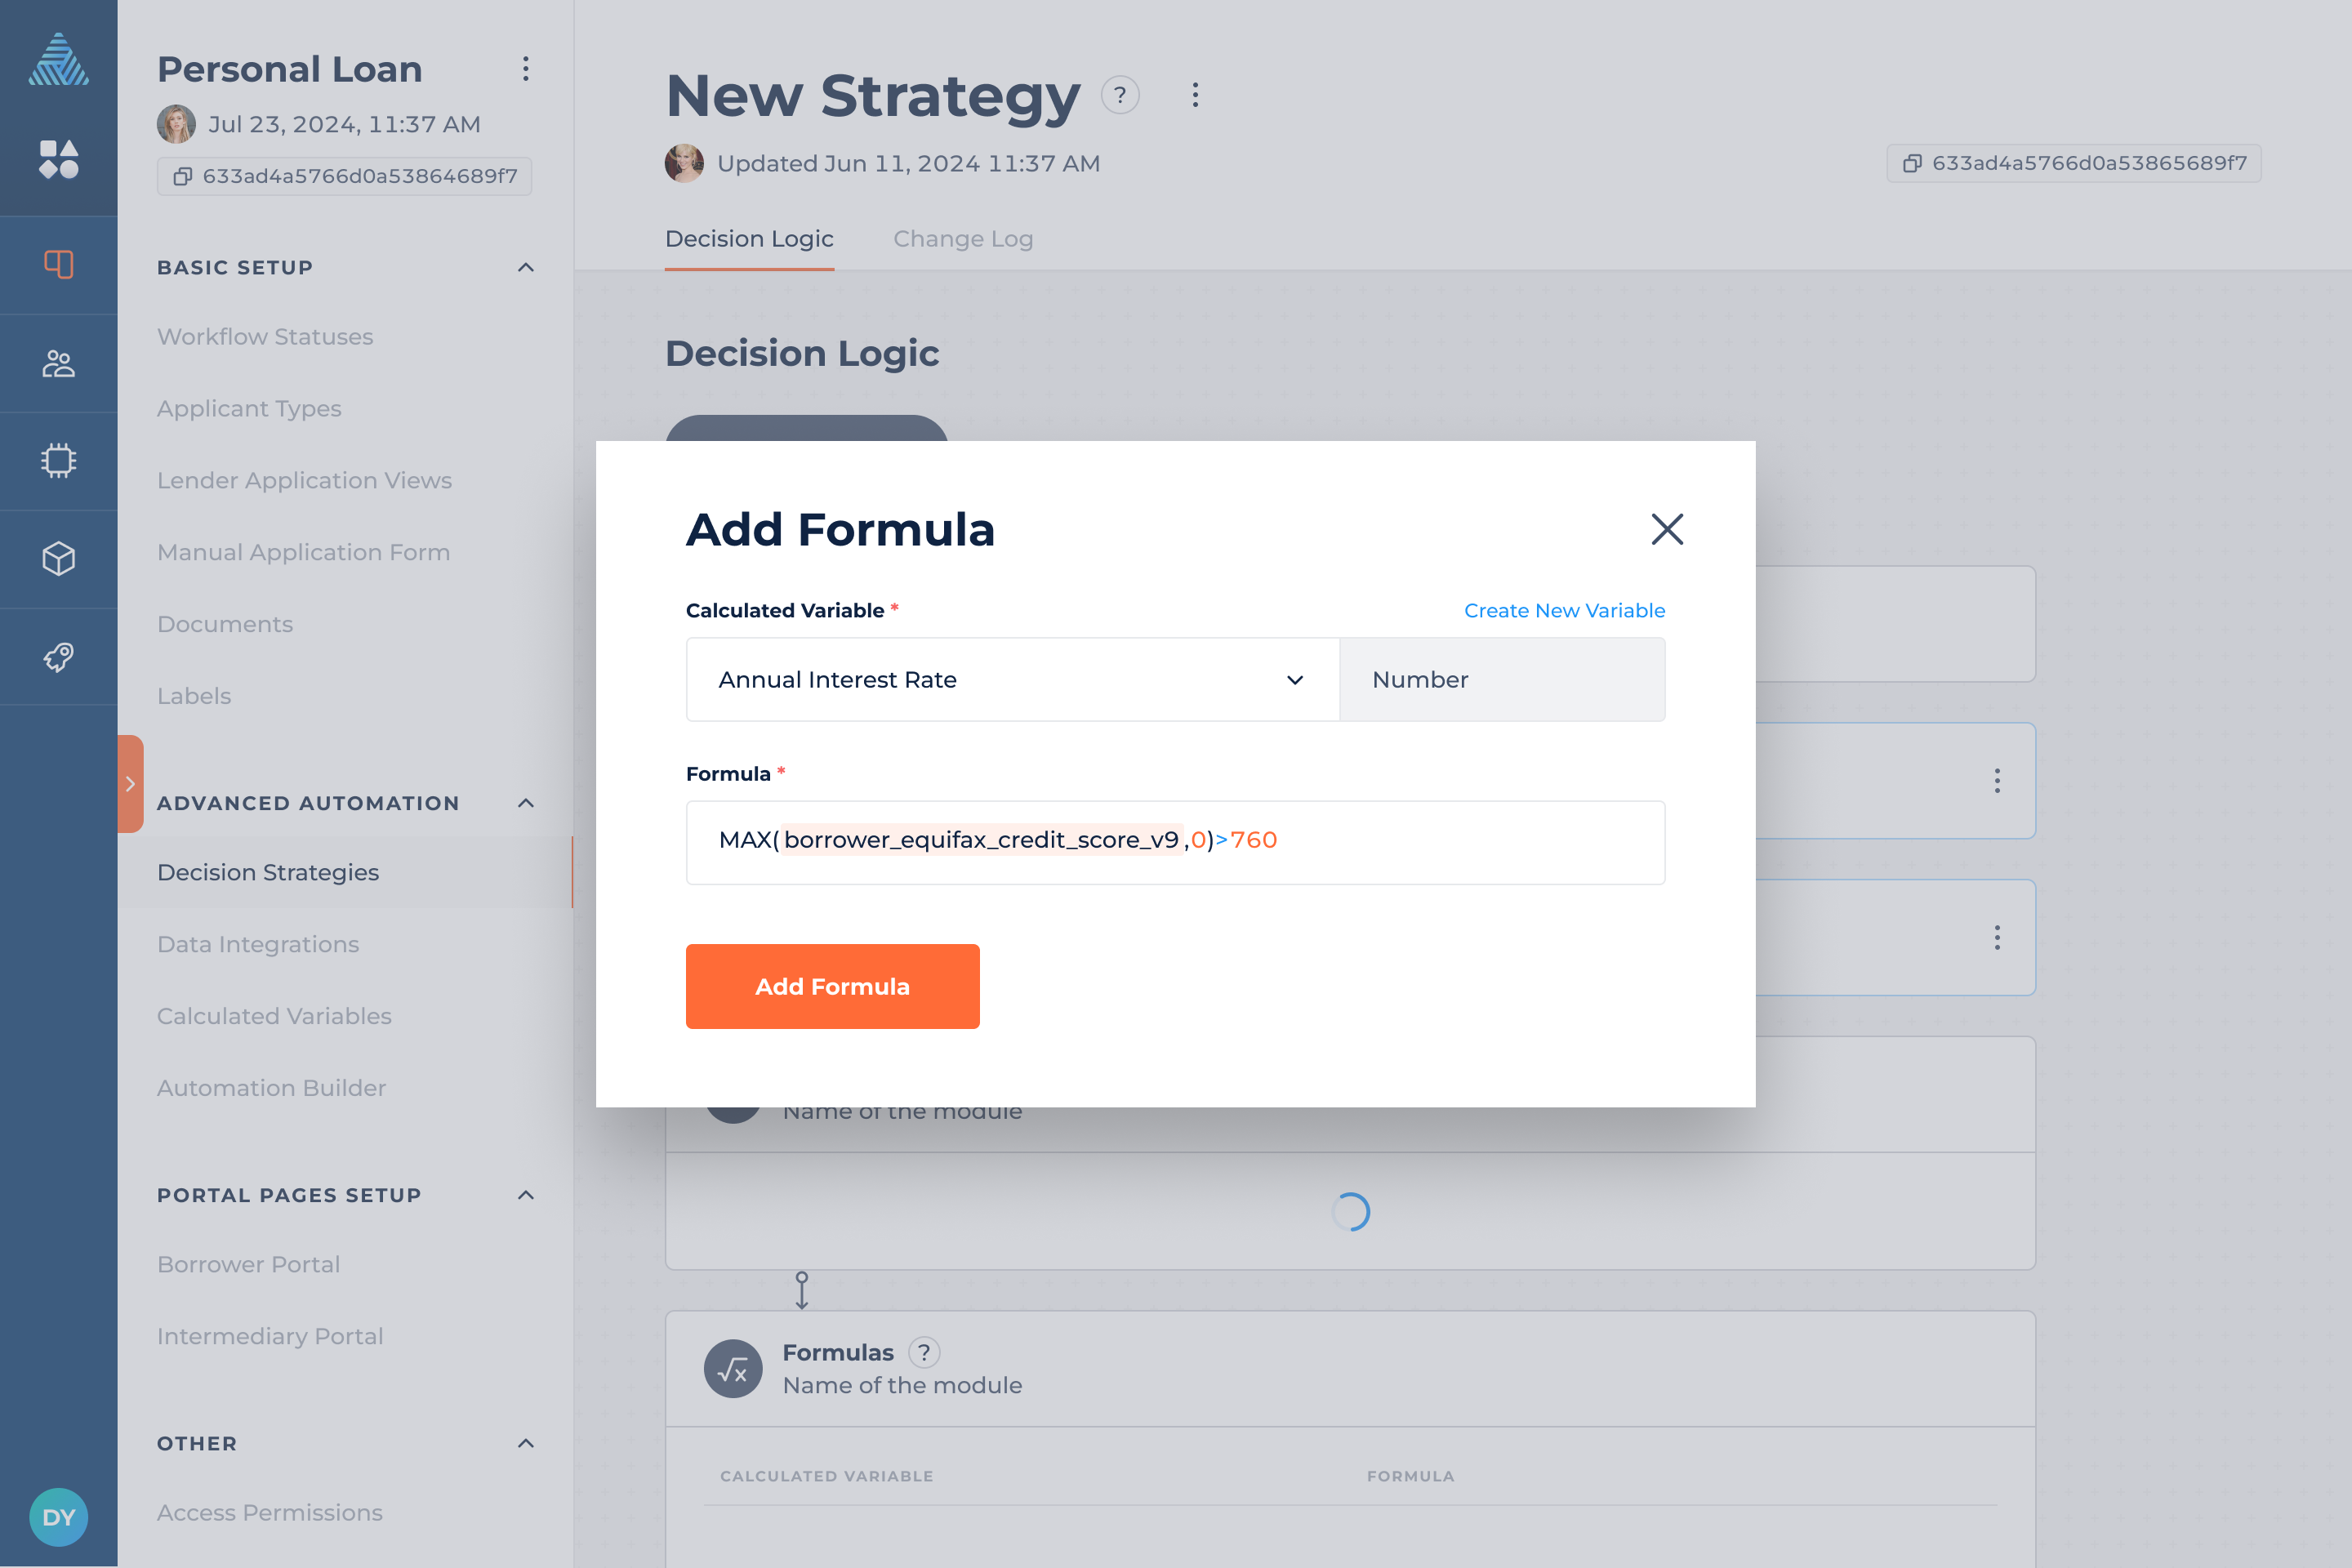
You’ll be asked to provide the following information:
- Calculated Variable, a variable that will have a calculated value.
- Formula, a calculation created using the DigiFi Formula Language.
Lookup Table Module
The "Lookup Table" module lets you assign a value to a variable based on defined input values. The Lookup determines specific information based on predefined values. It contains various combinations of input values and corresponding outputs.
To add a rule:
- Click on a module to expand it.
- Click on the "Edit Lookup Table" button at the bottom of the module.
You’ll be asked to provide the following information:
- Output variable, which lets you select a variable and assign a value.
- Input Variable 1 (Y-axis variable), refers to one of the variables used to search for data along the vertical (Y) axis in a lookup table.
- Input Variable 2 (X-axis variable), refers to one of the variables used to search for data along the horizontal (X) axis in a lookup table.
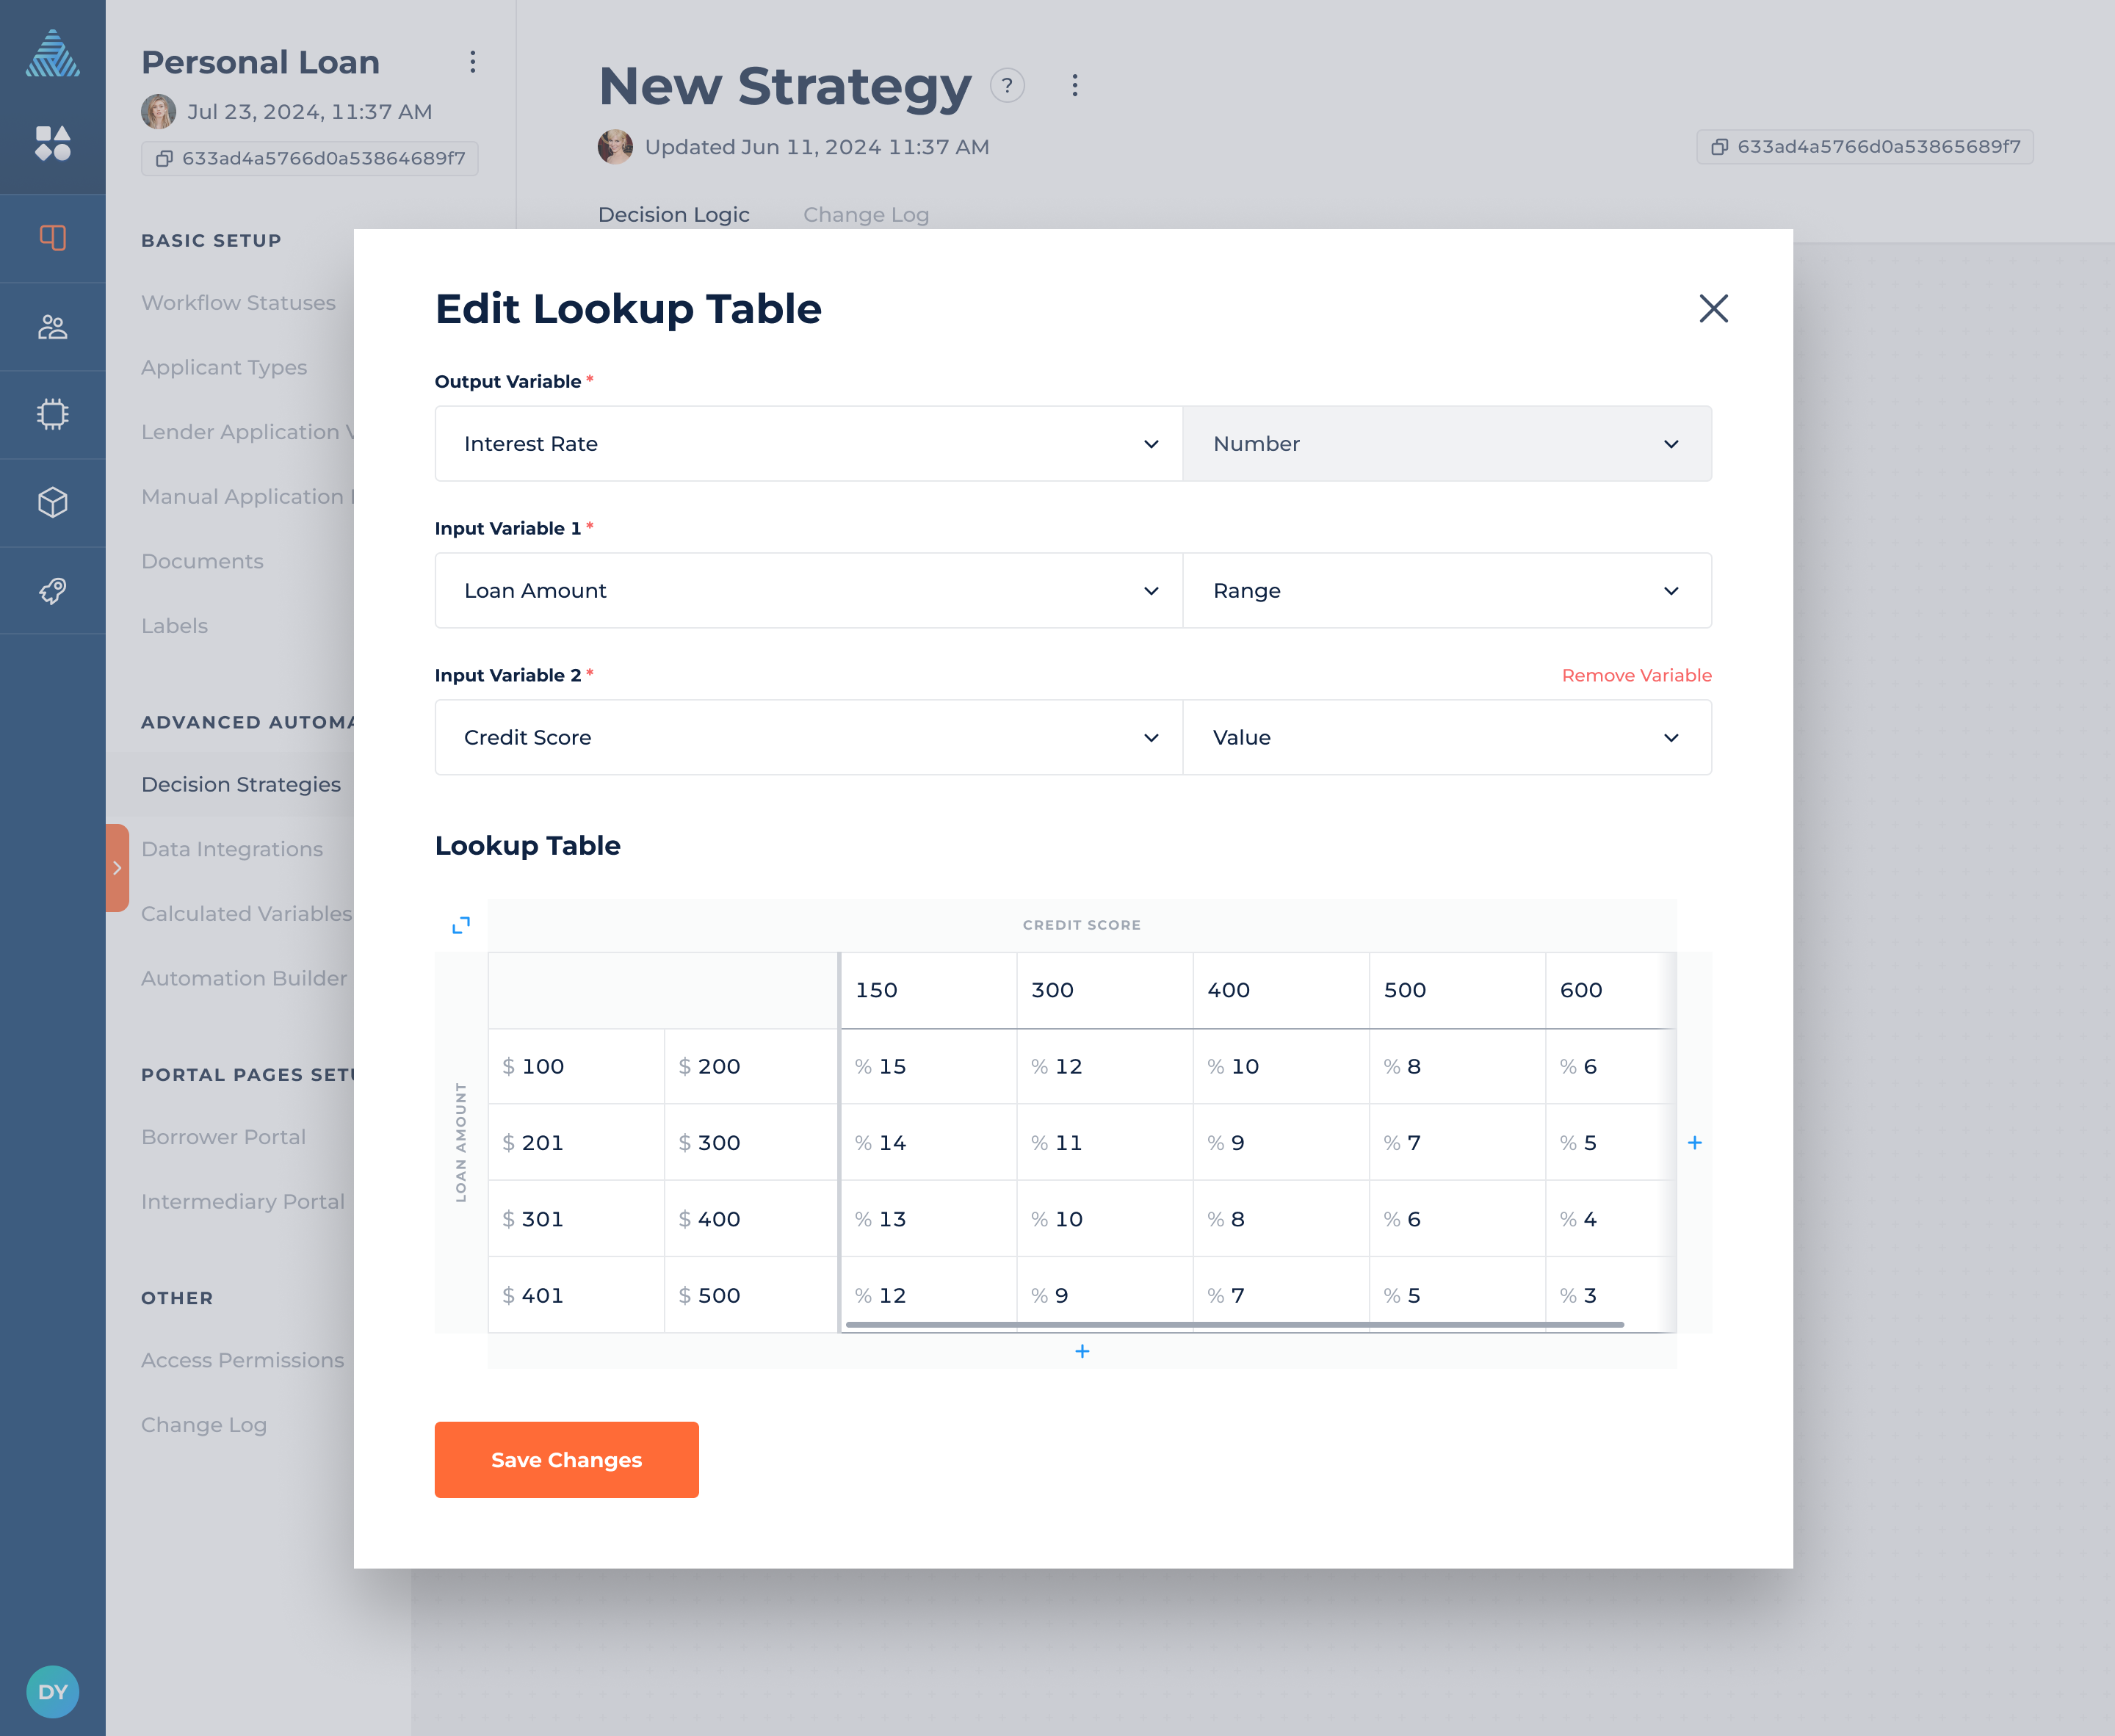
Input Variable 1 and Input Variable 2 are used to perform two-dimensional lookups within the table, allowing you to cross-reference data based on the values of these variables. You can select a variable of any type (except the "Table" variable) for the inputs. The data type of the selected input variables determines the formatting of the table cells in the lookup table.
Lookup table limits:
- The maximum number of rows is 20.
- The maximum number of columns is 20.
Scorecard Module
The "Scorecard" module lets you provide Base Score and a set of conditions. It will generate a final score by adding the weights of all conditions that pass to the Base Score.
To add a rule:
- Click on a "Scorecard" module to expand it.
- Click on the "Add Scorecard Rule" button at the bottom of the module.
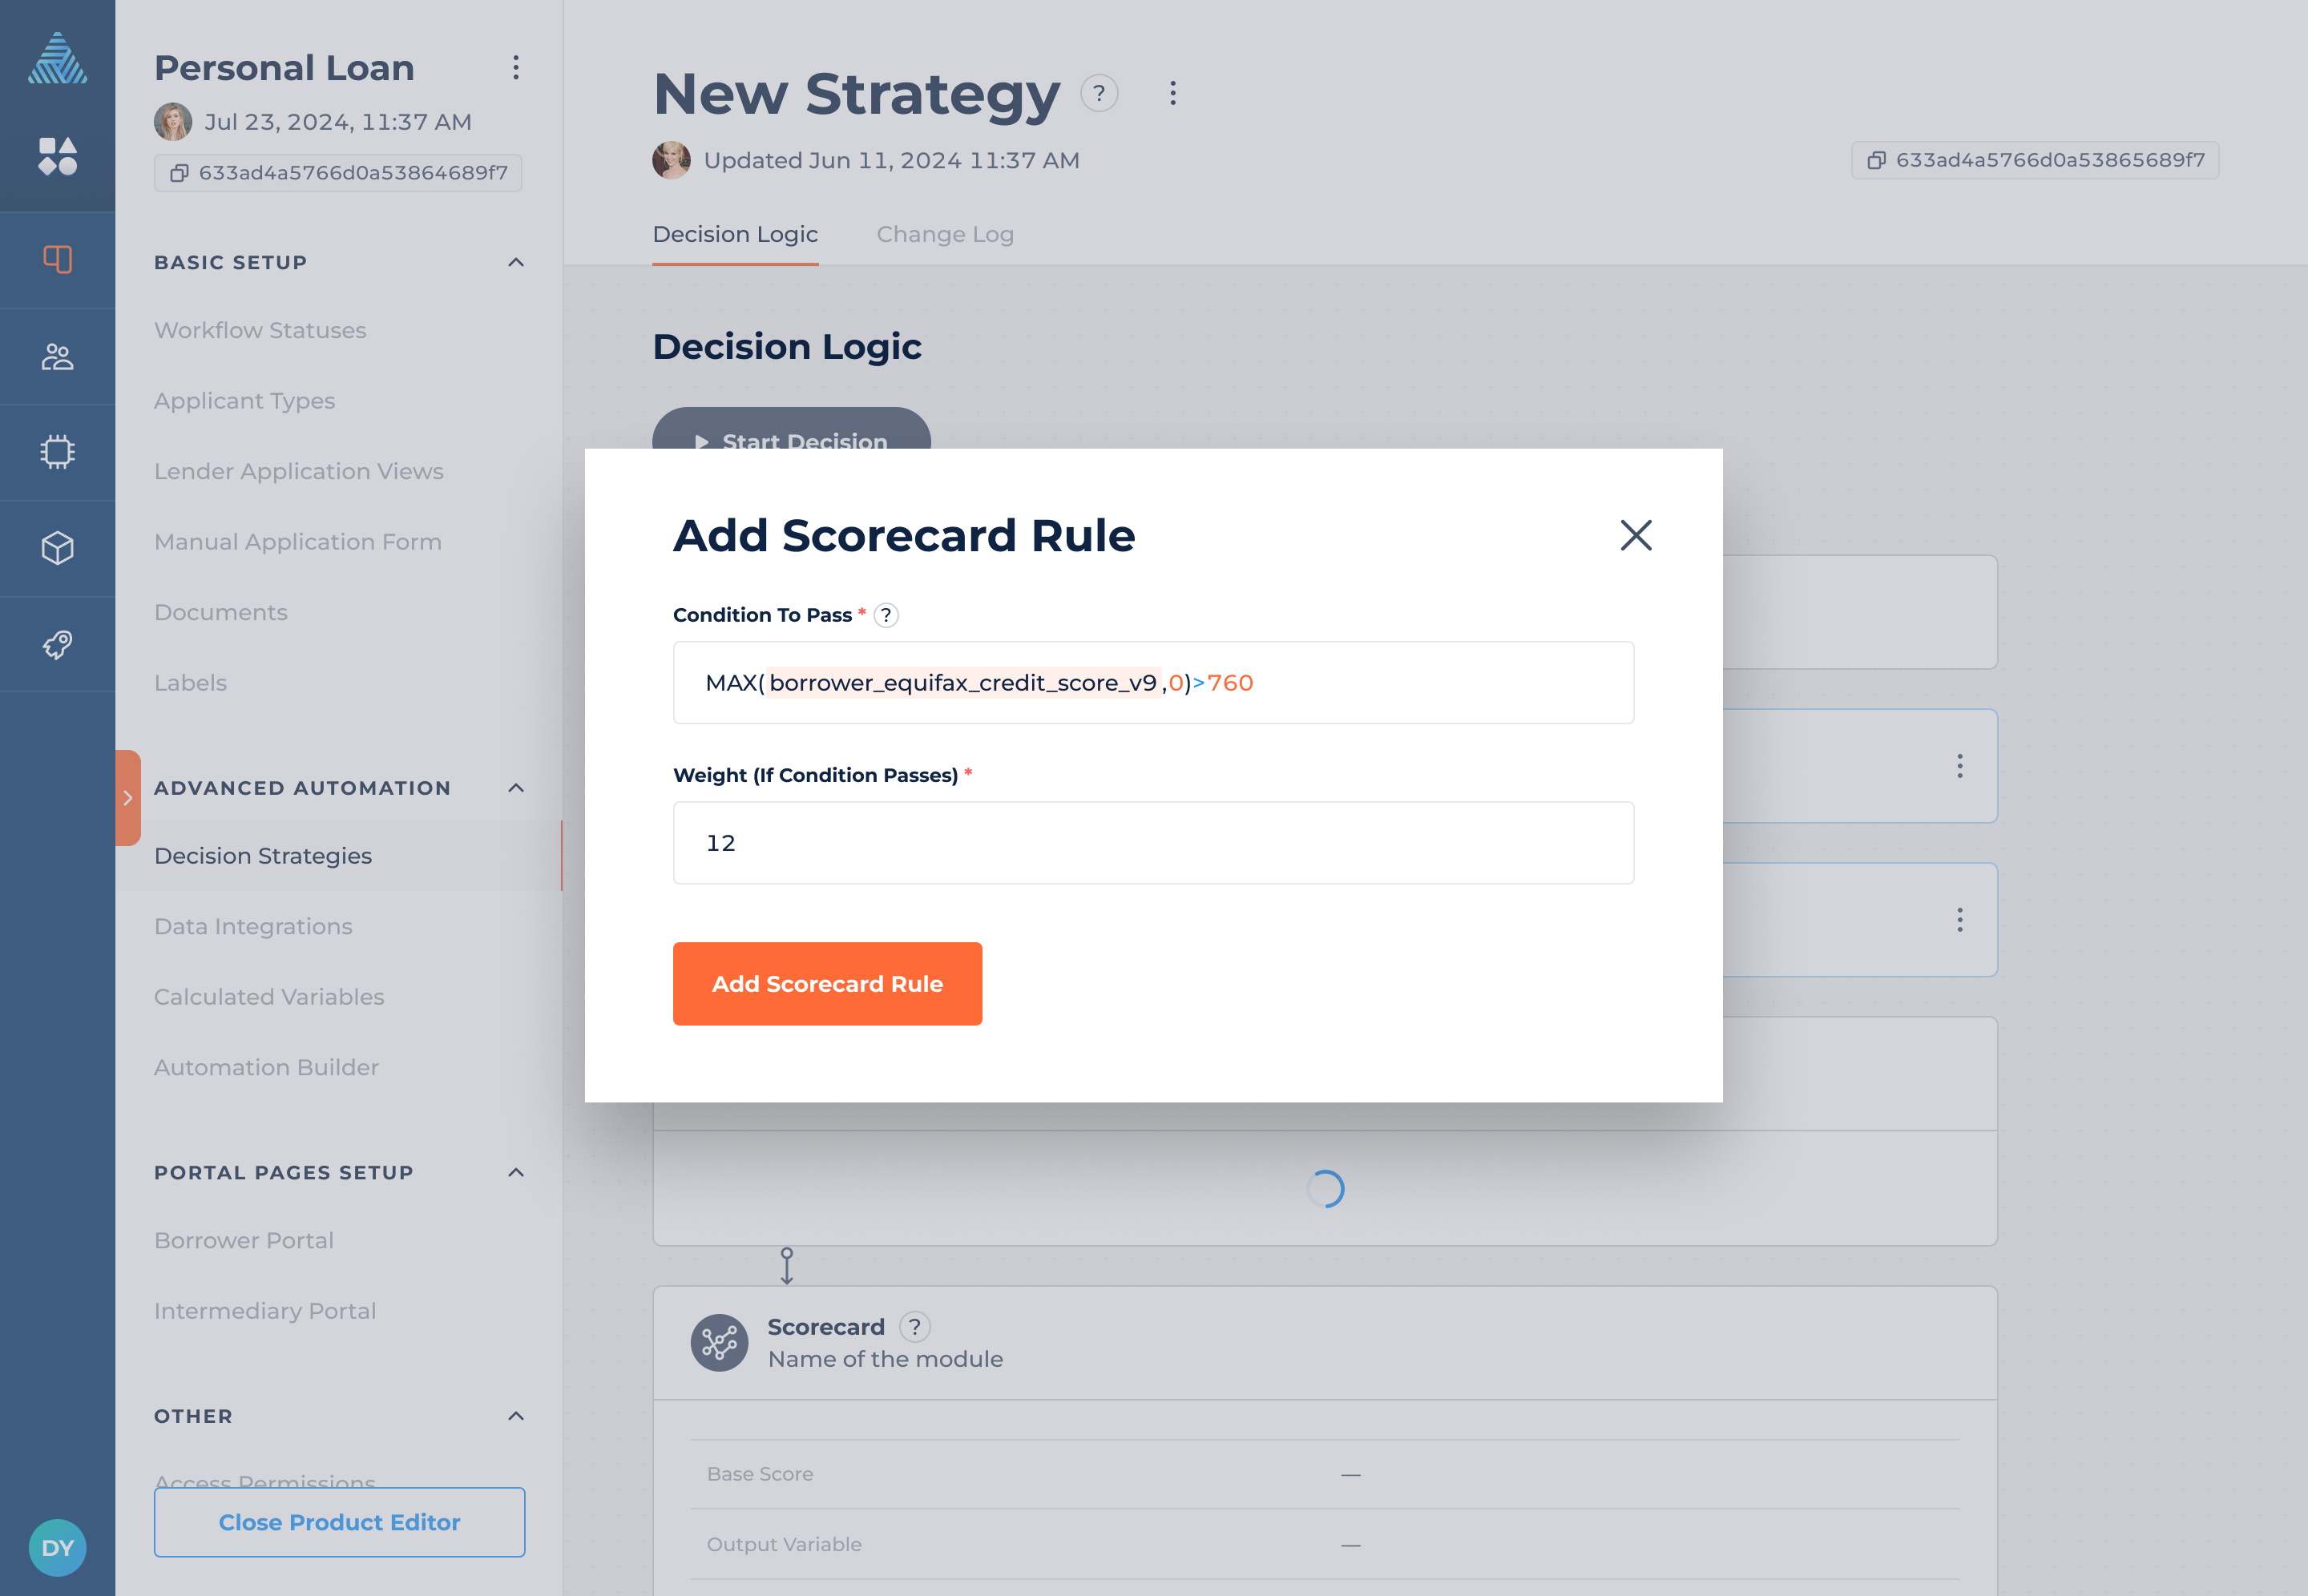
You’ll be asked to provide the following information:
- Condition To Pass, must return “true” (string) or TRUE (boolean) to pass.
- Weight (If Condition Passes), which is added to the Base Score if the condition passes.
You need to set a “Base Score” and an “Output Variable” for the score to be generated. The Output Variable is where the final score will be assigned.
Amortization Table Module
The "Amortization Table" module lets you provide calculation settings and inputs to generate an amortization schedule of expected loan payments. The generated schedule must be assigned to a corresponding table variable and its columns.
To edit the calculation settings:
- Click on the "Amortization Table" module to expand it.
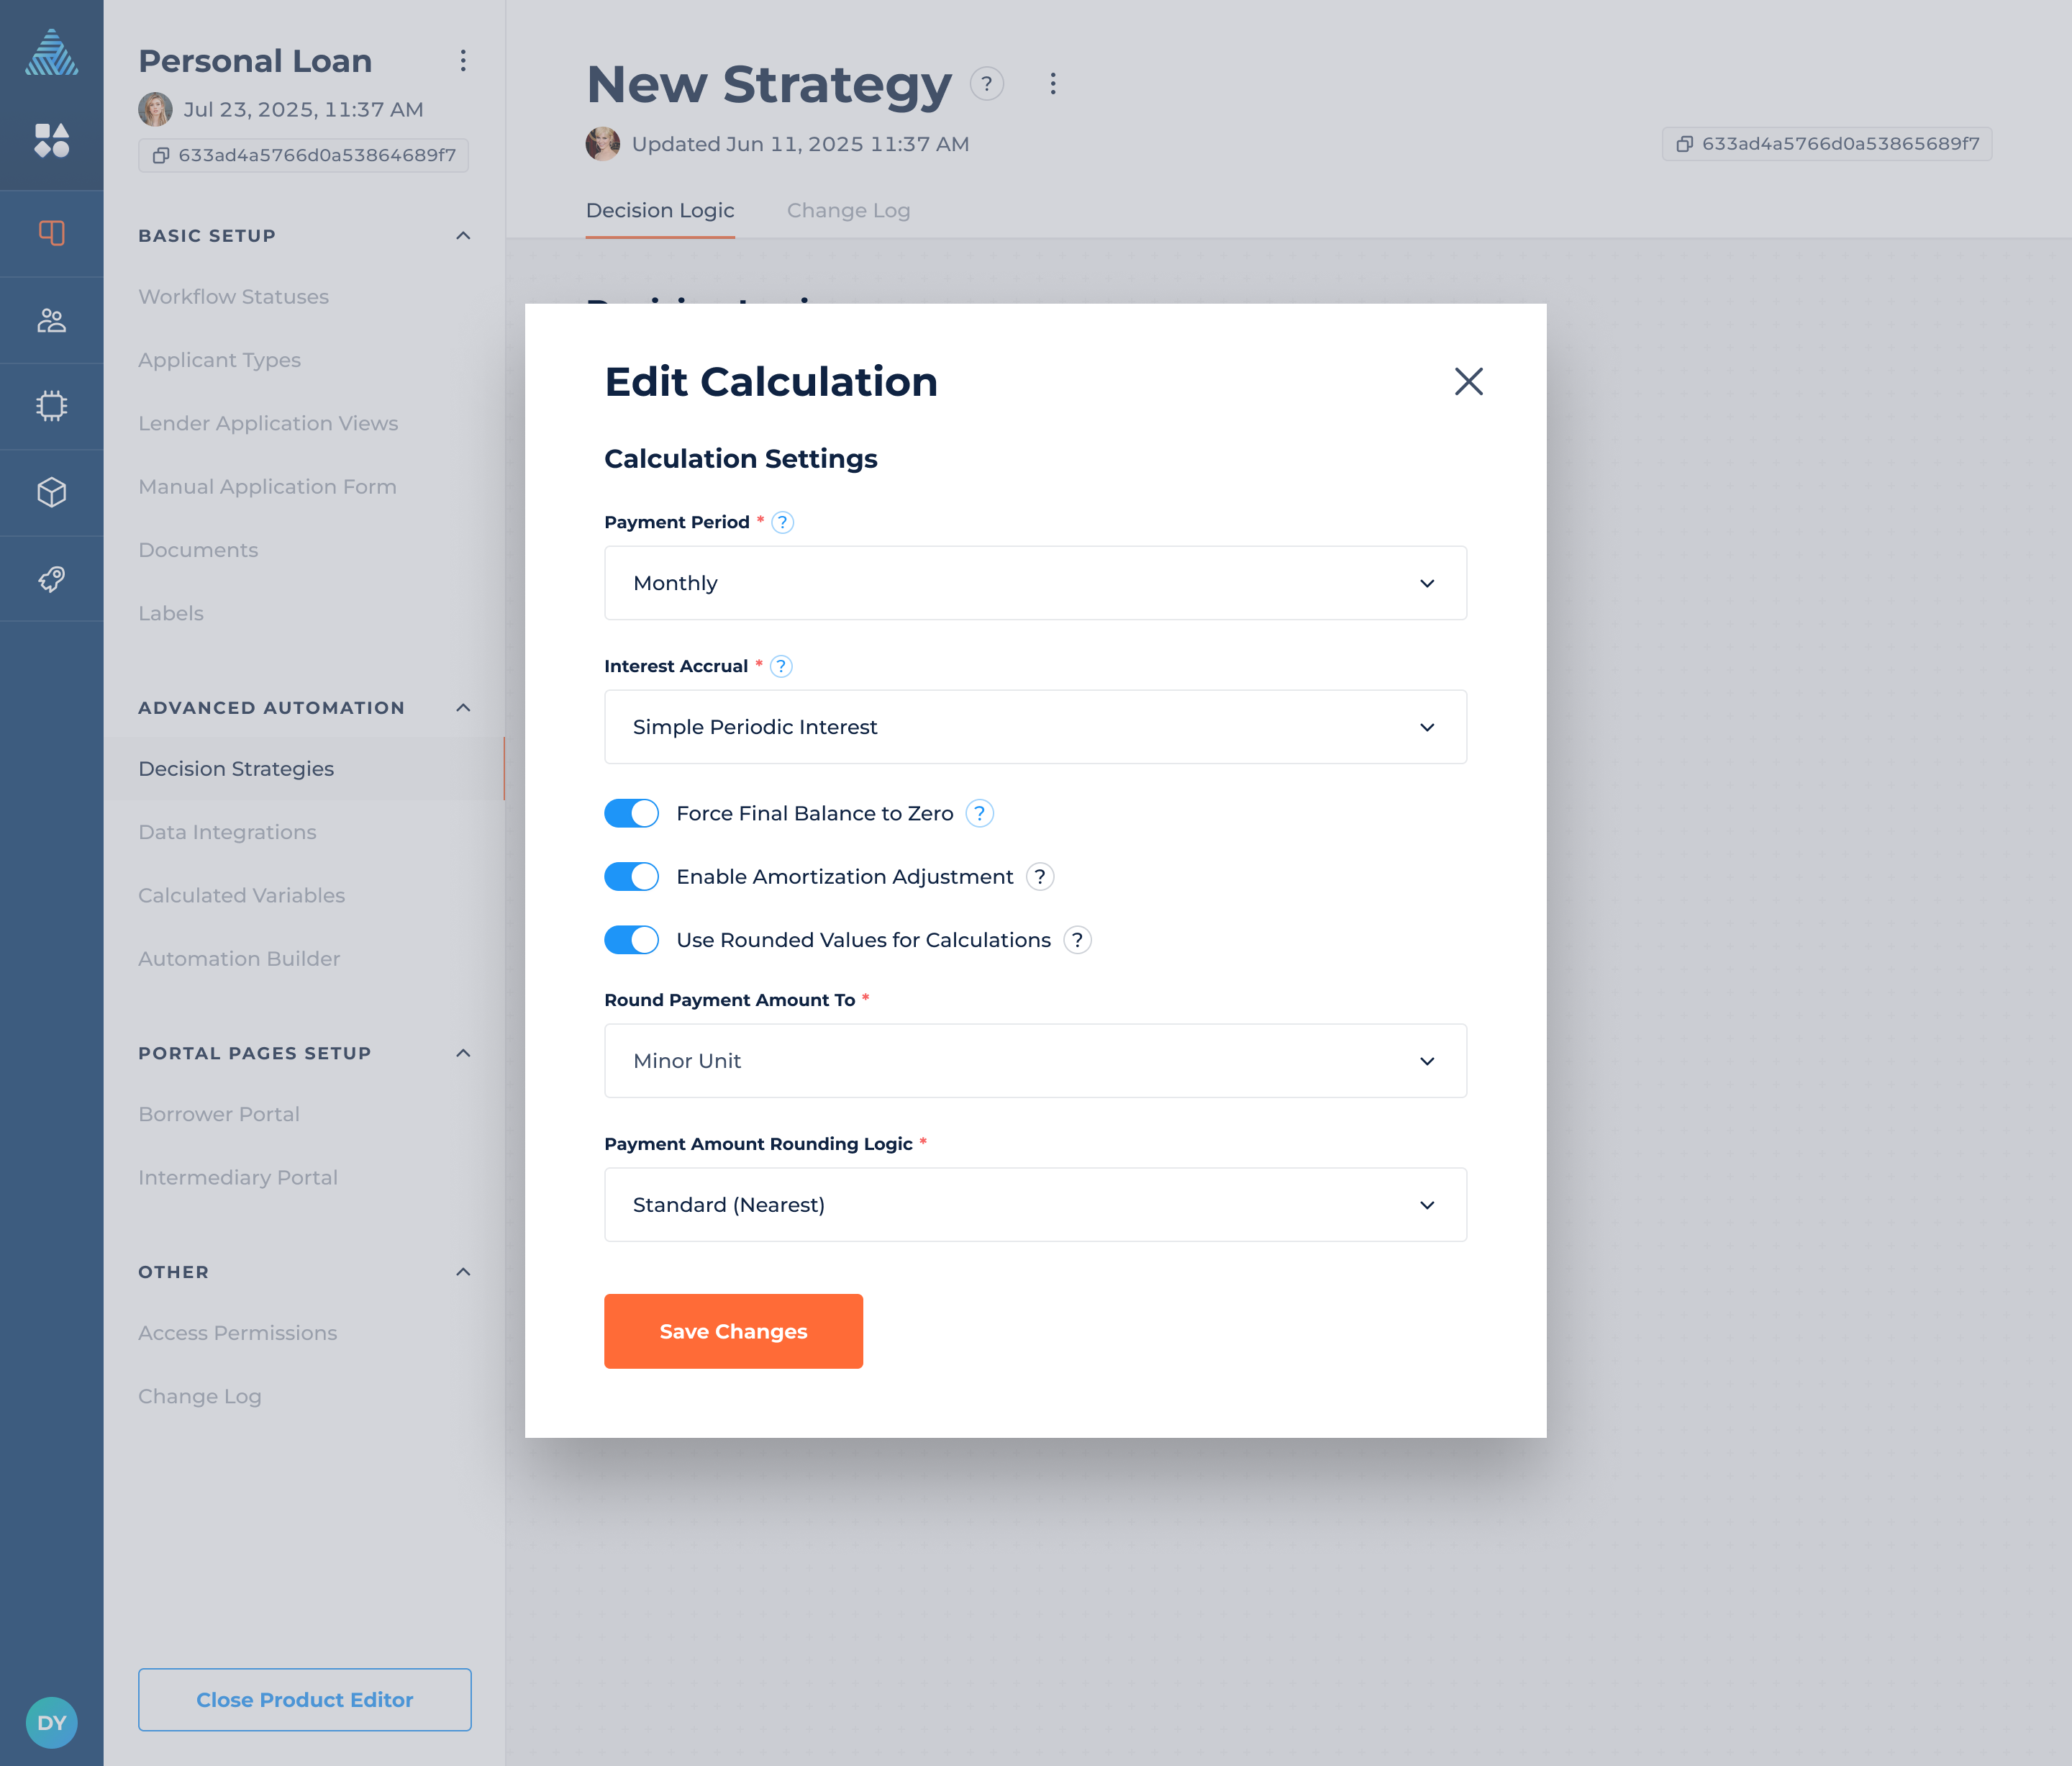
- Click on the "Edit Calculation Settings" button:
- Select Payment Period: Monthly, Quarterly, Semi-Annually, or Annually.
- Select Interest Accrual Method: Simple Daily 360, Simple Daily 365, or Simple Periodic Interest.
- Toggle on Final Balance to Zero if it should be enforced (enabled by default).
- Toggle on Amortization Adjustment if it should be enabled.
- Toggle on Rounded Values if they should be used for calculations.
- Choose whether the Payment Amount should be rounded to the Minor Unit or Whole Unit.
- Select the Payment Amount Rounding Logic: Standard (Nearest), Round Up, or Round Down.
Please note that all values (other than the Payment Amount) will use standard (nearest) rounding when the Rounded Values toggle is enabled.
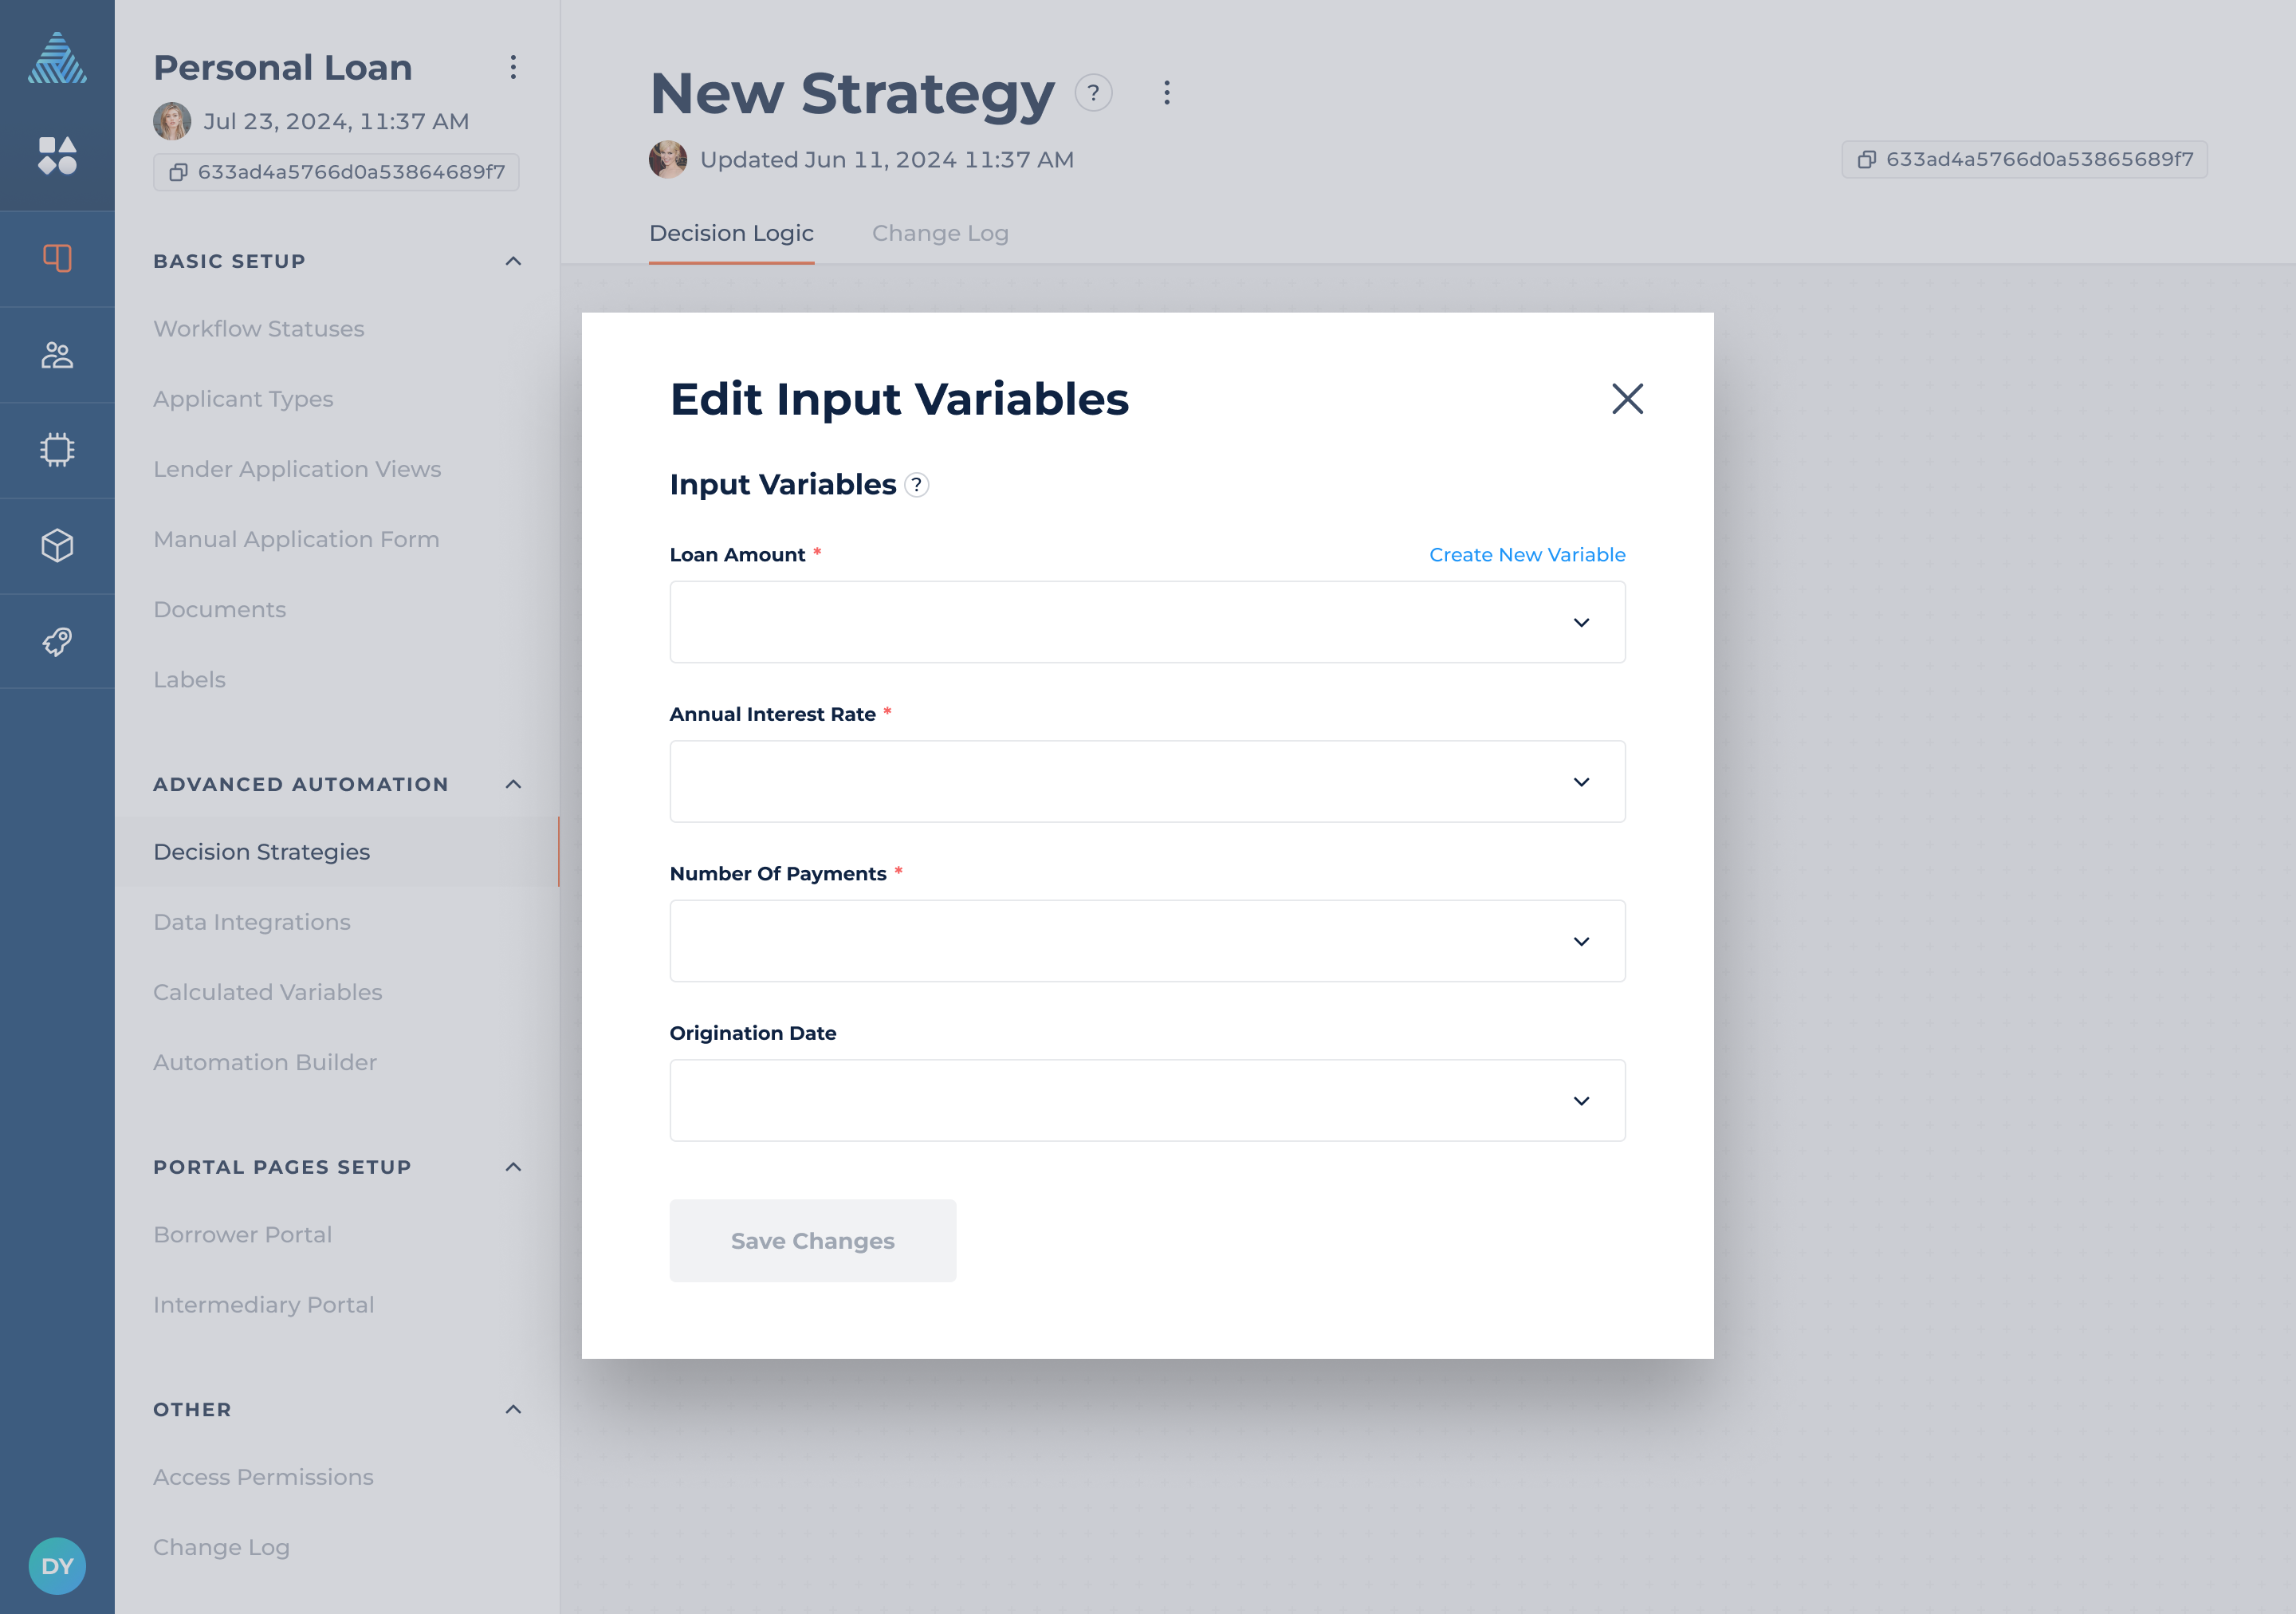
To edit the inputs for the Amortization Table:
- Click on the "Edit Input Variables" button:
- Select the corresponding variables for Loan Amount, Annual Interest Rate, Number of Payments, and Origination Date.
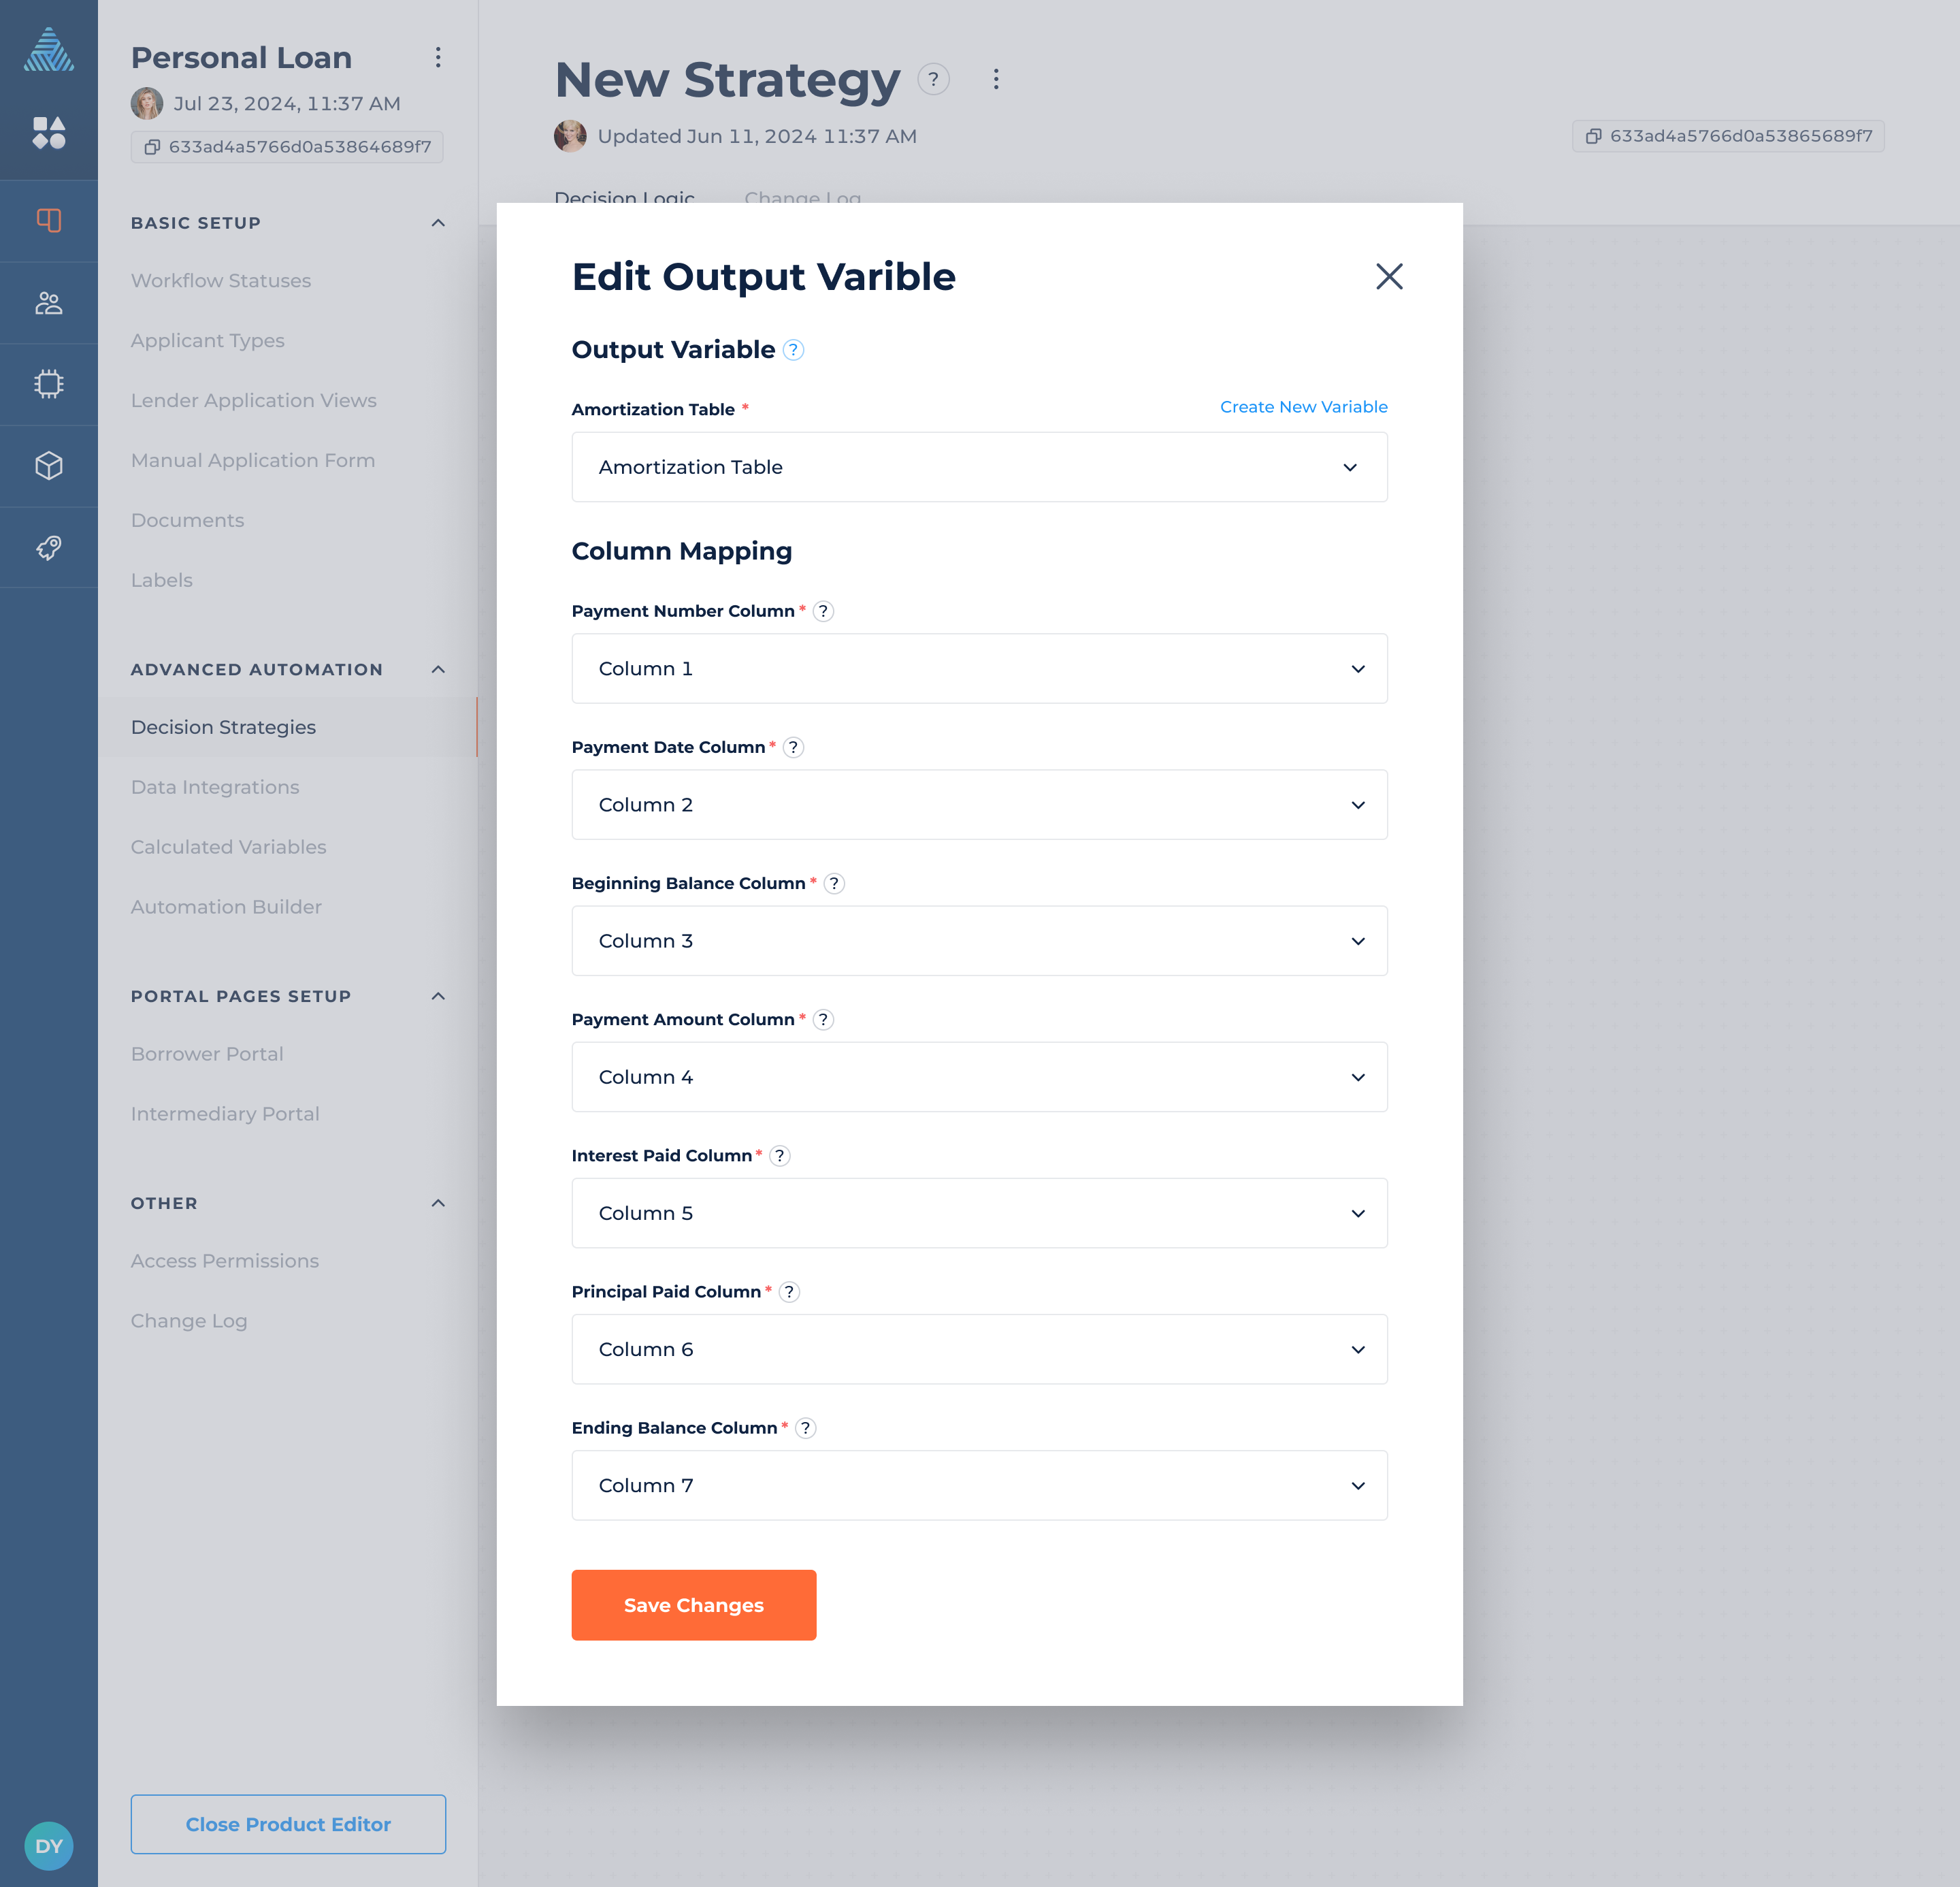
To edit the output variable that will contain the amortization table:
- Click on the "Edit Output Variable" button.
- Select the corresponding table variable where the generated amortization table will be saved.
- Complete the column mapping for the following columns: Payment Number, Payment Date, Beginning Balance, Payment Amount, Interest Paid, Principal Paid, and Ending Balance.
Integration Module
Integrations with data sources and predictive models can be implemented within decision strategies using the "Integration" module type. Before a data integration can be added to a decision strategy, it must be set up in the Data Integrations section.
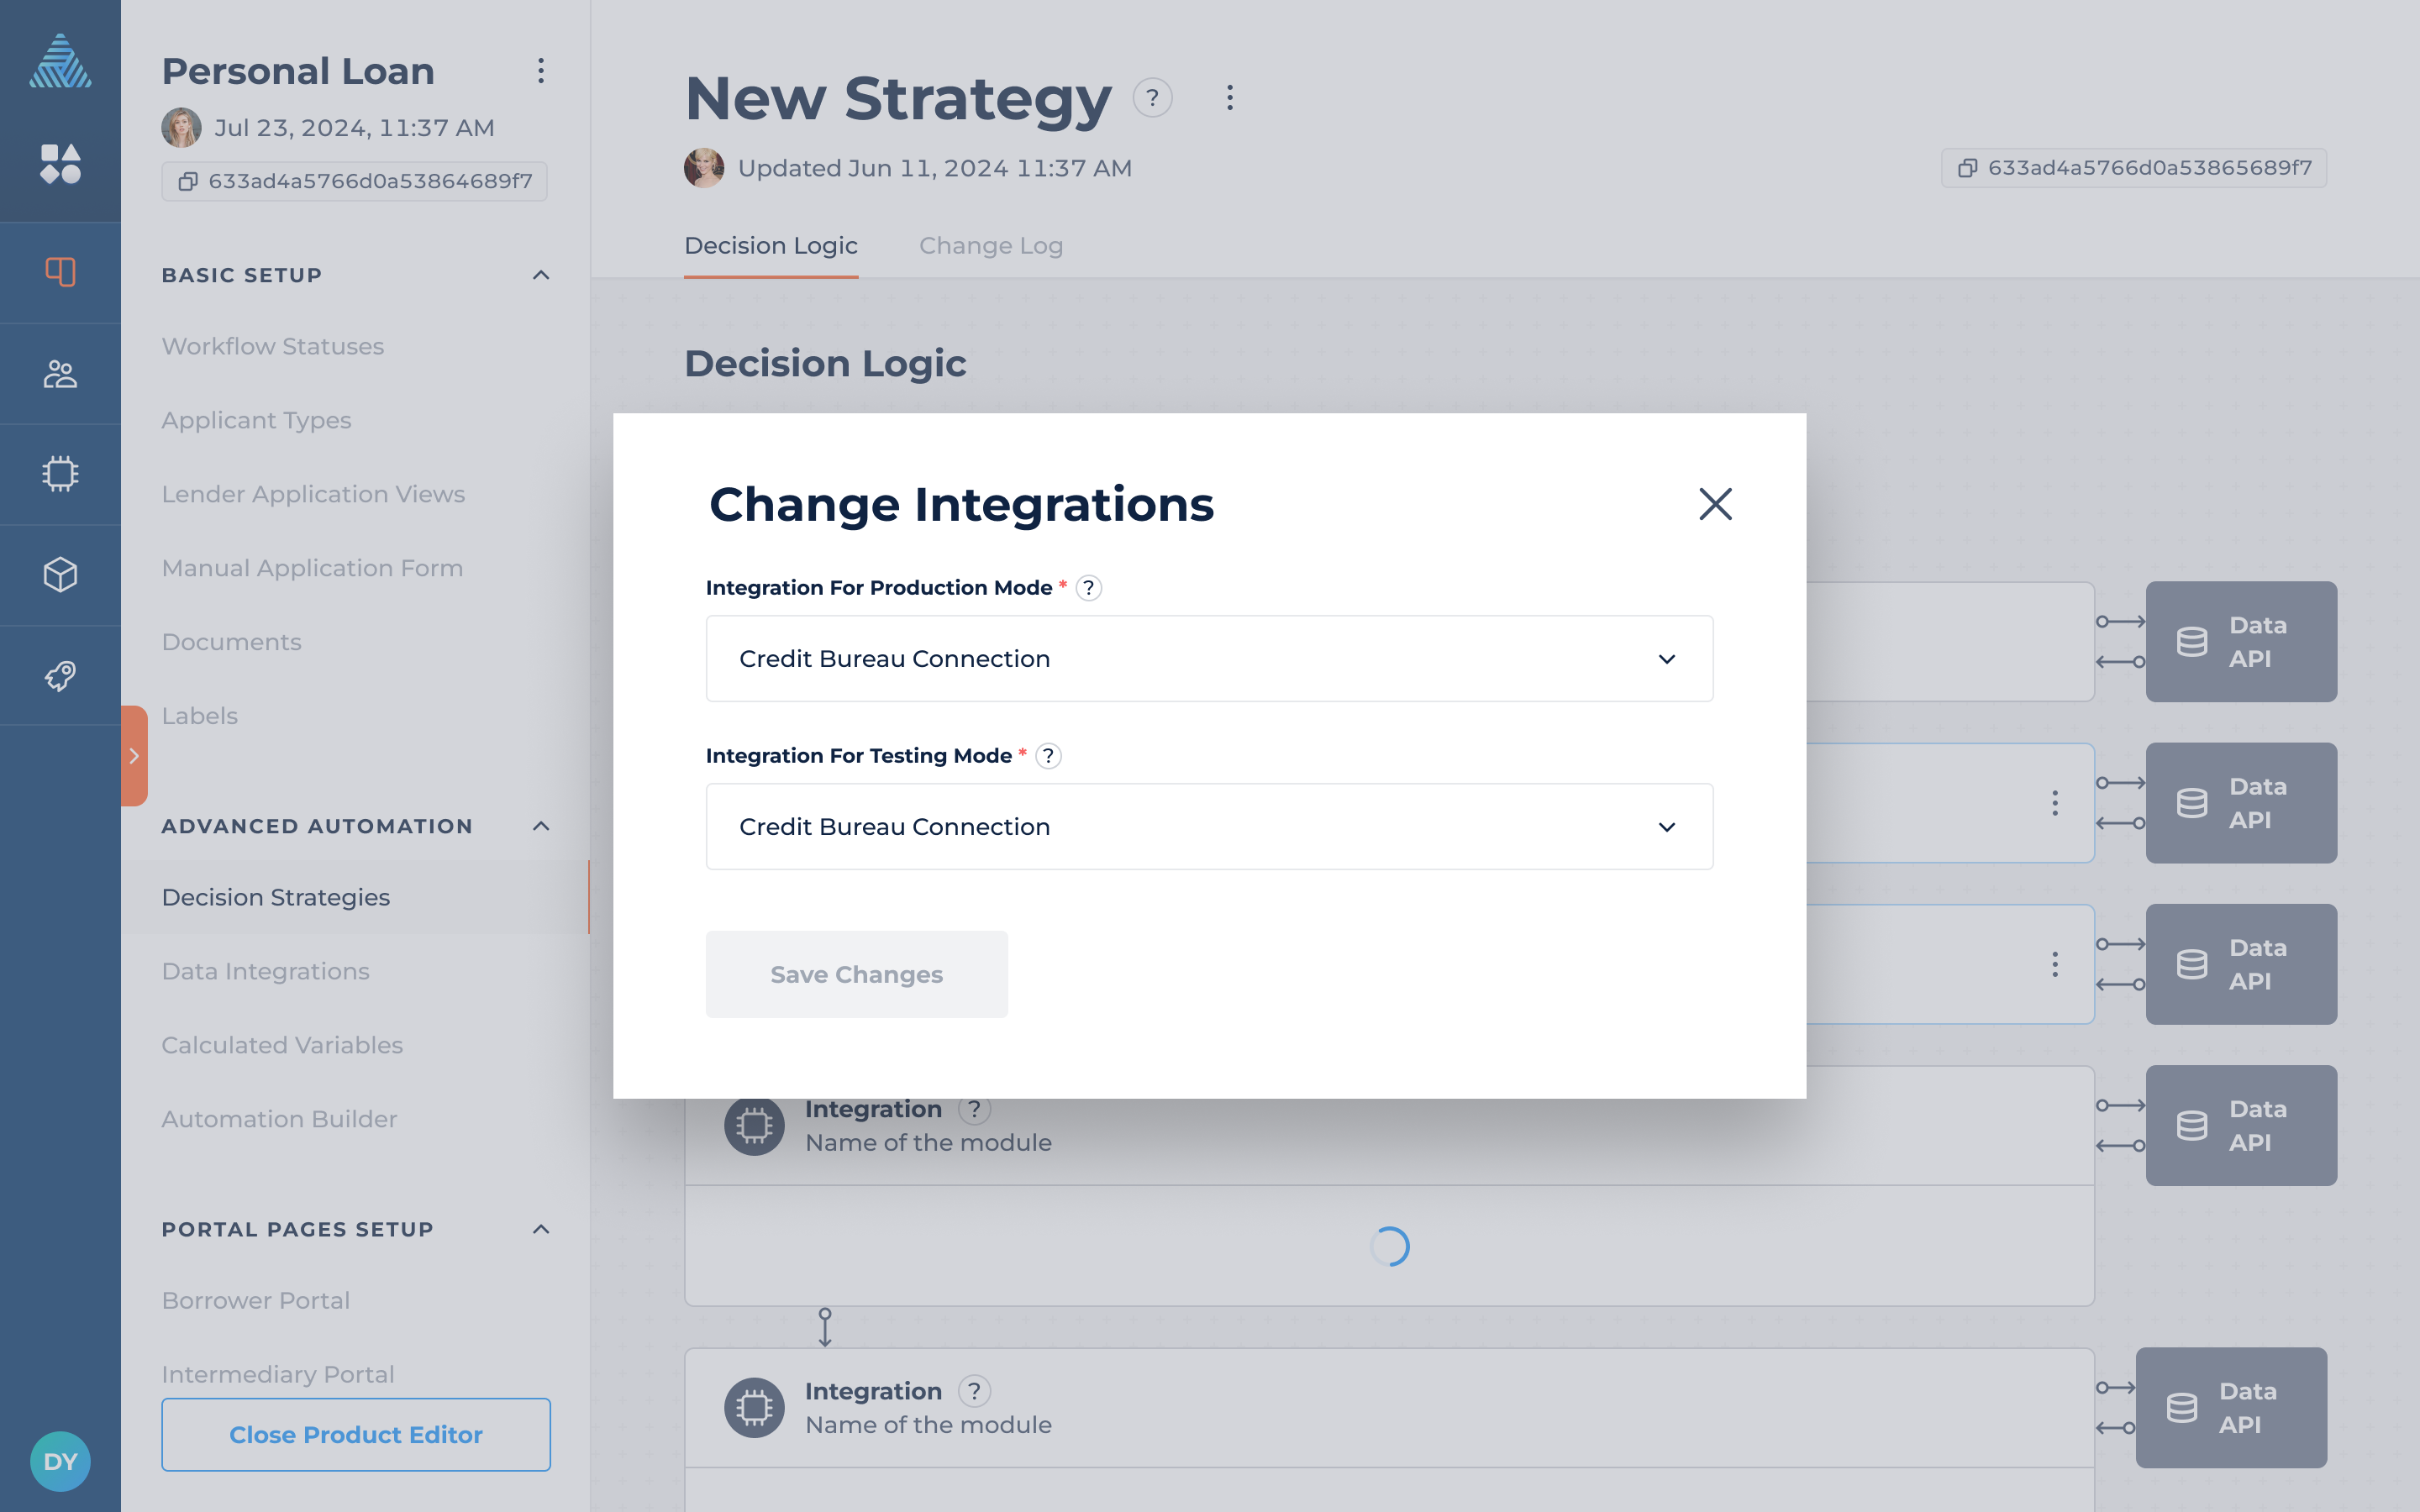
When you add a data integration to a decision strategy, you'll need to set up the following:
- Selected Integration, which gives you the option to change the integration that will run in this module. You have to select "Production Mode" or "Test Mode" Integration, which allows you to provide different integrations - with different credentials - for the two modes.
- Error Handling, which lets you select how integration-related errors will impact the overall execution process.
Decision Module
The "Decision" module type lets you provide a set of conditions that must pass for the decision to continue. If any condition fails, the decision will fail and the corresponding decline reason(s) will be assigned.
To add a rule:
- Click on a "Decision" module to expand it.
- Click on the "Add Condition" button at the bottom of the module.
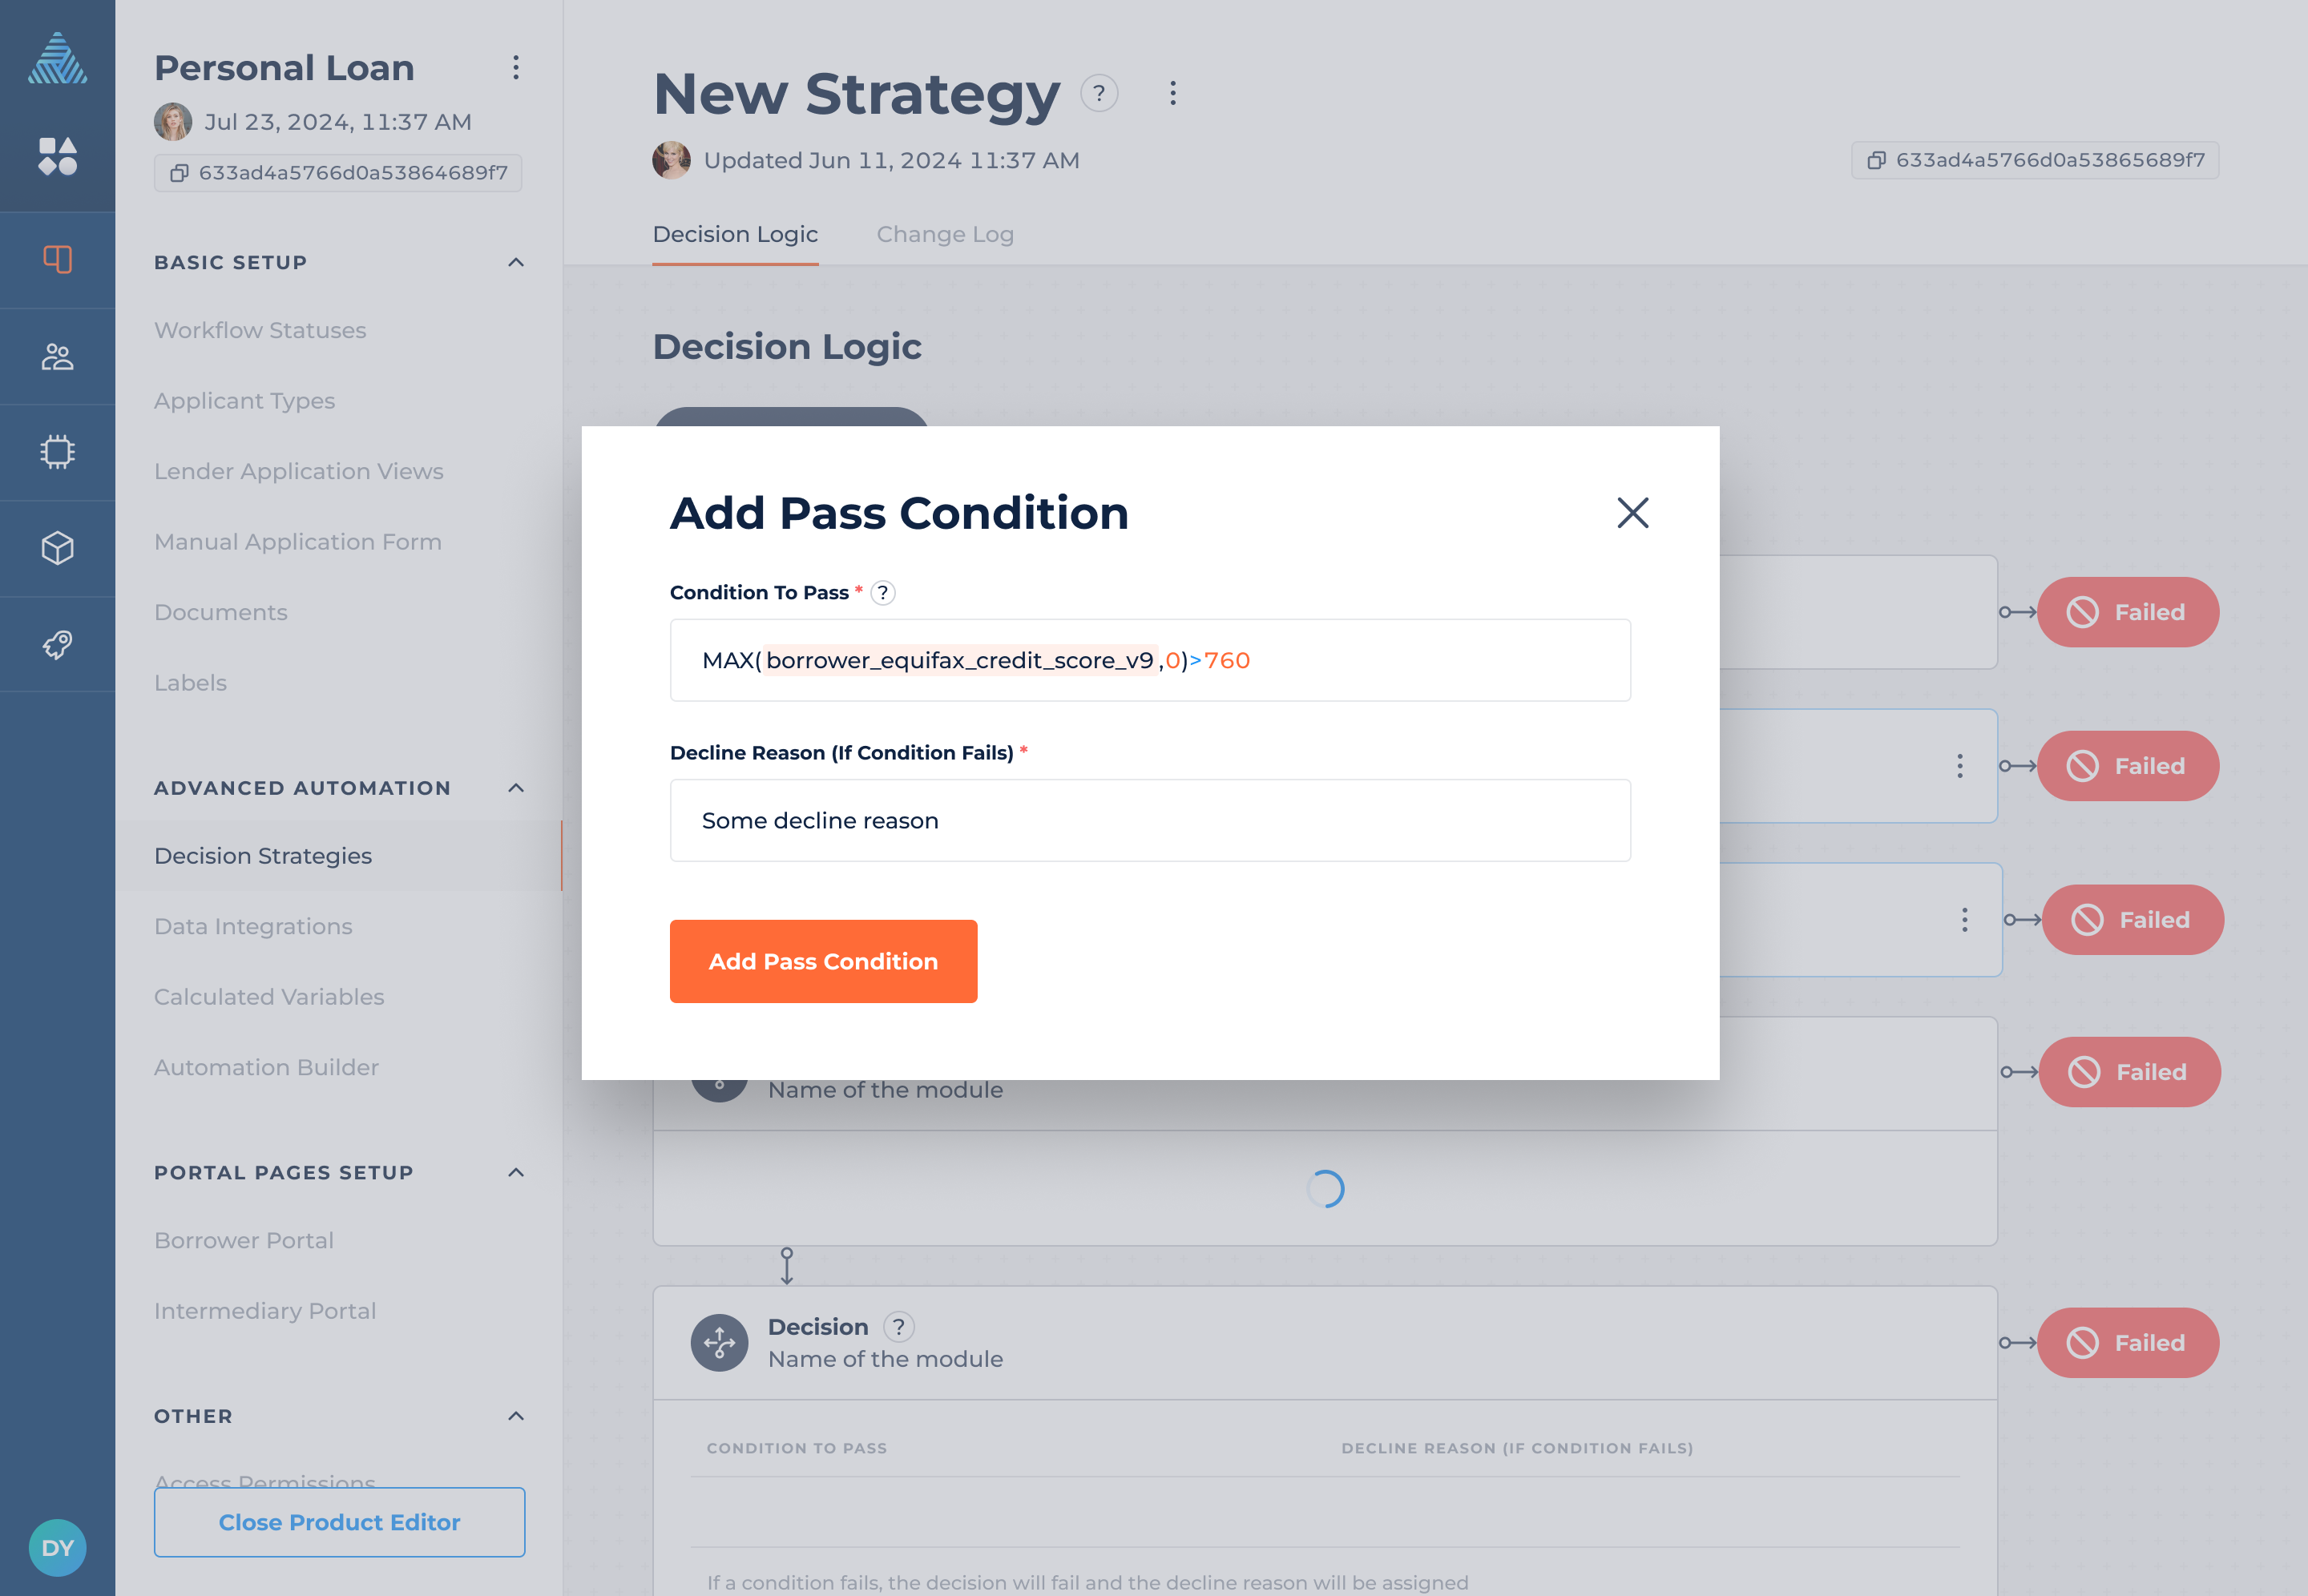
You’ll be asked to provide the following information:
- Condition To Pass, must return “true” (string) or TRUE (boolean) to pass.
- Decline Reason (If Condition Fails), that will be saved if the condition fails.
Change Log
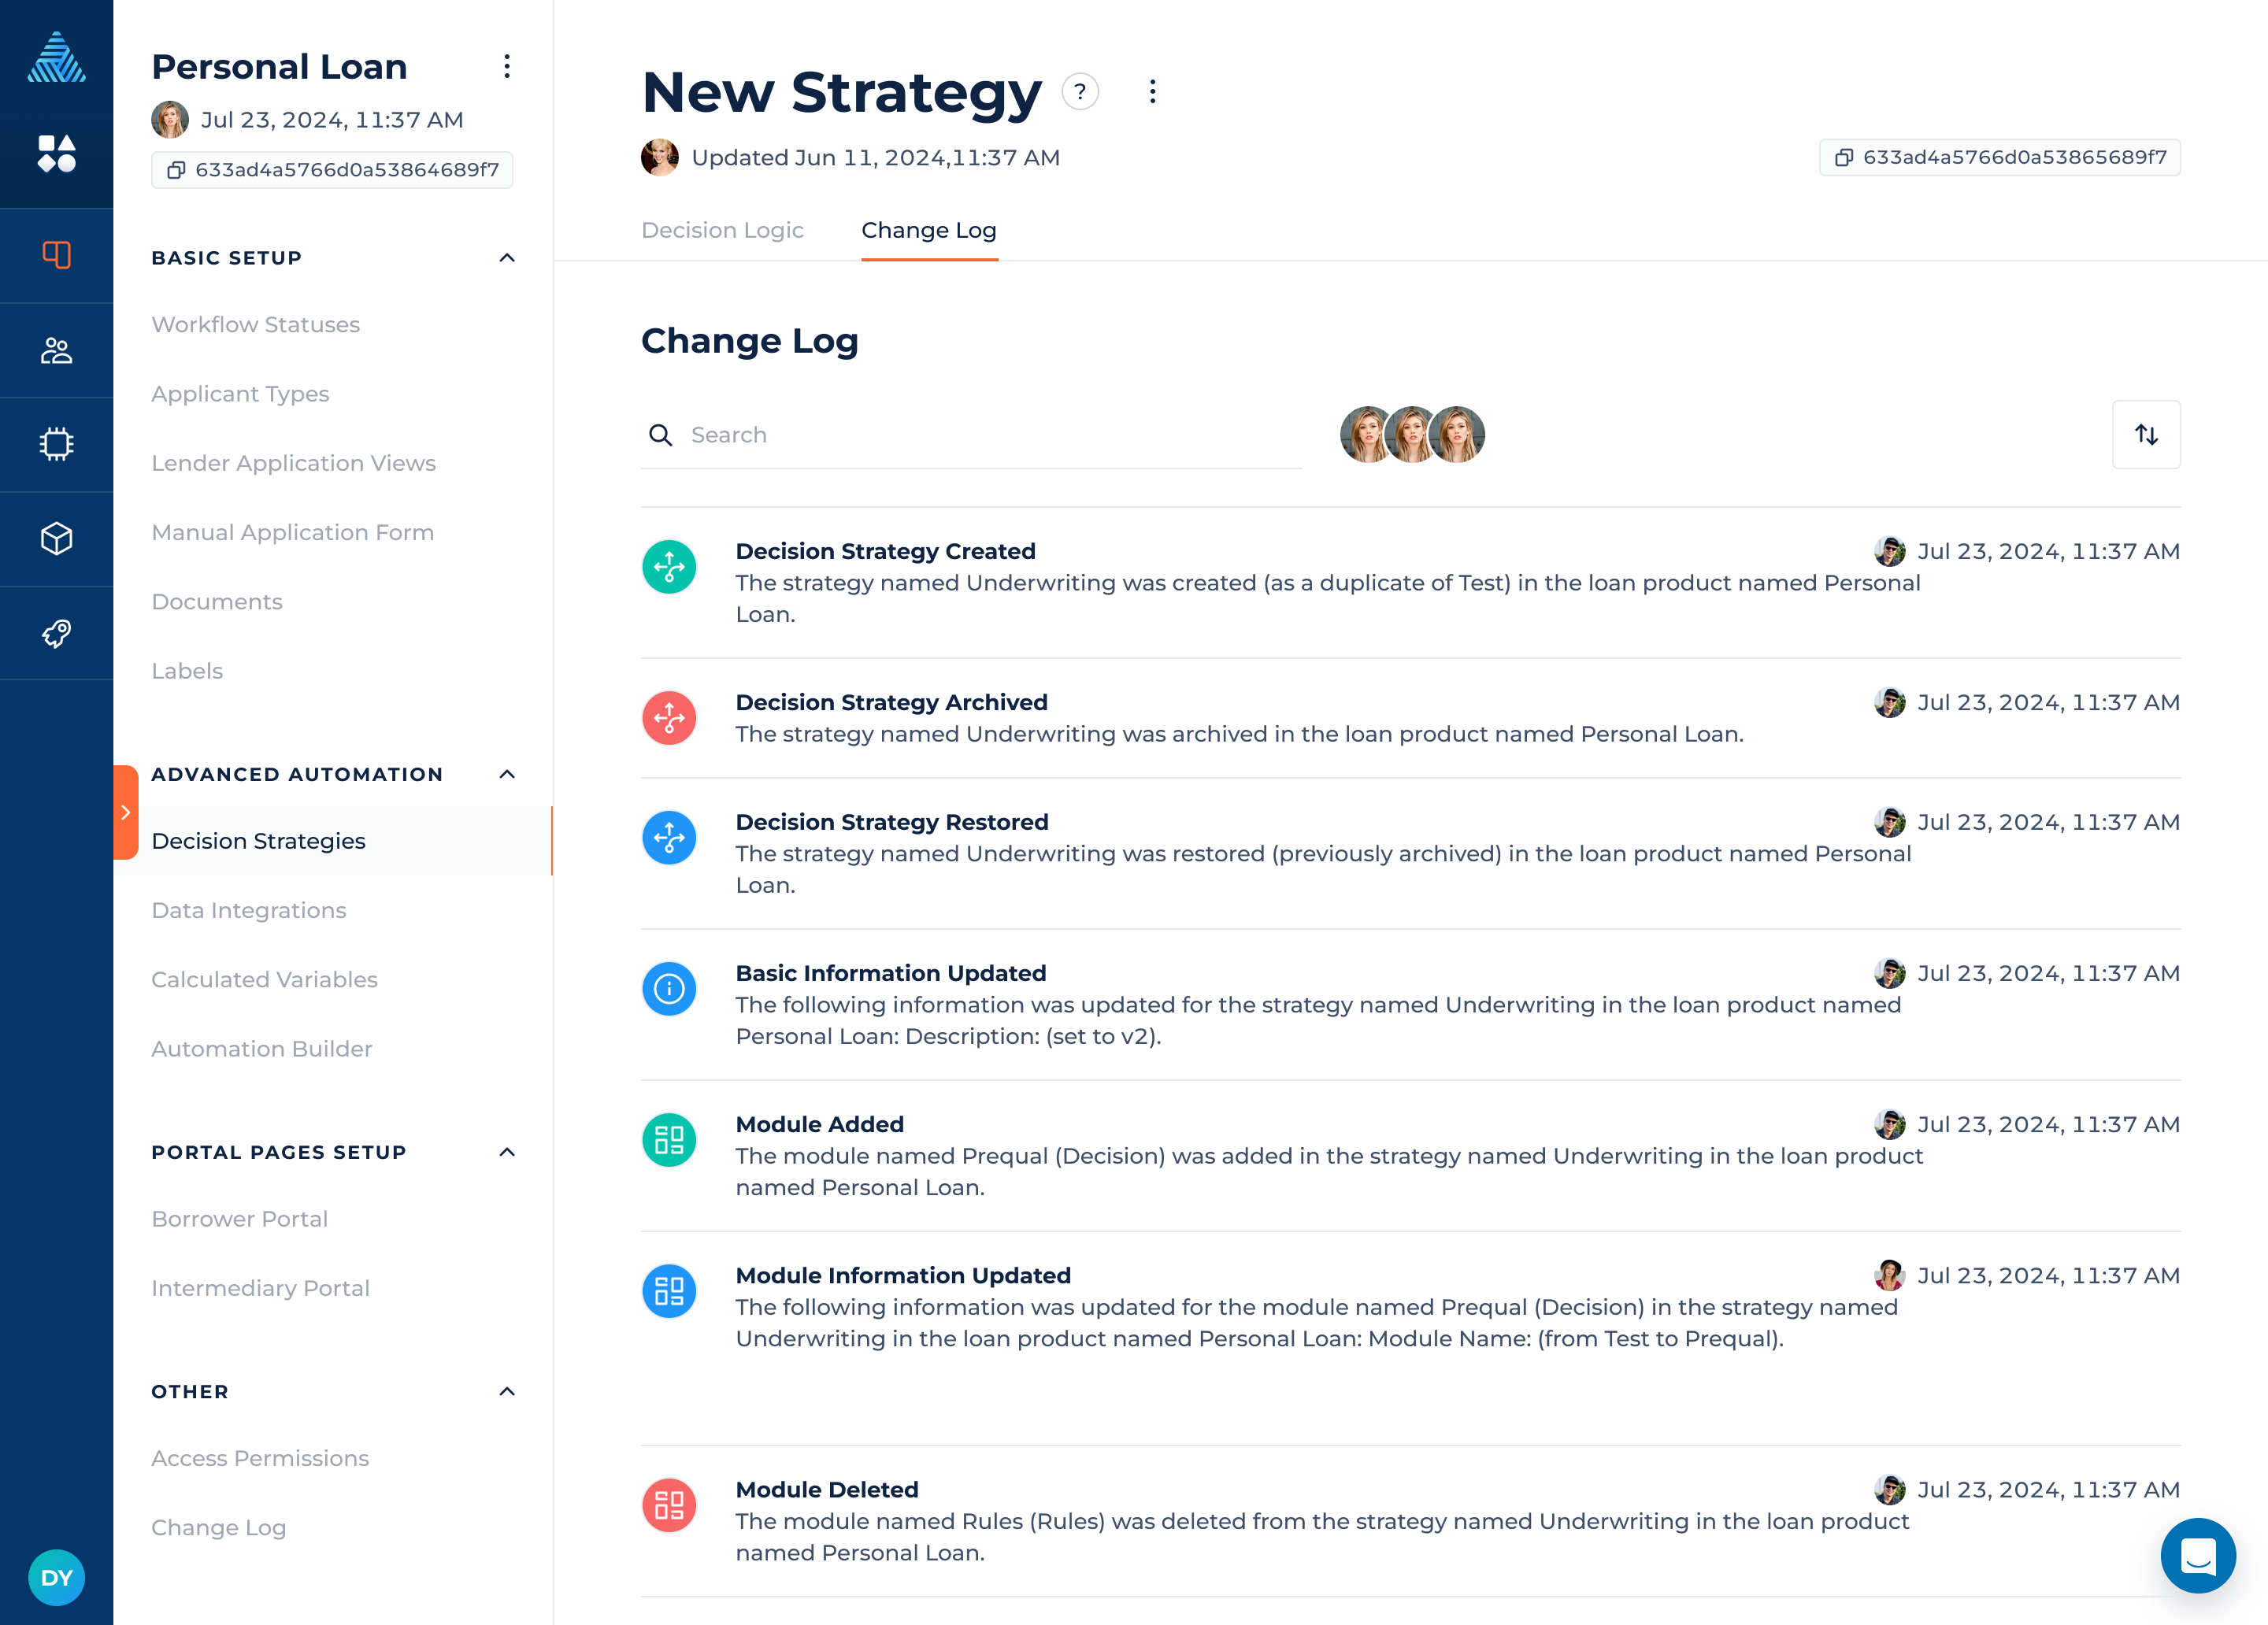
Tracking updates helps users understand historical changes and ensure compliance. Every time a change is made to a decision strategy, DigiFi records what change was made, when and by whom. A record of historical changes can be viewed on the Change Log tab.
You can sort changes from Newest to Oldest or vice versa by clicking on the ⇵ button on the right side.
Updated 3 months ago
