General Settings
How to launch your intermediary portal through DigiFi.
Overview of General Portal Settings
This section is for platform administrators who are setting up or managing the system. It covers key elements of intermediary portal configuration, including how to:
- Configure, launch and disable the testing and production portals.
- Manage general settings and password protection.
- Add legal consents.
- Configure your production portal domain (e.g. https://portal.yourbankname.com).
Portal Status
This page displays the actual portal status (which will initially be disabled) and lets you view the steps that must be taken before the portal can be launched.
Launching your portal(s) requires completing a few steps:
Step 1: Provide Company Information
The first step requires ensuring that your basic company information, including Company Name and Legal Address, is correct. These will be used throughout the intermediary portal, including in the portal itself and emails, and should be accurate. To update your company information, navigate to the Billing page.
Step 2: Customize Portal Branding
The second step requires you to customize the appearance and language of your intermediary portal. This is done through the Branding section, where you can select a customer-facing language and incorporate your company’s colors and logo. These customizations will also be reflected in the automatic emails sent to borrowers and intermediaries.
Step 3. Connect Email Account
DigiFi's intermediary portal includes emails to your intermediaries. For example, intermediaries receive an email when a certain automation is triggered. These emails must be delivered from your email domain for both legal reasons and to ensure a seamless borrower experience.
Our platform includes an integration with SendGrid, which is part of Twilio (a public company) and is a leading provider of automated email delivery. If you don't already have a SendGrid account, you'll need to make one and connect it to DigiFi as described in the SendGrid Email Delivery section of our user manual.
Once you've connected your SendGrid account, emails will automatically be delivered from your domain and configurations in SendGrid, creating a completely seamless experience for your partners.
Step 4. Connect Messaging Account
DigiFi’s intermediary portal includes built-in text messaging capabilities for intermediary communications and two-factor authentication (2FA). To enable SMS delivery, you must connect a Twilio account and configure at least one verified phone number.
Our platform includes an integration with Twilio, a leading communications provider for SMS and phone verification services. If you don't already have a Twilio account, you'll need to make one and connect it to DigiFi as described in the Twilio SMS Messaging section of our user manual.
Once you've connected your Twilio account, all text messages from the intermediary portal will be sent using your configured Twilio phone number(s). This includes:
-
Intermediary communications
-
Two-factor authentication (2FA) codes
-
Account creation verification
-
Phone number change verification
-
Other portal-related authentication and notification messages
This creates a seamless and fully branded communication experience for your customers.
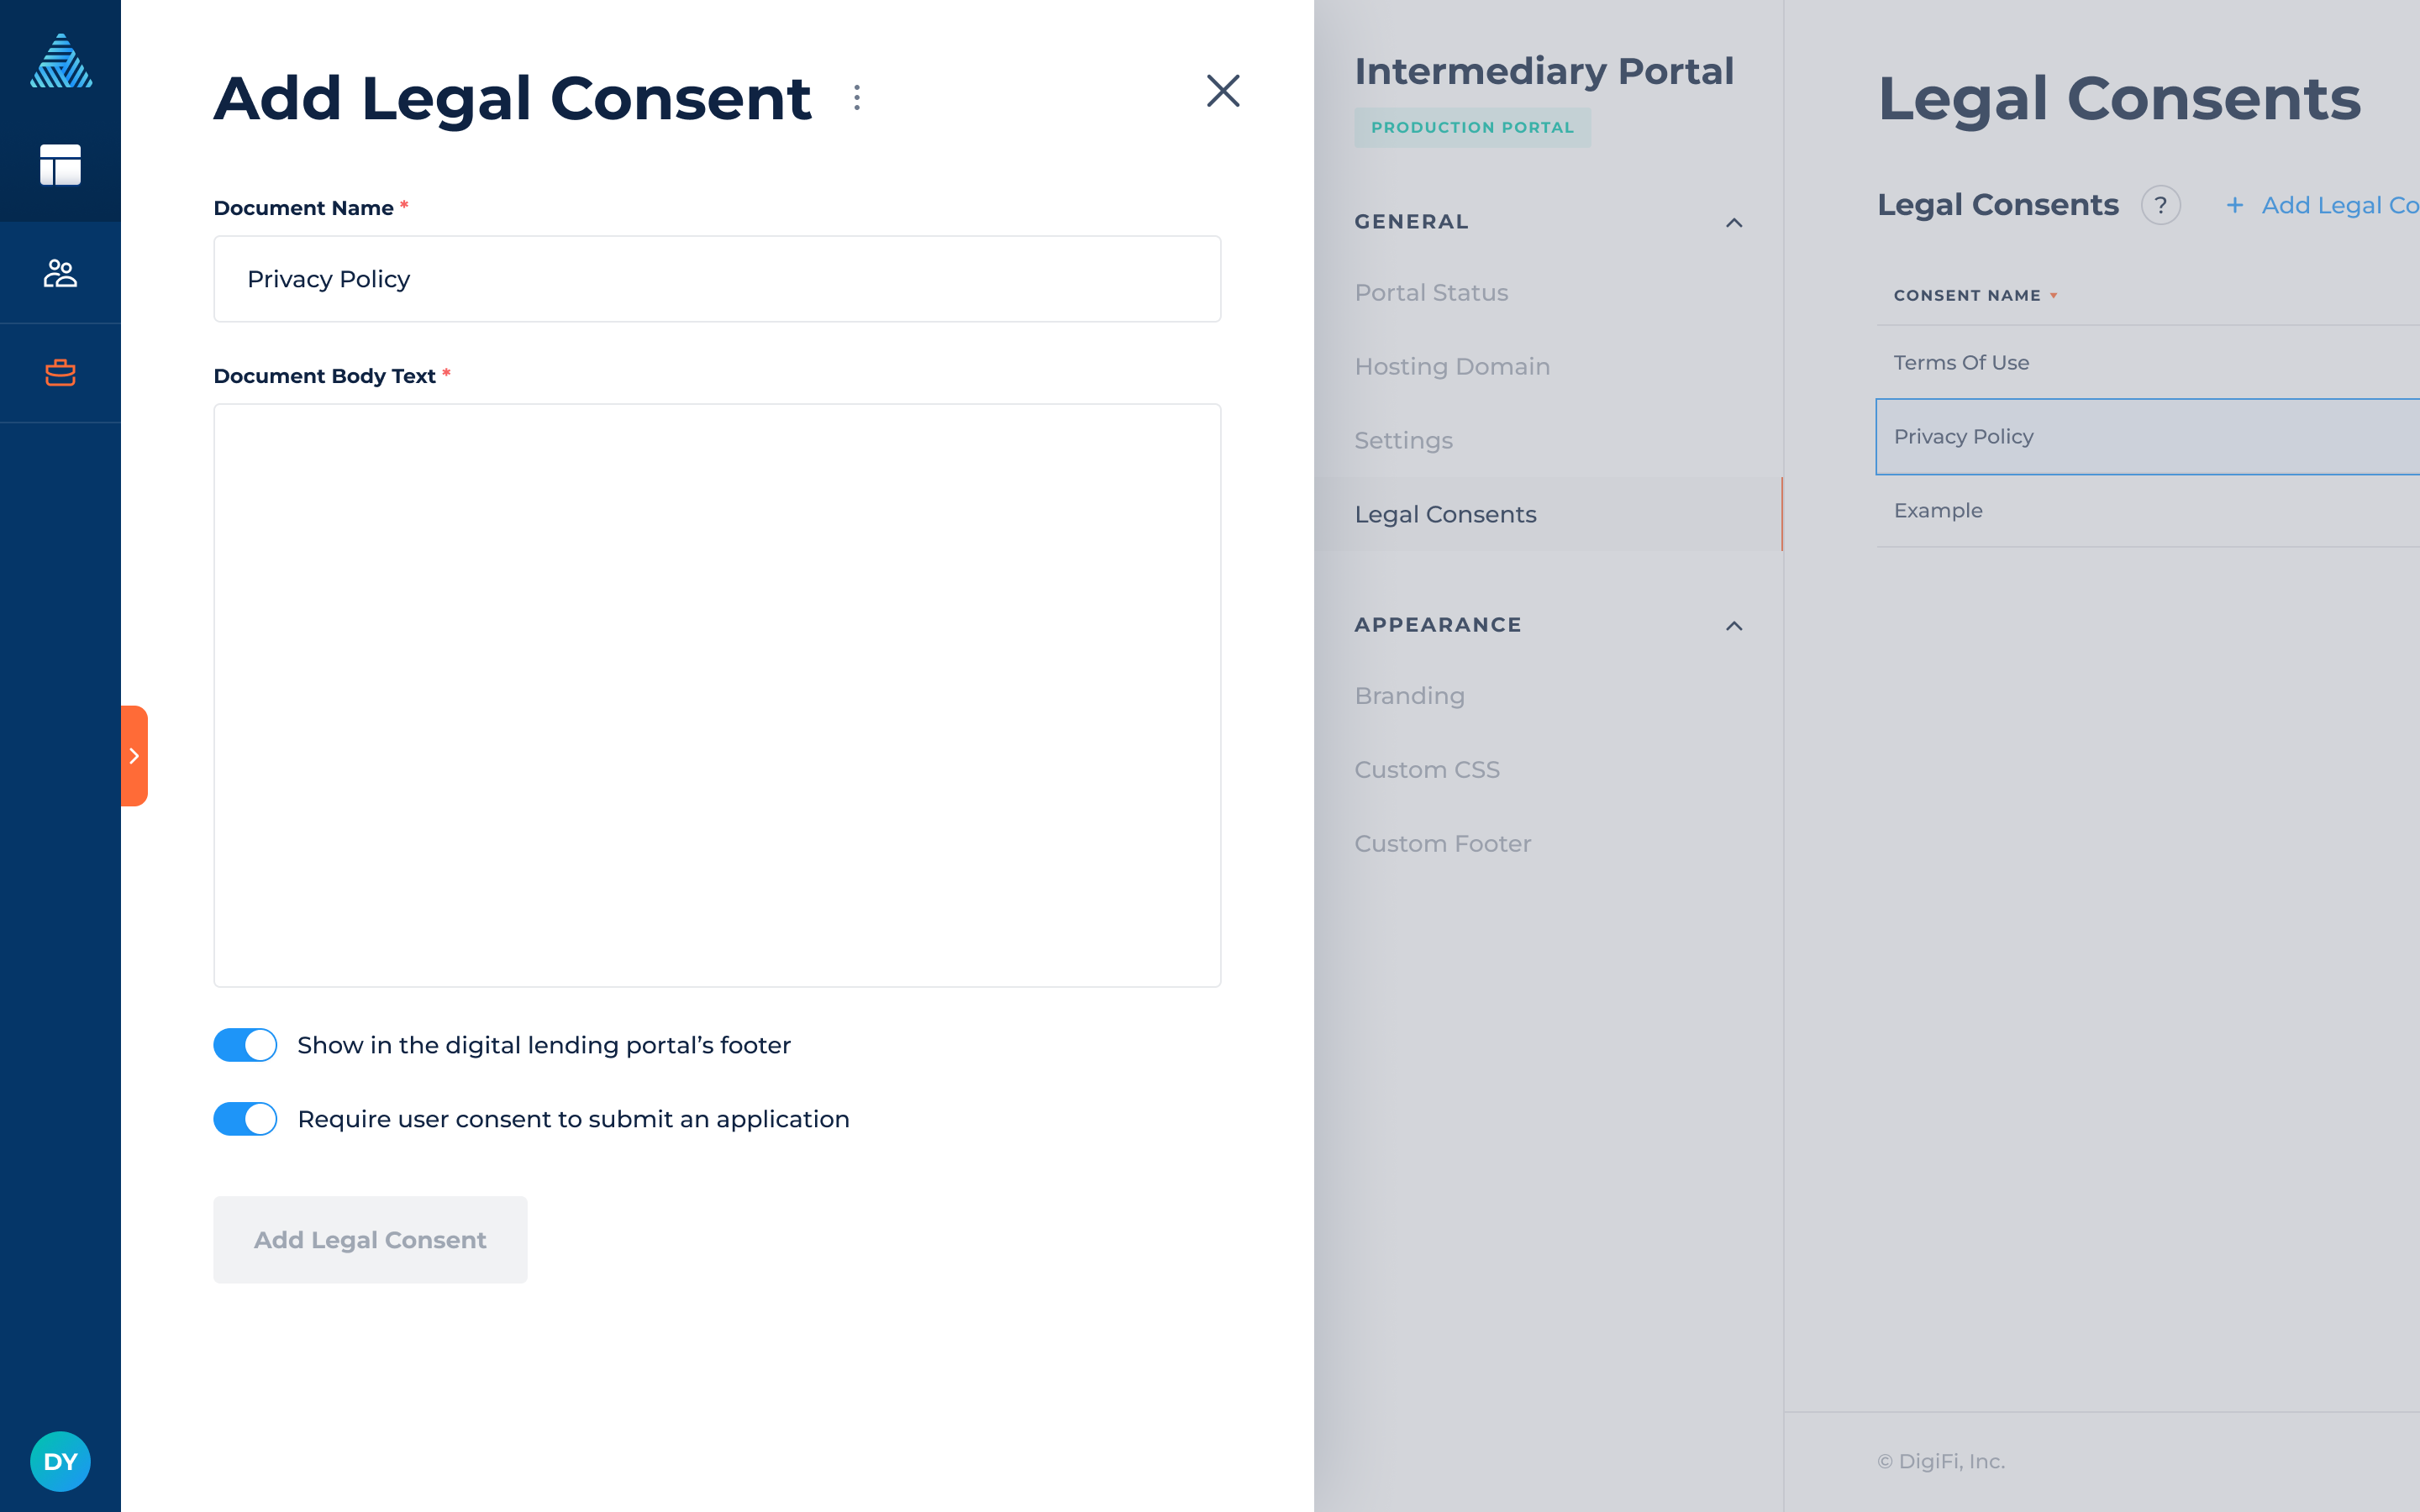
Step 5: Add Legal Consents
The legal consents can be configured in the "Legal Consents" section under the "General" setup of the portal. At least one legal consent must be added before you can launch the intermediary portal.
To add a legal consent:
- Click on the “Add Legal Consent” button.
- Choose how the consent content should be provided:
- Internal consent: Use the rich text editor to define the full consent text shown in the portal.
- External consent page (URL): Enable the “Link to external consent page (URL)” toggle.
- When enabled, the rich text editor is replaced with a URL input field.
- Users will be redirected to the specified external page instead of viewing internal consent content.
- Switch the toggles to determine whether the document will appear in the website's footer and/or when they submit new applications.
- Click on the “Add Legal Consent” button.
To delete a legal consent:
- Hover over the consent's line in the table.
- Click on the 3-dots and select "Delete Legal Consent."
- A pop-up window will open in which you can confirm that you want to delete the consent.
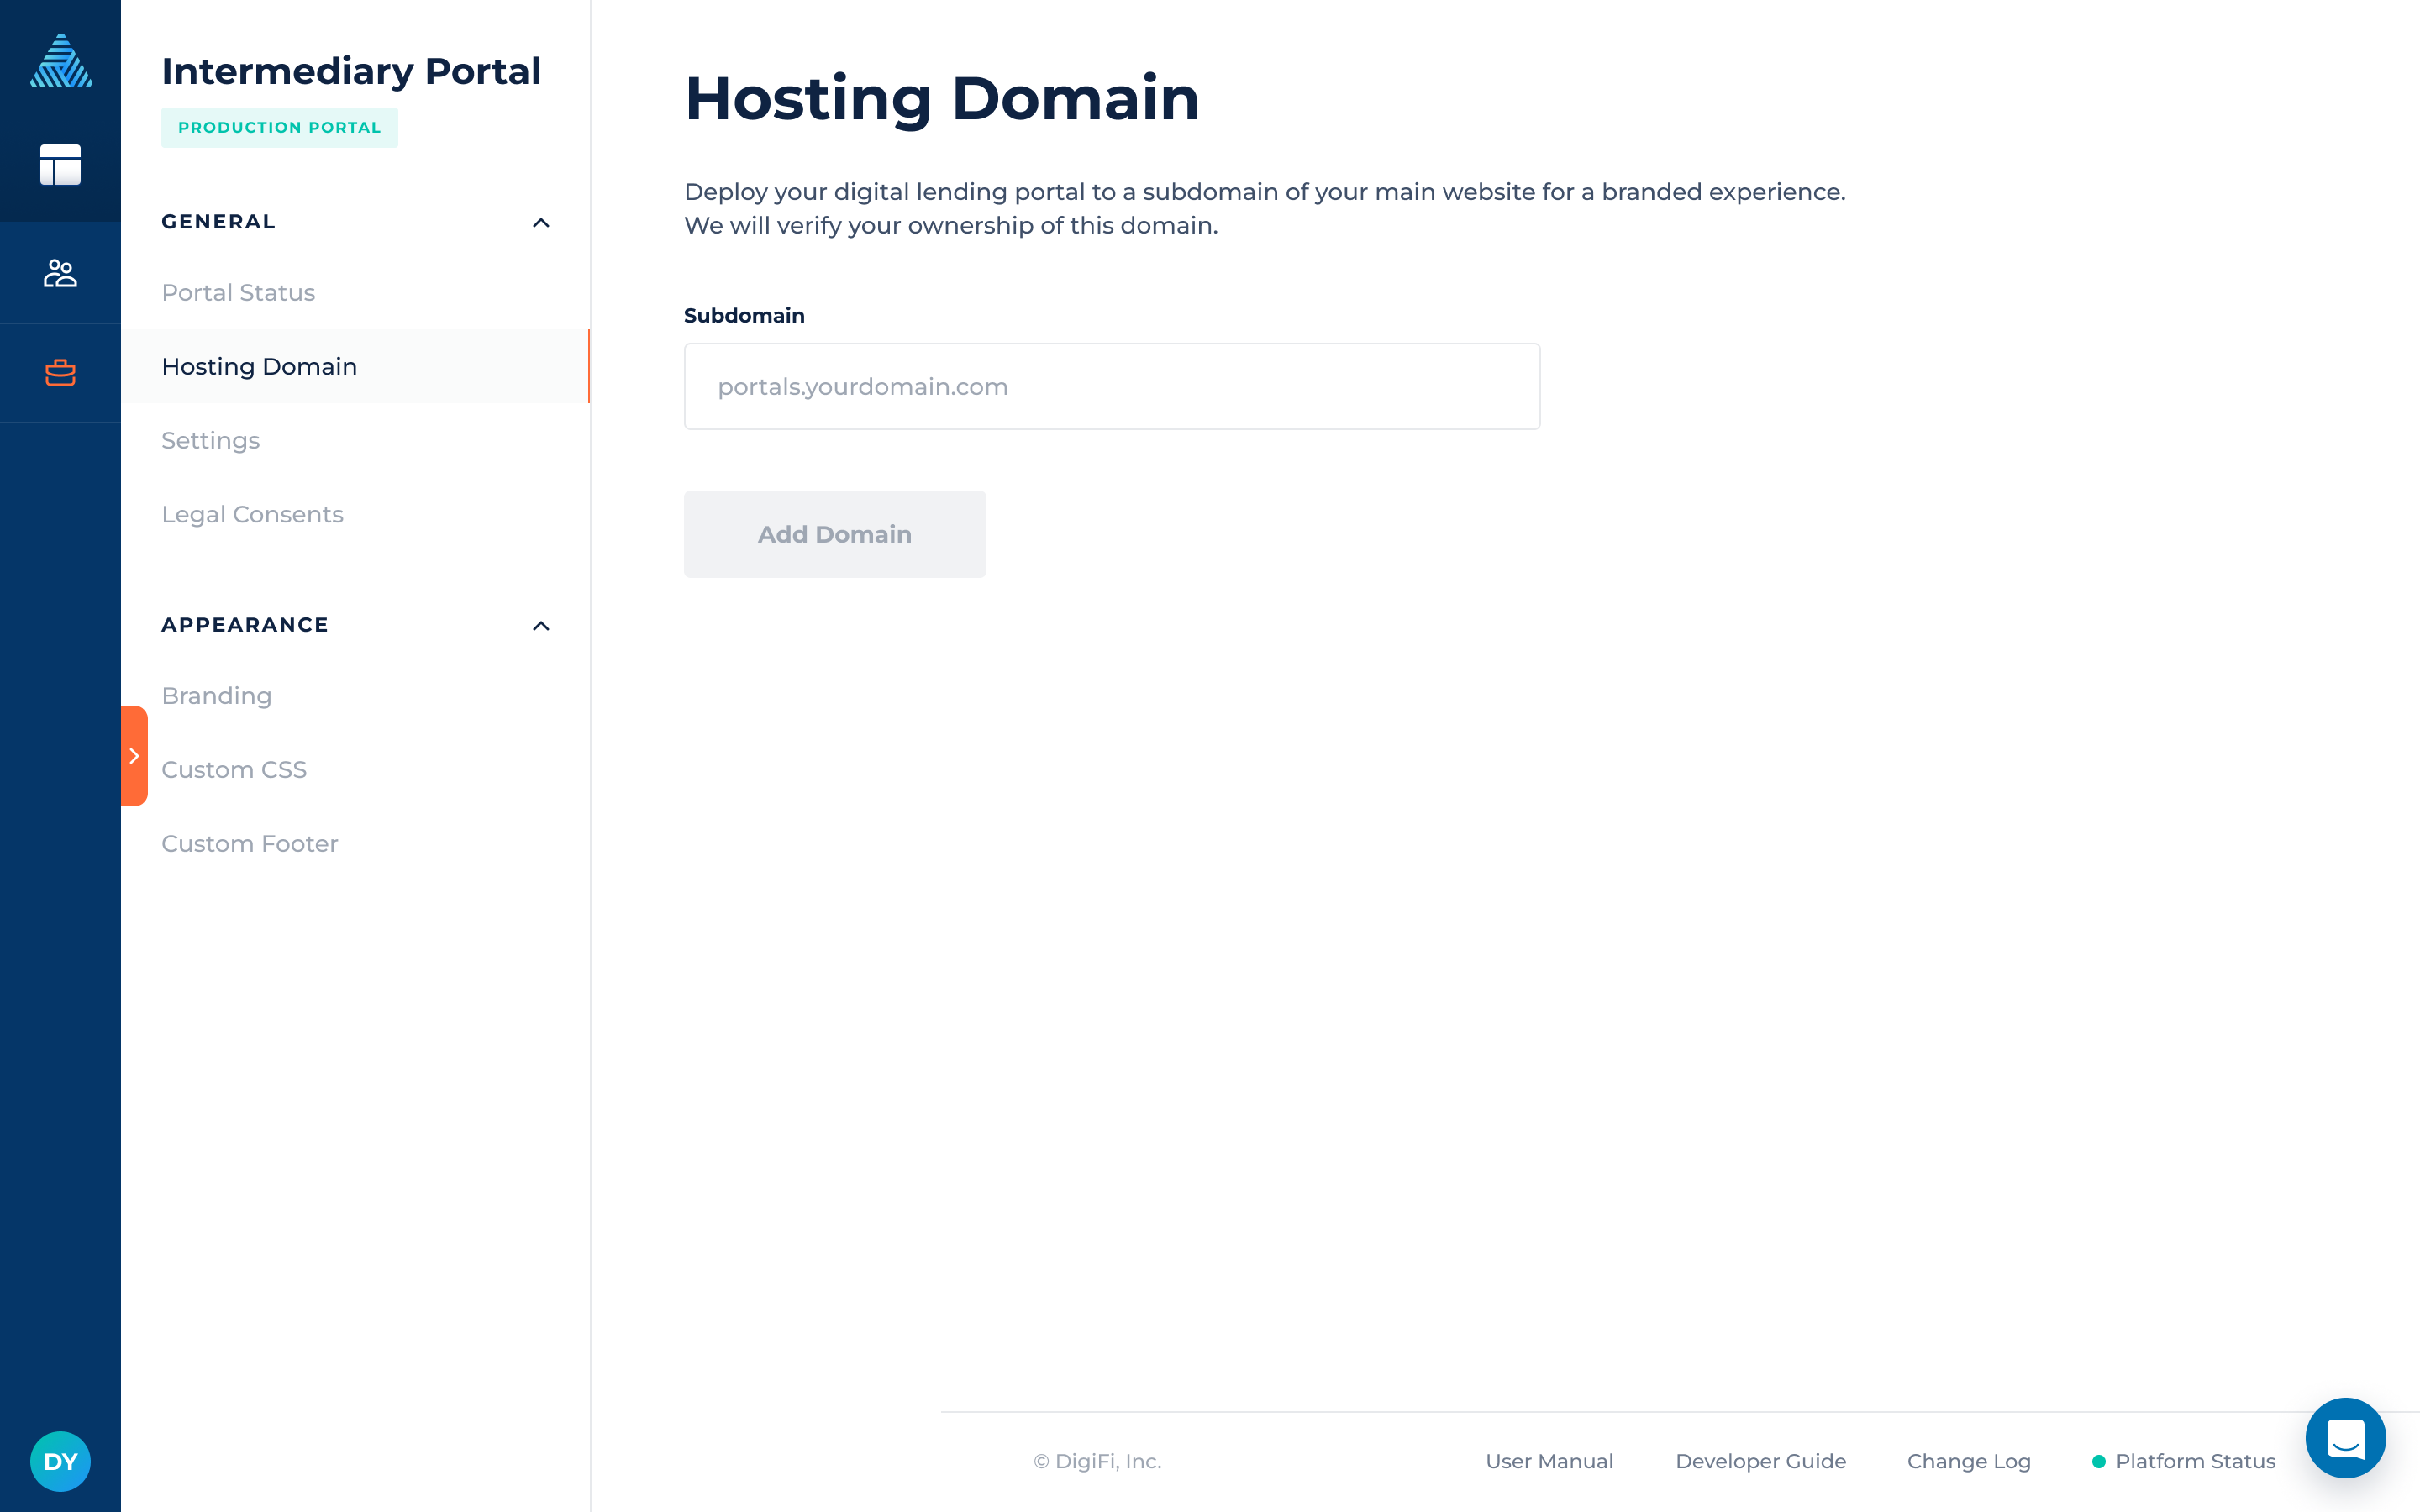
Step 6: Connect Your Hosting Domain (Production Only)
The production portal must be hosted at a web domain that you provide. The “Hosting Domain” page lets you connect the portal to a subdomain of your main website and provide your intermediaries with a seamless branded experience.
We suggest https://loans.yourdomain.com or https://portal.yourdomain.com!
To connect the standard portal to the custom domain:
- Provide the subdomain name.
- Click the “Add Domain” button.
- Visit the admin console of your domain registrar and add a record to your DNS settings, selecting CNAME as the record type (you may need to contact someone in your IT department for this).
- Copy the host and target values generated by the DigiFi platform into your DNS settings.
- Refresh the webpage.
- DigiFi automatically triggers verification of the domain ownership. If verification passes successfully, you will see the status “Connected”. This often takes a few minutes, so please be patient!
If we're not be able to confirm the CNAME, you will see the status “Issues Detected” and an error message. Please contact us if you need help connecting the borrower portal to your subdomain.
Please note that the domain certificate is issued automatically via Let’s Encrypt after the "Launch Portal" button is clicked and the portal has been successfully launched.
Step 7: Disable Custom Portal Authentication
This is usually not a required action, however if you previously connected a custom lending portal to DigiFi's authentication, you'll need to revoke this. Navigate to the "Custom Portal Auth" section of the platform and disable it.
Step 8: Launch Portal
After you have completed all the steps, the portal's status will change from “Disabled” to “Ready to Launch”. To run the portal deployment click the “Launch Portal” button. A pop-up window will open in which you can confirm that you want to launch the portal or go back to the “Portal Status” page.
It typically takes a few minutes to launch the portal. Once launched, you’ll see a link to the "Sign In" page, which you should share with users associated with intermediaries.
If your portal does not launch within 10 minutes or you receive an error message, please contact us for assistance.
Step 9: Invite Your Intermediaries
Once your portal is launched, you can invite users associated with the intermediary record to create accounts and complete the loan origination process online. After creating accounts, users can track applications, provide additional information, and complete required tasks.
The portal is secure and requires a password, email verification and phone verification from every user. Two-factor phone authentication (or "2FA") is an additional layer of security for the account and helps to prevent unauthorized access. We'll send a text message to the user's mobile phone with an authentication code every time they attempt to sign in.
Hosting Domain
The testing portal doesn't require a hosting domain, so it is ready to launch once you complete the required steps. DigiFi will automatically generate a domain when the portal is launched, allowing you to start testing immediately if needed.
A production domain is always required to launch the production portal. The portal must be hosted on a web domain that you provide. To add a production domain, please follow the instructions provided here.
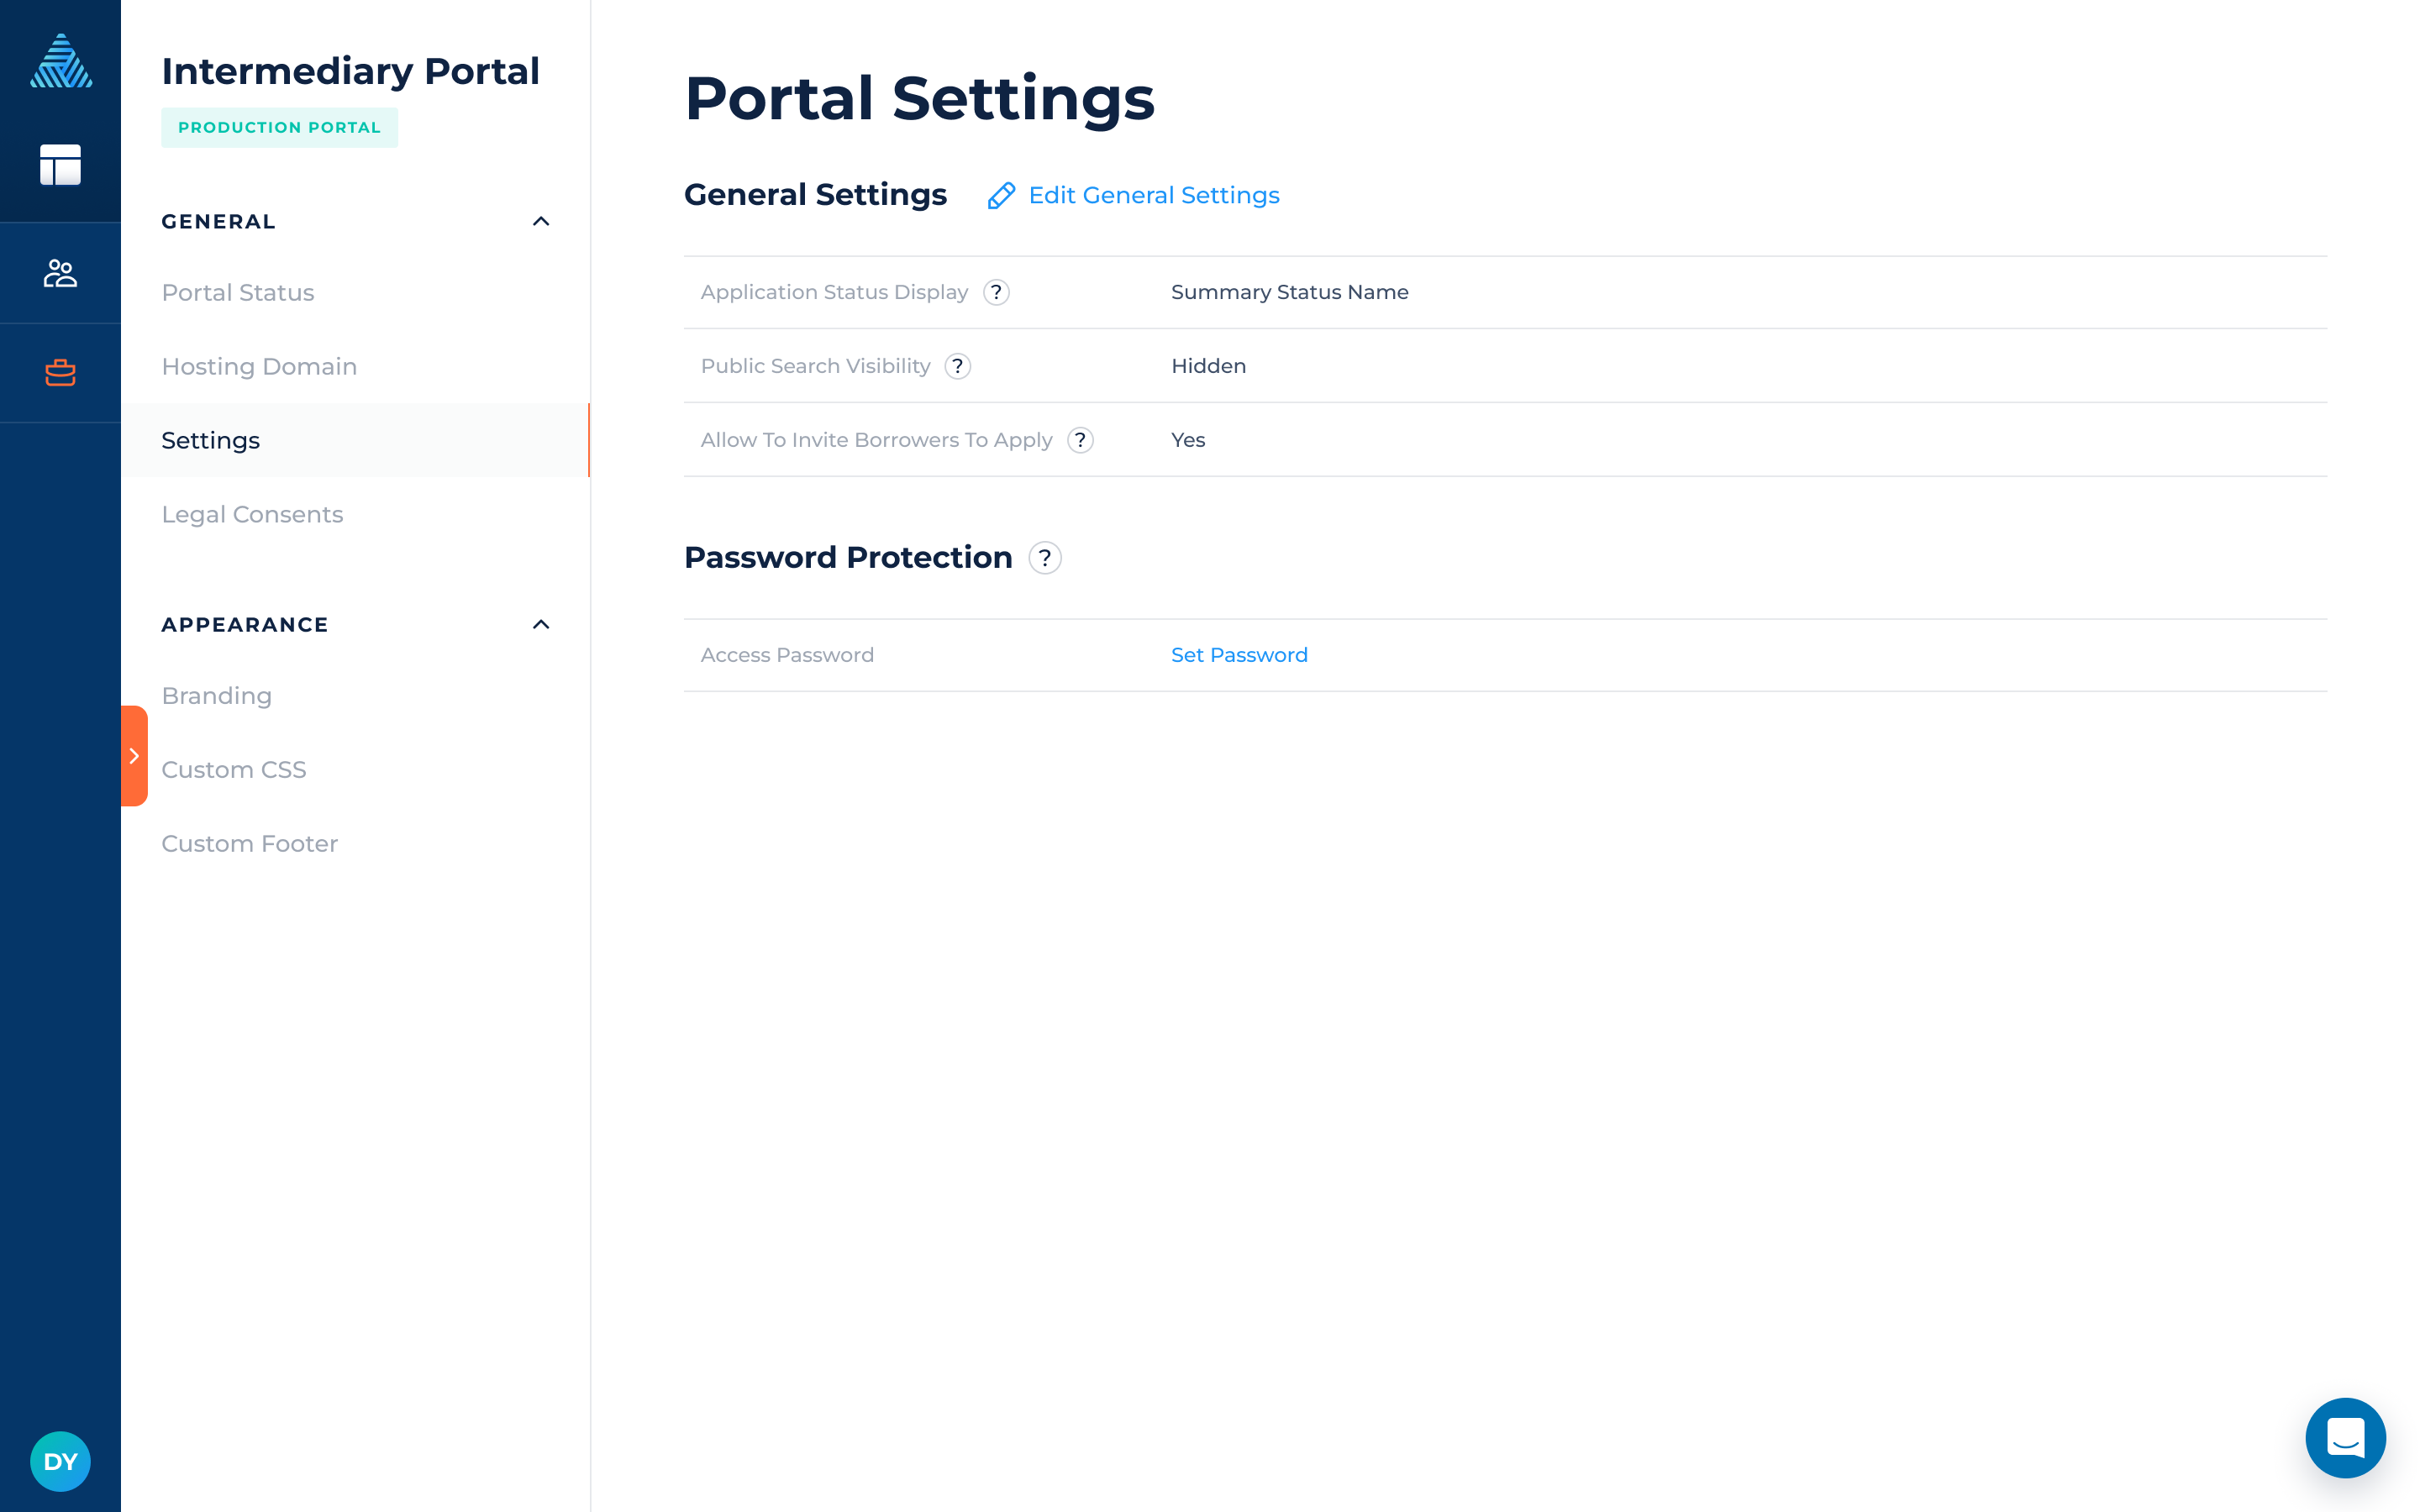
Settings
Your portal includes several general settings that allow you to control access, security, and how information is displayed to users. These include options like password protection and search engine visibility.
- Application Status Display: Choose how application statuses appear to users on the portal. You can display either Summary Status Names (In Progress, Approved, Rejected) or Actual Workflow Status Names (which show your system’s exact application status names).
- Public Search Visibility: Decide whether your portal should appear in search engine results (e.g., Google, Bing, etc.). This setting applies only to the production portal, test portals are hidden from search engines by default.
- Allow To Invite Borrowers To Apply: Enables intermediaries to invite their customers to apply through the borrower portal via email or by copying the application link. If enabled, the invitation button will appear on the intermediaries' home page next to the "New Application" button, allowing them to quickly invite borrowers to apply.
- Access Password: Enhance the security of your portal by adding a password and restricting external access. We recommend always having a password on your testing portal and having a production password until you are ready to take it live for users.
Legal Consents
DigiFi's intermediary portals let you add legal consents (e.g. Term & Conditions, Privacy Policy, E-Signature Acknowledgment, etc.) which appear in the portal's footer and/or that the intermediary must consent to when they submit new applications. At least one legal consent must be added before the portal can be launched. For detailed instructions on uploading legal consents, please refer to the guide provided here.